Table of Contents
Advertisement
Quick Links
Advertisement
Table of Contents

Related Manuals for ESX Vision Naviceiver VN710 VW-P1


Summary of Contents for ESX Vision Naviceiver VN710 VW-P1
- Page 1 VN710 VW-P1...
- Page 2 INTRODUCTION Always follow the instructions in this manual before using the device. Please keep this manual easily accessible in the vehicle for future reference. Features • iGo Primo, 3D Navisoftware with TMC on 8GB SD card, 46 countries including Turkey with Points of Interests display and search function, 3D building views, TTS voice output, warnings, over 25 system and prompt languages . Latest Map Guarantee (30 days) after activation via www.naviextras.com. • High-resolution 17.8 cm (7“) LCD touchscreen display with 800 x 480 pixels • Advanced i10 operating system based on Microsoft Windows CE 6 • 600 MHz CPU, 4 GB iNand Flash Drive, 256 MB DDR1-RAM, 256 MB NAND Flash RAM • Audio amplifier with 4 x 50 Watts max. • Pre-amplifier outputs (4 V) Front/Rear/Subwoofer/Center • DSP-Audioprocessor with 9-Band-Equalizer and 5.1 Surround-Sound • Bluetooth™ handsfree, phone book synchronization and A2DP audio streaming • Media playback (MP3/WMA/MPEG4/MPEG1/2/WMV/AVI/DivX etc.)
-
Page 3: Table Of Contents
INDEX Safety Information ...........................4 Basic functions ............................6 Operating elements .................................6 Main menu ....................................7 Navigation ....................................8 Audio player ....................................9 – Playback mode and playlist ..............................10 – Enlarged level display .................................10 Radio .....................................11 – Settings and presets ................................12 – RDS functions ..................................13 DVD (DVD/CD-Player)................................14 Bluetooth™...................................16 – Pair and decouple devices ..............................16 – Contacts and call history ..............................17 – Keypad ....................................18 – Audio playback ...................................18 Apps (Applications) ................................19 – iPod™ ....................................20 – Video . -
Page 4: Safety Information
SAFETY INFORMATION • In general, the assembly and installation of the device must be performed by a trained and technically skilled specialists, as the installation and connection of the device requires complex knowledge. • This device is only suitable for the operation in a vehicle with an on-board voltage of 12 volts, negative ground. • Improper installation or use may void the warranty. • Note any time the traffic regulations of the country in which the device is operated. • Please ensure, that with the engine turned off the vehicle‘s battery does not discharge fully. The device is another electrical consumer which must be operated with the engine running, other-wise the vehicle‘s battery will be discharged and the vehicle can not be started. • Set the volume of the device only as loud, that you are still be able to hear warning signals (e.g. police sirens) and traffic noise inside the vehicle. • Operate the device as driver only if it‘s absolutely necessary and in the driving safety is not compromised. The same stands for looking at the screen. If necessary, better park your vehicle at a safe and appropriate location. • The traffic rules of the EU prohibit to view moving pictures or movies while driving, if the screen of the device is installed within sight of the driver, as he may be distracted. View the screen as driver only for the navigation function, and then only briefly that you will not be distracted. Note at any time the local traffic regulations. In an accident, regress claims could be made by the car insurance company. • This device is not a substitute for your personal judgment or perception. All suggested routes from the navi- gation system should never be taken as a reason to disregard the local traffic rules. Your personal assessment of traffic or your knowledge of safe driving practices is paramount. Always match your driving with the current traffic situation. • Do not follow the suggested routes, if the navigation system instructs you to take an unsafe or illegal way, puts you in an unsafe situation, or directs you into an area which you consider unsafe. • If problems occur while driving, park the vehicle in a safe and appropriate place to continue before you operate. - Page 5 SAFETY INFORMATION • The device supports only DVD/CD standard disk size of diameter with 12 cm. Do not attempt to insert disks with a different size or any other object into the disk slot. Be sure to load only one disk at the same time. • Please use only the included original accessories. Ensure a sufficient mounting of the device by using the included installation accessories, as in the event of an accident enormous accelerations may occure. Poorly installed devices and equipment in accidents could represent a severe risk to the driver and the other passen- gers of the vehicle. • Note under all circumstances the regulations and advices of the vehicle manufacturer and do not make any modifications to the vehicle, which could interfere with safe driving. Please treat all parts of the device and the components of your vehicle always with caution. • Please avoid short circuits and make sure that no metal objects can get inside the device. Also make sure that all connections are properly connected and avoid the interchanging of the polarity of all connections. Complete the installation only while the the ignition is turned off. • In the event of a defect or malfunction, do not attempt to repair it by yourself or open the device, this is dangerous and could cause injury or damage to the equipment or vehicle. A repair should be done by trained and authorized personnel only. The device uses a Class 1 laser to read the disk. Eye contact with a laser is very dangerous to the human eye. • If you connect an external device, you should first read the instruction manual of the external device and make sure that it is compatible. Avoid connecting an incompatible external device. • If you install external applications onto the operating system of the device or operate files, make sure that they are „virus free“ and compatible with Windows CE 6. Otherwise there is a risk that the operating system no longer works properly and must be reinstalled.
-
Page 6: Basic Functions
BASIC FUNCTIONS OPERATING ELEMENTS 1. Turn the display on / off. 11. Open the radio mode. 2. Start or pause the media playback. 12. Open the audio player. 3. Slot for CD/DVD disks (Ø 12 cm). 13. Open the phone mode. 4. Eject the inserted CD/DVD. 14. Power on / off (short tap). Volume controller (rotate). 5. Open the DVD/CD player menu. 15. MicroSD card slot. 6. Open the main menu. 16. Controller knobs for selecting or switching 7. Skip to the next track/title/station/chapter. in the user menus. Push knob to open the audio settings 8. Skip to the previous track/title/station/chapter. (not while DVD/TV playback) 9. Mute function on / off. 17. Reset button 10. Open the navigation system. -
Page 7: Main Menu
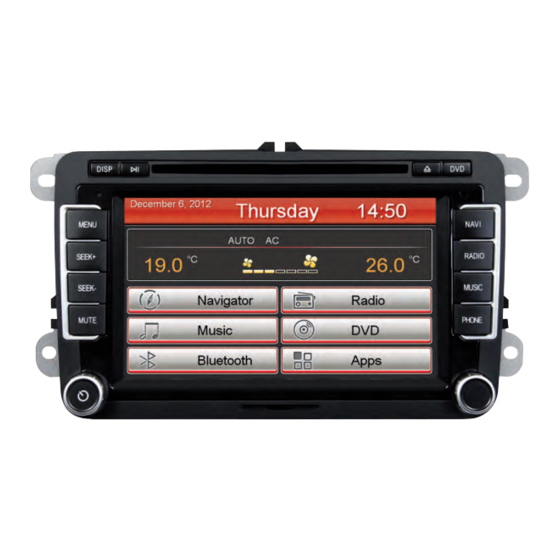
BASIC FUNCTIONS MAIN MENU After power on, the device displays the main menu. By pressing the „MENU“ button on the device, you can always get to the main menu too. 1. Depending on the selected design theme (Skin), the current date and time will be displayed here. 2. On some vehicle models the A/C display information is shown here. This information will only appear if you make adjustments on the Climatronic. Overall the function is depending on the CAN-bus interface and the built-in vehicle controller. For vehicle models that were built before 2009, this display information is not available. Depending on the selected design theme (Skin), the current audio player or radio station information will be displayed here. 3. The main menu displays five to eight key panels, which start the selected application or lead to the regarding submenue. -
Page 8: Navigation
BASIC FUNCTIONS NAVIGATION Open the navigation application by tapping „Navigator“ in the main menu or by pressing the „NAVI“ button on the device. Please refer to the separate manual for the navigation software. The device provides the ability to use any navigation software (Windows CE 6.0 compatible). Patch the naviga- tion software (on microSD card) with the device as follows: Tap on „Apps“. Tap on „Options“. Tap on „System“. Tap on „Browse“. Tap on „SD“ and then choose the navigation software on your MicroSD card with a double tap. After this selection, the device always opens this navigation software after touching the „Navigation“ key pad or the „NAVI“... -
Page 9: Audio Player
BASIC FUNCTIONS AUDIO PLAYER Open the audio player by tapping „Music“ in the main menu or by pressing the „MUSIC“ button on the device. The audio player supports audio formats like MP3, WMA and WAV. Refer to page 14 for CD Audio playback. -
Page 10: Playback Mode And Playlist
BASIC FUNCTIONS Playback mode and playlist Tap on „Menu“ and then on: „Scan“ for a short playback of each song in the playlist. „Random“ for a randomized playback within all titles. „Repeat“ to replay the current title. „Save playlist“ to save the current playlist on „Local“. „Clear list“ to delete the current playlist. Tap on „Open Audio File“ to open the file manager. Now you can add audio files from the local disk or connected USB stick or MicroSD card to your current playlist. Confirm your selection by a double tap. Delete a stored playlist by using the filemanager (> APPS). Enlarged level display (not available on all skins) Tap on the level meter to open the enlarged Tap on „Audio Settings“. Refer to the inst- ructions in section „Audio“ in the „APPS“ view. -
Page 11: Radio
BASIC FUNCTIONS RADIO Open the radio application by tapping „Radio“ in the main menu or by pressing the „RADIO“ button on the device. 1. Displays the current frequency band and the 10. With the arrows, you can quick start the search current station frequency, tap here for directly for a station from current frequency up or down. quick tuning. 11. RDS (AF, TA, PTY) features. 2. Current time. 12. Tap on the „gear icon“ to open the settings. 3. PTY category of the current station. 13. Station presets. 4. Tap here to enter the main menu without 14. Tap here to the open the different preset pages, interrupting the radio playback. -
Page 12: Settings And Presets
BASIC FUNCTIONS Settings and station presets Tap on the „gear icon“ to open the settings and then: „Rename Station“ to rename the current radio station. „Delete Station“ to delete the current radio station from the presets. „Delete All Stations“ to delete all radio stations from the pre- sets. „Local Setting“ to open the settings for the local radio frequen- cy standards. Tap on „Audio“ to open the audio settings. Refer to the instruc- tions in section „Audio“ in the „APPS“ menu. Rename Station: Tap on the white input box to change the radio station name by using the screen keyboard. Tap on „Name as freq.“ to set the frequency as radio station name. Confirm your entry with „OK“ or tap „Cancel“ to exit the menu without changes. Local Setting: Choose e.g. EUROPE from the list of local radio frequency stan- dards. Confirm your entry with „OK“ or tap „Cancel“ to exit the menu without changes. After you change the settings, restart the radio application. Basically, the device can operate several applications simultaneously. -
Page 13: Rds Functions
BASIC FUNCTIONS RDS functions This device supports RDS (Radio Data System) in the frequency range 87.5 - 107.9 MHz FM. The fol- lowing RDS functions are only available if they are supported by the selected radio station. AF (Alternative Frequency) The AF function enables the automatic switching of the recei- ving frequency when leaving the reception range of a trans- mitter. The device then checks the reception quality and au-... -
Page 14: Dvd (Dvd/Cd-Player)
BASIC FUNCTIONS (DVD/CD-Player) The DVD player supports the following formats: DVD, DVD-R/RW, DVD+R/RW, VCD, CD, CD-R/RW, MP3. Open the DVD application by tapping „DVD“ in the main menu or by pressing the „DVD“ button on the device. Tap during DVD playback on any spot on the display to open the DVD menu. When you playback a CD or MP3-CD, the user interface is different. - Page 15 BASIC FUNCTIONS 1. Tap here to open the System Settings of the 3. Tap here to set the subtitle options DVD player, where general settings, audio of the currently inserted media. settings, video settings and language settings 4. Tap here to open the title menu. can be specified. 5. Tap here for the information of the currently inserted media. Tap again to hide the display. 6. Tap here to open the main menu of the currently inserted media. 7. Tap here to go to the previous page of the DVD menu (refer to the previous page). 2. Tap here to open the audio playback settings. NOTE: Some of the described features and settings are available only if the inserted media is suited In DVD mode the currently available languages accordingly. settings can be specified.
-
Page 16: Bluetooth
BASIC FUNCTIONS BLUETOOTH™ Open the Bluetooth™ application by tapping „Bluetooth™“ in the main menu or by pressing the „PHONE“ button on the device. PAIRING At first pair the devices, if necessary refer to the manual of your mobile phone. Open the „Settings“ menu on your mobile phone and open the Bluetooth settings. Turn on Bluetooth and then search for compatible devices. The Bluetooth name of the device will be displayed. Select your device from the device list in the phone and enter the PIN code 1234. -
Page 17: Contacts And Call History
BASIC FUNCTIONS CONTACTS AND CALL HISTORY Once your mobile phone has been connected via Bluetooth to the device, the synchronization of your contacts and call history starts automatically. Tap on „Contacts“. Tap on a name to start a phone call. Tap on the white search field to search for Tap on „History“. a contact, by typing its name on the screen keyboard. Tap on „Missed“ to display the missed pho- Tap on „Received“ to display the already re- ne calls. ceived phone calls. -
Page 18: Keypad
BASIC FUNCTIONS Tap on „Dialled“ to display the already tran- To synchronize your contacs and call history sacted phone calls. tap on „Sync. Now“. TASTATUR Tap on „Keypad“ to enter phone numbers manually. Then enter the desired number and then tap the green phone icon to start dialing. Tap the red phone icon to end the phone call. You can dial with the paired mobile phone, but this is not re- commended while driving and may be illegal in your country. An incoming call should not be accepted automatically by the device. If this occurs and the call is automatically answered, disconnect the phone and pair it again. AUDIO STREAMING As soon as a mobile phone is paired via Bluetooth with the device, it is possible to play audio files from the mobile phone via the device, if the mobile phone supports the Bluetooth A2DP audio streaming standard. The... -
Page 19: Apps (Applications)
BASIC FUNCTIONS APPS Open the application menu by tapping on „Apps“ in the main menu. The device offers a variety of applications that can be used as described below. Some of these func- tions require the appropriate accessories. 1. Tap here to switch off the display. To switch on 6. Tap here to open the Audio Settings. -
Page 20: Ipod
BASIC FUNCTIONS iPod™ (optional) Make sure that the iPod™ is properly connected to the device via the supplied cable. This cable allows also the connection of an iPhone™ (until 4S) to use its built-in audio playback mode. The battery is charged via the connecting cable when the de- vice is switched on. With older iPod ™ models, it may occur, that they will not be detected, after the device was switched off. Disconnect and connect again the iPod ™ in this case. The user interface is modeled like the user interface of the iPod™. You get access to the iPod™ its contents and playlists through the lower control panels. By tapping „MENU“ you can make the desired playback settings such as „Shuffle“ or „Repeat“. Please avoid disconnecting the iPod/iPhone™ during operation. This could cause a sys- tem crash. Movie After you have tapped on „Movies“, the file manager will open. Select then a movie file either on the local hard drive or the USB stick or the inserted microSD card. If a movie isn‘t playable, the codec or file format of the file is not compatible with the device. Supported video formats: MPEG 1/2/4, AVI, WMV, DivX, H.264 Tap on „Options“ to perform file operations. Tap on the screen to display the movie control panel during playback. Pull or push the pro- Tap double on the file to start playback. -
Page 21: Video
BASIC FUNCTIONS TV/DAB+ (optional) The device offers the possibility to connect and operate a se- parate TV tuner (DVBT) for the reception of digital TV signals. Optionally, it is also possible to connect and operate an exter- nal digital radio receiver (DAB, DAB+). Depending on the model the touchscreen function is enabled. Please refer to the manual of the connected tuner. Files With the file manager, it is possible to manage and open com- puter specific file formats. The system supports the following file formats: Photo: BMP, JPEG, GIF, PNG Video: MPEG 1/2/4, WMV Audio: MP3, WMA, WAV Office: PDF, Word (.doc), Excel (.xls), PowerPoint (.ppt) Tap once on a file to select it, tap twice on the selected file to open it. Tap on the desired storage location to dis- Tap on the desired file category to display play the available and compatible files. the other available and compatible files. -
Page 22: Internet (Optional)
BASIC FUNCTIONS Tap on „Options“ to perform file operations, such as deleting or copying files. With the copy function, it is possible to move files to another location or to another disk. Once you have open an image file, you can start a slideshow of all the pictures stored in the directory. Tap on the image and the playback options are displayed. Tap on „Info“ to view the memory information of each storage locations. Here you can view the file categories and the used disk space on the selected storage location. The usage is displayed in percent and in kilobytes/megabytes/ gigabytes. Internet (optional) With a separately available 3G USB adapter and an activated SIM card (3G), it is possible to use the optional „Internet“ fea- ture. Connect the 3G USB adapter incl. the SIM card into with the USB port of the device. The follow the installation instruc- tions of the stick. Make sure you have your access data of your the internet connection. The operation of the browser works best with the included sty- lus marker. After tapping „Internet“, the Microsoft™ IE browser opens, which you can operate with the touchscreen. The operation is modeled like a standard web browser on your home computer. By tapping on the yellow icon, the screen keyboard of the IE web browser opens and allows manual text inputs. Exit the application with the yellow arrow on the left above or press „MENU“ on the device. -
Page 23: Audio Settings
BASIC FUNCTIONS Audio You can open the audio settings in the main menu by tapping on „Apps“ and „Audio“ or by pressing the right rotary control (except while DVD/TV playback) on the device. Sound adjustment Acoustic center Tap on one of the control bars to change the Tap on one of the seating positions or on the sound adjustment. arrows to align the front and rear speakers. - Page 24 BASIC FUNCTIONS Advanced Audio Settings Tap on „Advance“ to open the menu for the advanced audio settings. On the left under „Pre-Channel Volume“ you can set the indi- vidual volume for each application. Just tap on the arrow icons to change the value upward or downward. Scroll down the left field to display all applications. Under „MISC“ and „Key Beep“ you can activate or deactivate a key tone for every interaction. Under „Audio Channel“ you can set the output signal from 4 to 5.1-channel signal. Is the „Audio Mixer“ in „ON“ position, the voice output of the navigation system is only hearable on the front speakers in „OFF“ position on all speakers. While using the Audio Player with the „ON“ position the music will be quiten down and with „OFF“ the music will be completely muted. Under „Loudness“ you can activate the loudness function of the audio signal. Under „Bass Freq.“ or „Treble Freq.“ you can set the frequency of the loudness function .
-
Page 25: Aux (Optional)
BASIC FUNCTIONS Scroll down on the right to get to the crossover settings for the subwoofer and a center speaker. This is only useful if a subwoofer or center speaker is used. Subwoofer (optional) Under „Frequency“ you can set the cut-off value and only the frequencies below this value will be played via the subwoo- fer. This relieves the subwoofer and improves the sound. With „Gain“ you can set the desired level of the subwoofer signal . Under „Phase“ you can shift the phase of the signal to match the bass with the vehicle‘s acoustic. Center (optional) Under „Frequency“ you can set the cut-off value and only the frequencies above this value will be played via the center speaker. This relieves the speakers and improves the sound. With „Gain“ you can set the desired level of the center speaker signal. NOTE: Tap on „Default“ to restore the respective factory preset. (optional) The original factory AUX (not with Media In Box) input allows to connect an audio playback device (MP3 player, mobile phone, etc.). -
Page 26: Options
BASIC FUNCTIONS Options You can open the Options by tapping on „Options“ in the „Apps“ menu. Language settings Tap on „Skin“. Select the desired language. Tap on „Apply“. User interface Tap on „Skin“. Tap on the menu „Skins“ and select the desired design theme (skin). Tap on „Apply“. Operating system Under „System“ you find information about the system. Shell: Version number of the user interface OS: Version number of the operating system MCU: Version number of the CAN-BUS protocol Check under www.esxaudio.de/navi if an operating system update is available or ask your retail dealer. Then follow the... - Page 27 BASIC FUNCTIONS Date/Time Tap on „Date/Time“. Select the desired time zone. Set the current date. Set the current time. Tap on the checkbox right to set on daylight Tap on „Apply“. saving time. Tap on the checkbox left to set the time for- mat to 12-hours (AM / PM). Please operate complex settings as a driver generally only if you have parked the car, otherwise the traffic safety is endangered. Otherwise you can not react in time, to avoid occuring danger situations.
- Page 28 BASIC FUNCTIONS Display Tap on „Display“. Set the desired brightness level for the dis- play. The checkbox „CCD Camera“, enables the optional rear view camera function. As soon as reverse gear is engaged, the transmission of the video camera is automatically displayed on the screen. With the checkbox below, the media playback will be paused when the reverse gear is engaged. Calibration of the touchscreen operation If the touchscreen function is inaccurate you can recalibrate the display. Proceed as follows: Tap on „System“. Tap on „Calibration“. Tap with the included stylus marker on the „+“. Then the „+“ will be moved to another location, then tap again on the „+“ and repeat this process until the calibration is complete. Then confirm the calibration process.
-
Page 29: Custom Settings
CUSTOM SETTINGS Menu assignment You have the possibility to arrange the main menu or apps menu to your liking. To change the position of a control panel, press and hold for 5 seconds the regarding panel in the main or apps menu until the dashed lines are visible. Then hold and slide the control panel to the desired position within the menu. To occupy a control panel with a new function, touch the con- trol panel for 1-2 sec. to open the edit menu. Tap on „Delete“ to remove the panel. Tap on „Edit“ to select a new function or application or tap on „Default“ to restore the original factory settings. Under „Edit“ you can select an application from the list to oc- cupy the current the control panel. You have also the possibility to link a control panel with any compatible software application (. EXE), which must be stored on the available storage locations. Tap on „Browse“ to select the desired application. Note: To exit the edit menu either press „OK“ or „Cancel.“ To exit the edit mode, tap on the screen (outside of the dashed lines) and the process is complete. -
Page 30: Wallpaper
CUSTOM SETTINGS Wallpaper You have the possibility to customize the background image to your liking. First, copy the desired wallpaper file to the microSD card, the USB stick or on the local hard drive. Tap on „Apps“. Tap on „Options“. Tap at „Wallpaper“ on „Browse“ Select a file by double click. Tap on „Apply“ to confirm your selection or Alternatively you can set an already opened image as your wallpaper. Tap on „Options“... -
Page 31: Start Logo
CUSTOM SETTINGS Bootlogo You have the possibility to customize the bootlogo (startup logo) to your liking. First, copy the desired file to the microSD card, the USB stick or on the local hard drive. Open the desired file in the file manager by Tap on „Options“ and select „Use as Startup double click. Logo“. Tap on „OK“ and restart the device. Button illumination You have the possibility to change the color of the button illumination on the device (only in night driving mode). -
Page 32: Additional Functions
ADVANCED OPERATIONS INFRARED REMOTE The included remote control allows you to control some basic functions on the device. Point directly with the front of the remote control to the screen of the device.The distance should not be more than 3 meters. If you use the remote control for the first time, you have to remove the safety foil in the battery compartment on the back. Here is an overview of the basic functions of the remote control, which can be different depending on the currently running application. 1. Power On/Off the device. Control keys within the menus. 2. Eject the inserted CD/DVD. Open the video menu. 3. Open the main menu. Display On/Off. 4. Open the audio settings. Play and control keys for media playback. 5. Option menu of the CD/DVD player. Play and control keys for for the rear media monitors 6. Quick switching between applications. (Real Dual Zone function). 7. Mute On/Off. 8. Volume control. NOTE: If the battery (button cell) is discharged, replace it only with a new one of the same type (CR2025). Please do not throw used batteries into household waste, bring them to a dealer that offers a proper dispo- sal, when you purchase a new one. -
Page 33: Multifunction Steering Wheel
ADVANCED OPERATIONS MULTI-FUNCTION STEERING WHEEL The device supports a control via the standard multifunction steering wheel.The control buttons are corresponding to the basic function of the device. The operation may vary slightly from car model to car model. The multifunction display (MFD) between the speedometer is also supported by the device and shows e.g. the RDS informa- tion in the radio mode. The display works only if it is enabled in your vehicle. Ask possibly your auto repair shop after activation. LIMITED MEDIA PLAYBACK For your own and your passengers safety the picture display in DVD/Video/TV/AV applications is limited and the unit will only playback the sound track of the medium while driving. If you have installed additional monitors in the rear compart- ment, the unlimited media playback (DVD and DVBT, except movie files) is possible, if you operate them with the included dual zone cable. -
Page 34: Troubleshooting
TROUBLESHOOTING If the following troubleshooting tips do not solve the problem and the malfunction persists, please contact an authorized repair or installation service. Do not open the device or attempt to repair it by yourself. This may cause serious damages to the electronic components of the device and in your vehicle or may void the warranty of the device. Problems Causes Remedy Starting process The device cannot be The ignition is off, but the device Switch on the ignition. turned on. needs the so called inginition impulse. The fuse or a fuse in the vehicle Replace the blown fuse with a electronics is defective. new fuse of the same type with the same value. Display Inaccurate or delayed input of The touch-screen is not properly Calibrate the touch screen touchscreen function. calibrated. under Apps - Options - System. The device opens an application Wait until the process is com- or is currently processing. pleted. Screen is black. The display is disabled. Tap on the screen. Sound There is no sound via the sound The connection or installation Check all connections and replace system of the vehicle hearable. was not done correctly or one of a possibly damaged cable with a the cables is defective. - Page 35 TROUBLESHOOTING Remedy Problems Causes CD/DVD playback The DVD menu can not be The disc does not support menus Insert another disc. opened. or is plagiarism. The picture quality during play- Brightness, contrast and color Check the DVD player settings back is insufficient. saturation are set too low. and correct them. Erroneous or disrupted playback. The disc is not loaded correctly. Insert the disc again with the print side up. The disc is scratched, broken or Insert another disc. deformed. The disc is not compatible with Insert another disc. the device. Optional connected devices (iPod™/TV-Tuner etc.) The connected device is not The device is not properly con- Check all connections and replace working. nected or the connection cable is a possibly damaged cable with a defective. new one. The devices is not compatible.
- Page 36 TROUBLESHOOTING Remedy Problems Causes Navigation The navigation application will The software is not compatible Check the compatibility of soft- not start. with the device. ware with Windows CE 6, or get yourself a compatible version. The software was not installed Check the settings under on the device properly. Apps - Options - System and if necessary, correct the navigation software path. The license of the installed Contact the software supplier. software or the useful life has expired. The device isn‘t able to find your The included GPS antenna is not Check the GPS antenna connec- current location or the route or not correctly connected. tion or get a new one in case of guidance is disturbed. defect. You are in an area with weak Continue driving until the GPS or no GPS signal, such as in a signal is available again. tunnel or on a remote road. The route guidance does not The navigation software is not up Update the software or contact match with the current road or to date. the software supplier.
- Page 37 TROUBLESHOOTING Remedy Problems Causes Bluetooth/Phone No connection or pairing of the Bluetooth function of the phone Enable Bluetooth function in the devices. is not enabled. phone settings. Bluetooth enabled but the phone Enable „visible“ in the phone is not visible. settings. The Bluetooth standard of the Use a compatible phone. phone is not compatible. Too many Bluetooth devices are Delete unused Bluetooth devices registered in the device. from the storage of the device. Bluetooth connection is too quiet The preset volume is set too low. Set the preset volume under Apps - Audio - Advanced - Blue- tooth on a higher value. No Bluetooth audio function. The Bluetooth audio function is Enable the function in the phone not enabled. settings. The Bluetooth standard of the Use a compatible phone. phone is not compatible. Front-/rear camera No transmission on the screen. The camera is not properly Check the connections for any connected to the device.
-
Page 38: General Notes
GENERAL INFORMATION Care and Maintenance This device is equipped with high precision and sensitive technique and should always be treated with caution. Please note the following tips to avoid endangering the warranty and extend the life of the appliance. • Children under 12 should not operate the device. Keep the device and all accessories away from small children. • Keep the device and its components dry. The effects of water, liquid or moisture can cause damage to the vehicle, the device itself or injury. • Keep the device and its components away from excessive heat. High temperatures may shorten the life of appliance of the electrical components. • Keep the device and its components away from excessive cold. Extreme temperature changes and moisture inside the device may cause the breaking of certain components. • Do not to drop the device and avoid violent shocks or excessive shaking • Do not use strong chemical cleaners, solvents or water to clean the device. Use a slightly moistened cotton cloth with soft surface. • Replace a blown fuse only with a new one with the same values . However, before you replace a defective fuse, check at first what is the cause of the short circuit. Start with the power supply cable. If the fuse blows again, a malfunction consists inside the device. In this case you should contact your authorized dealer. Warranty information The warranty complies with the legal rules in your country. To maintain your warranty coverage upright, keep your original purchase receipt to prove the date of purchase. Any damage of the product, based on incorrect or improper use, accident, incorrect and improper installati- on, modification of the barcode, natural disaster or any non-appropriate interventions, repairing or alteration outside our factory or authorized service centers, and caused by other acts, which are unauthorized, because have been made in an incompetent manner, is excluded from the warranty. This warranty is limited only to de- fective parts and especifically excludes all incidental or consequential damages and those who are associated with. Damage to the operating system or loss of data, which were caused by operator error or by third party software or computer viruses, are also excluded from the guarantee. - Page 39 GENERAL INFORMATION Legal Notice • ESX or Audio Design GmbH are in no way affiliated with the Volkswagen AG or any of its subsidiaries or affiliated companies connected to, or is acting on its behalf or with its authorization. • All registered product names, trade marks and brands are the property of their respective owners. • This owner‘s manual was made with the utmost care. • If you need to dispose the device, be aware that no electronic devices should be deposed in the household waste. Dispose the device in an appropriate recycling facility according to the local waste regulations. Consult if neccessary your local authority or dealer. • Technical changes and errors reserved. Due to the ongoing development of this device, it is possible that the information in this manual is incomplete or is not matching to the delivery status. Please visit periodically www.esxaudio.de/navi on the internet, to check if additional information and soft- ware updates are available. Customer service In general, the assembly and installation of the device should be made by a trained and technically skilled specialists. If you have any problems with operating the device, contact your specialist dealer or the Audio Design Service Department under Tel. +49 (0) 7253 - 94 65 92 or by E-Mail to navi@esxaudio.de. Declaration of Conformity Distributor: Audio Design Lautsprecher Vertriebs GmbH Am Breilingsweg 3, DE-76709 Kronau/Germany Hereby, Audio Design GmbH declares that the ESX VN710 VW-P1 device is in compliance with the essential, fundamental requirements and other relevant provisions of the following directive: R&TTE Directive 1999/5/EG...
- Page 40 ESX Car Media Systems · Audio Design GmbH Am Breilingsweg 3 · D-76709 Kronau/Germany Tel. +49(0)7253 - 9465-0 · Fax +49(0)7253 - 946510 www.esxaudio.de - www.audiodesign.de ©2013 All Rights Reserved...
Need help?
Do you have a question about the Vision Naviceiver VN710 VW-P1 and is the answer not in the manual?
Questions and answers