Table of Contents
Advertisement
Quick Links
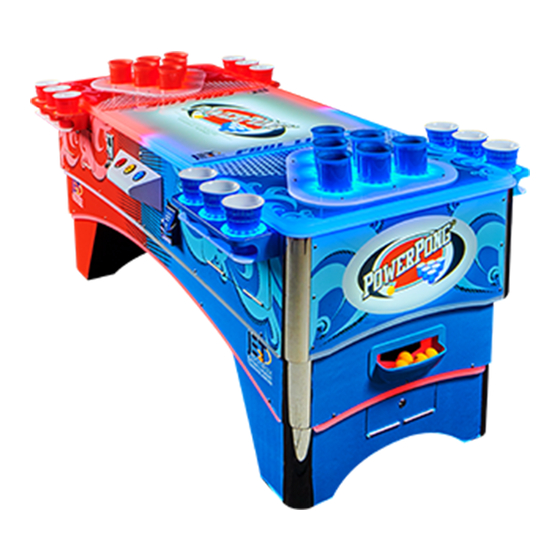
POWER PONG SERVICE MANUAL
For Additional Information or for an Electronic Copy of This Manual Visit Our Website
www.JENNISONGAMES.com
VERSION 1.0
Jennison Entertainment Technologies Corporation
822 South Nova Road • Daytona Beach, Florida 32114 • U.S.A.
Toll Free Number: 1-855-JET-GAME
Phone Number: 1-386-255-1599
Fax Number: 1-386-255-1589
MANUFACTURED BY:
Service Email: Service@JennisonGames.com
Information Email: Info@JennisonGames.com
Advertisement
Table of Contents

Subscribe to Our Youtube Channel
Related Manuals for Jennison Entertainment Technologies POWER PONG


Summary of Contents for Jennison Entertainment Technologies POWER PONG
- Page 1 POWER PONG SERVICE MANUAL VERSION 1.0 MANUFACTURED BY: Jennison Entertainment Technologies Corporation 822 South Nova Road • Daytona Beach, Florida 32114 • U.S.A. Toll Free Number: 1-855-JET-GAME Phone Number: 1-386-255-1599 Service Email: Service@JennisonGames.com Fax Number: 1-386-255-1589 Information Email: Info@JennisonGames.com For Additional Information or for an Electronic Copy of This Manual Visit Our Website...
- Page 2 Turning The Power On Checking The LED Lights Inserting Tickets Into Dispenser Program Setup Game Settings & Program Dip Switch Settings New Jersey Software Settings Board Inputs Board Outputs SEG Display Jumper Settings Jennison Entertainment Technologies Power Pong Service Manual Page 2...
-
Page 3: Safety Notifications
Follow all instructions contained within this manual and do not make any modifications to the game without first contacting Jennison Entertainment Technologies. DANGER All danger messages are marked in RED boxes. Failure to adhere to these messages could result in personal injury or injury to others. -
Page 4: Epilepsy Warning
Play in a well-lit room Do not play when you are drowsy or fatigued If you or any of your relatives have a history of seizures or epilepsy, consult a doctor before playing. Jennison Entertainment Technologies Power Pong Service Manual Page 4... - Page 5 POWER PONG, CAUTIONS, & NOTICES DANGER DO NOT perform repairs or maintenance on the game with the power ON. Always turn the power OFF and unplug the unit from the wall before servicing. DANGER DO NOT remove the game from its shipping pallet or skid...
- Page 6 Use appropriate care when servicing the game and ensure that all removed components are away from facility guests and children. CAUTION Only qualified service personal should service POWER PONG. Contact J.E.T. first with any questions before replacing any part. Jennison Entertainment Technologies...
-
Page 7: Fcc Compliance
This Class “A” digital apparatus meets all requirements of the Canadian Interference-Causing Equipment Regulations. Cet appareil numérique da la classe “A” respecte toutes les exigences du Réglement sur le matériel brouilleur du Canada. Jennison Entertainment Technologies Power Pong Service Manual Page 7... -
Page 8: Rohs Compliance
As of January 2014, Jennison Entertainment Technologies has tested all components used in the manufacturing of POWER PONG. All components have been found to be within the standards set forth for RoHS compliance by the European Union. Test reports are available and will be provided upon request. - Page 9 COMPLIANCE TO UL 22 STANDARDS Jennison Entertainment Technologies has had POWER PONG tested by TUV Rheinland to ensure that it meets or exceeds the safety standards set forth by UL 22 Standards. POWER PONG HAS BEEN TESTED TO THE FOLLOWING STANDARDS: UL 22: 2008 R7 .
-
Page 10: Dimension Information
40 1/4" 1023 POWER PONG ships on one MDF (medium density fiberboard) skid within the United States, Canada, and Mexico. In some cases, the MDF skid may be secured to a wooden pallet if common carrier freight companies are involved in the transportation of the unit. Be sure to inspect the packaging when the unit arrives and notate any damage with the driver and on the BOL before signing for the unit. -
Page 11: Electrical Requirements
YOU MUST ALSO SELECT THE NEW INPUT AC VOLTAGE ON THE POWER SUPPLY DANGER DO NOT OVERLOAD ANY CIRCUIT WITH THE ADDITION OF POWER PONG. ENSURE THAT THE OUTLET HAS PROPER VOLTAGE BEFORE TURNING ON THE UNIT Jennison Entertainment Technologies Power Pong Service Manual... -
Page 12: Installation
HAS A DIFFERENT MEANING AS SEEN IN THE FOLLOWING CHART. FAILURE TO FOLLOW THIS MANUAL IN ITS ENTIRITY COULD LEAD TO SERIOUS BODILY INJURY. IF THERE IS ANY DOUBT DURING THE INSTALLATION OF THIS UNIT - CONTACT JENNISON ENTERTAINMENT TECHNOLOGIES OR YOUR DISTRIBUTOR PRIOR TO CONTINUING. NEITHER J.E.T. OR YOUR DISTRIBUTOR IS RESPONSIBLE FOR ANY DAMAGE CAUSED DURING IMPROPER INSTALLATION PROCEDURES. -
Page 13: Installation Instructions
Step # 1 Check the packaging for any damage POWER PONG is shipped complete in one MDF carton. When the unit arrives, please check the outside packaging for any damage and notate all damage with the delivery carrier before signing the delivery receipt. - Page 14 Before lifting the game remove the wooded blocks holding the legs to the pallet. With the help of at least one other lift the Power Pong off the skid by placing your hands on the lower panel inside of the legs to protect your hand in case of the game falling over (This game weight 525 pounds the more help you have the better).
- Page 15 Check Box When This Step is Complete Step # 9 Inspecting each player station Inspect both player stations and ensure that there is no damage. Check Box When This Step is Complete Jennison Entertainment Technologies Power Pong Service Manual Page 15...
- Page 16 Use six included machine screws and securely attach the side cup assembly to the main cabinet using a long handled philips headed srew driver. Be careful not to over-tighten the screws. Check Box When This Step is Complete Jennison Entertainment Technologies Power Pong Service Manual Page 16...
- Page 17 Then connect the eight pin molex connector making sure all pins inside the connector are secure. Check Box When This Step is Complete Jennison Entertainment Technologies Power Pong Service Manual Page 17...
- Page 18 For example: If you can see "115V" then the power supply is set to 115V. If you can see "230V", then the power supply is set to 230V. Check Box When This Step is Complete Jennison Entertainment Technologies Power Pong Service Manual Page 18...
- Page 19 CAUTION PLUG THE CORD INTO A PROPERLY GROUNDED OUTLET. ENSURE THAT YOU DO NOT OVERLOAD THE CIRCUIT WITH THE ADDITION OF THIS GAME Check Box When This Step is Complete Jennison Entertainment Technologies Power Pong Service Manual Page 19...
- Page 20 Check Box When This Step is Complete Step # 24 Selecting play functions The red button to the right starts a game ( After being credited) without dispensing balls. Check Box When This Step is Complete Jennison Entertainment Technologies Power Pong Service Manual Page 20...
- Page 21 7mm nuts holding the yellow ground strap and mounting screws. Remove block off plate and leave inside cabinet for potential future use. Check Box When This Step is Complete Jennison Entertainment Technologies Power Pong Service Manual Page 21...
- Page 22 Installing free play button (for home use or rental use) Power on the game and check for function, one button push is equal to one coin. Enjoy Check Box When This Step is Complete Jennison Entertainment Technologies Power Pong Service Manual Page 22...
- Page 23 GAME SETTINGS & PROGRAM POWER PONG has been designed to include a software program where all game settings are easily managed through the use of a simple dip switch changes Although the software is very simple to navigate, we highly recommend reading the following programming section to fully understand how to make changes to the software and how each change will affect the machine.
- Page 24 Jennison Entertainment Technologies Power Pong Service Manual Page 24...
- Page 25 Jennison Entertainment Technologies Power Pong Service Manual Page 25...
- Page 26 A certain version of software has been designed to allow Power Pong to be operated within the State of New Jersey. This version of the software complies with the following requirements: 1) Maximum allowable wager per player dose not exceed $10.00 per game.
- Page 27 GAME SETTINGS - DIP SWITCH SETTINGS (SWITCH # 1) All game settings in Power Pong can be programmed using the three dip switch banks on the I/O board. The switches are Switch # 1 (SW1), Switch # 2 (SW2), and Switch # 3 (SW3). Reference the chart below to make program changes including the number of coins required to start the game, the length of game play, and the re-rack options for SWITCH # 1 (SW1).
- Page 28 GAME SETTINGS - DIP SWITCH SETTINGS (SWITCH # 1 CONTINUED) SWITCH # 1 (EXPANDED) ITEM DESCRIPTION DESIGN SW11 SW12 SW13 SW14 SW15 SW16 SW17 SW18 OFF OFF OFF OFF NO SECOND RE-RACK CUP LOWERED INTO TABLE RAISED CUP LOCATION Jennison Entertainment Technologies Power Pong Service Manual Page 28...
- Page 29 GAME SETTINGS - DIP SWITCH SETTINGS (SWITCH # 2) All game settings in Power Pong can be programmed using the three dip switch banks on the I/O board. The switches are Switch # 1 (SW1), Switch # 2 (SW2), and Switch # 3 (SW3). Reference the chart below to make program changes including the number of coins required to start the game, the length of game play, and the re-rack options for SWITCH # 2 (SW2).
- Page 30 GAME SETTINGS - DIP SWITCH SETTINGS (SWITCH # 3) All game settings in Power Pong can be programmed using the three dip switch banks on the I/O board. The switches are Switch # 1 (SW1), Switch # 2 (SW2), and Switch # 3 (SW3). Reference the chart below to make program changes including the number of coins required to start the game, the length of game play, and the re-rack options for SWITCH # 3 (SW3).
- Page 31 MAIN BOARD INPUTS POWER PONG - MAIN BOARD INPUT IC (74HC245N) CHART INPUT # CONTENT PICTURE COIN UP SIGNAL EXTRA BALL RESET PLAYER # 1 - MOTOR SENSOR # 1 PLAYER # 1 - MOTOR SENSOR # 2 PLAYER # 1 - MOTOR SENSOR # 3...
- Page 32 The Power Pong input/output board utilizes 5 input IC's to control all inputs used within the game. In Power Pong, all FIVE of the FIVE IC's are used. These are no spare input IC's on the board that can be used to replace the other input IC's should one become corrupt.
-
Page 33: Main Board Outputs
GOALIE ALL STARS - MAIN BOARD IC (ULN2803) OUTPUT CHART OUTPUT # CONTENT PICTURE U23 IS NOT UTLIZED IN POWER PONG. THIS SPARE IC CAN BE USED IN U29 TO RECITFY POTENTIAL ISSUES WITH THOSE IC'S. IF YOU SWAP IC'S, BE SURE TO PUT THE DEFECTIVE IC BACK INTO U23 BEFORE POWERING THE UNIT ON. - Page 34 PLAYER # 2 - MOTOR DRIVER # 3 PLAYER # 2 - MOTOR DRIVER # 4 PLAYER # 2 - MOTOR DRIVER # 5 PLAYER # 2 - MOTOR DRIVER # 6 BALL HOPPER MOTOR DRIVER LOGO LED Jennison Entertainment Technologies Power Pong Service Manual Page 34...
- Page 35 Jennison Entertainment Technologies Power Pong Service Manual Page 35...
- Page 36 POWER PONG TROUBLESHOOTING GUIDE The troubleshooting section of this manual is to be used as a guide for determining what component maybe faulty and what steps are recommended to rectify the problem. Before contacting your distributor, please check to make sure that the unit is in fact plugged in and receiving power and that there are no loose connections.
- Page 37 Jennison Entertainment Technologies Power Pong Service Manual Page 37...
- Page 38 These steps are also used when removing the hopper motor, the two screws on ope would be removed the other two are access from the bottom of the game. Jennison Entertainment Technologies Power Pong Service Manual Page 38...
- Page 39 Locate and remove the eight 2.5 mm hex headed bolts holding down the pyramind playfield acrylic. Please note the shorter of the screws goes in the middle of the acylic. Jennison Entertainment Technologies Power Pong Service Manual Page 39...
- Page 40 Jennison Entertainment Technologies Power Pong Service Manual Page 40...
- Page 41 12 philips headed screws holding down the top of the assembly. Carefully remove the top of the main cup assembly noting that the rubber cup rims will provide a little resistance to removal. Jennison Entertainment Technologies Power Pong Service Manual Page 41...
- Page 42 Once they are loosened the motor shaft will slide out of the motor cam and then can be removed with the motor plate from the assembly. Jennison Entertainment Technologies Power Pong Service Manual Page 42...
- Page 43 Remember that the shorter of the 2.5 mm hex headed screws goes in the middle location of the acrylic. Jennison Entertainment Technologies Power Pong Service Manual Page 43...
Need help?
Do you have a question about the POWER PONG and is the answer not in the manual?
Questions and answers