Advertisement
KS-12 取扱説明書
このたびは、ローランド・キーボード・スタンド
KS-12 をお買い上げいただき、まことにありがとうご
ざいました。
このスタンドを、お使いになる前に説明書をよくお読
みになってからご使用ください。
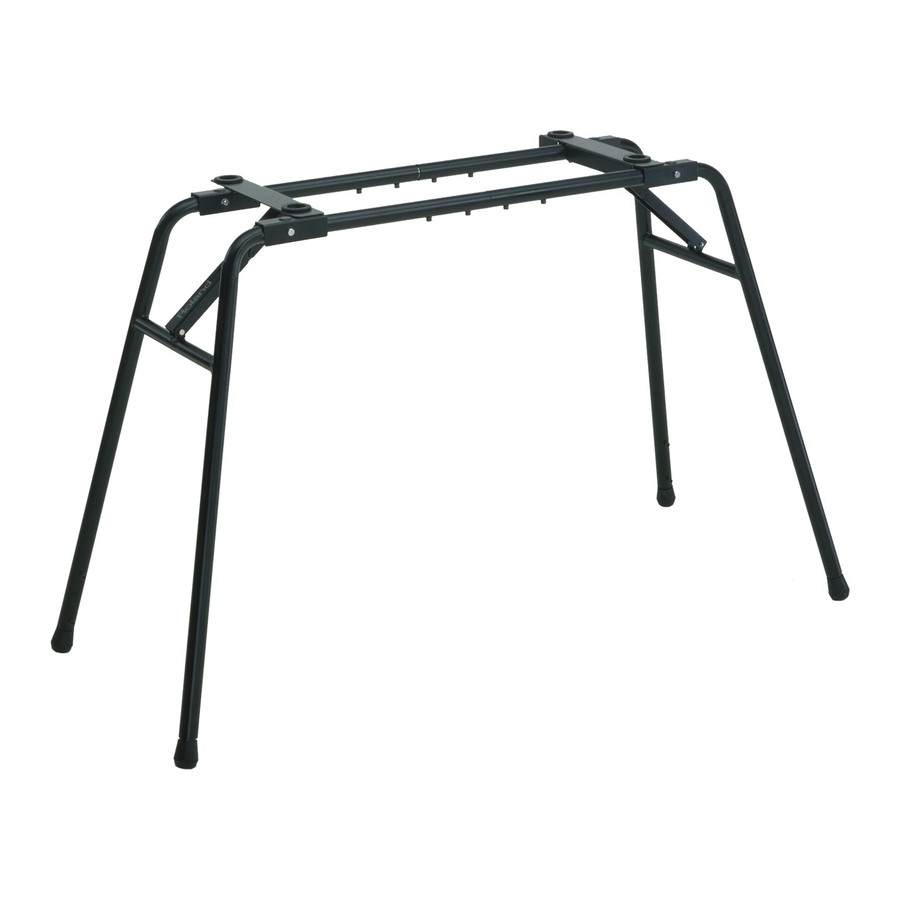
● 組み立て方式
図の様に A 方向に回転させた後、脚を下に向けてから B 方
向に力を加え、ロックさせてください。
折りたたむ場合、逆に脚を上に向けてから C 方向に力を加
え、ロックを解除させ、D 方向に回転させてください。
fig.MG_1318.epsI
D
A
C
B
● 横幅の調節
ネジ
により F 寸法 582mm (開梱時) 、 647mm、712mm、
E
728mm、777mm、842mm、907mm、の 7 段階に調節でき
ます。
fig.IMG_1316.eps
● 高さの調整
高さは、 ネジ
G
により 630mm(開梱時) 、 695mm、 760mm
の 3 段階に調節できます。
D
A
C
F
G
E
KS-12 SETUP PROCEDURE
Thank you very much for purchasing the Roland
Keyboard Stand KS-12.
Please read this instruction carefully before using
this stand.
● Assembly
Pull the legs outward in direction A as shown in the figure.
Then, after turning the stand over so its feet rest on the floor,
push in direction B to lock the legs in place.
Reverse this procedure when collapsing the stand by turning it
over so its legs point upward, then push in direction C to unlock
the legs. Next, move the legs inward in direction D.
fig.MG_1318.epsI
D
B
B
● Adjusting the width of the Stand.
By taking the screws
stand to 7 different lengths; 582mm (as taken out of the
Box), 647mm, 712mm, 728mm, 777mm, 842mm, 907mm by
measurement F.
fig.IMG_1316.eps
● Adjusting the height of the Stand.
The height of the Stand can be adjusted to 3 different levels,
which are 630mm (as taken out of the Box), 695mm and
760mm.
A
A
C
E
off, you can adjust the width of the
F
E
D
C
B
G
Advertisement
Table of Contents

Subscribe to Our Youtube Channel
Related Manuals for Roland KS-12


Summary of Contents for Roland KS-12
- Page 1 KS-12 取扱説明書 KS-12 SETUP PROCEDURE Thank you very much for purchasing the Roland このたびは、ローランド・キーボード・スタンド Keyboard Stand KS-12. KS-12 をお買い上げいただき、まことにありがとうご ざいました。 Please read this instruction carefully before using このスタンドを、お使いになる前に説明書をよくお読 this stand. みになってからご使用ください。 ● Assembly ● 組み立て方式 Pull the legs outward in direction A as shown in the figure.
- Page 2 安 全 上 の ご 注 意 ● このスタンドは、スプリングを使用しています。組み立てるときや折りたたむときに、スタンドの足がスプリングの力 によって戻ろうとします。手をはさまないように、注意してください。 ● ネジをしっかり締め付けてください。緩んだ状態で使用していると、キーボードが落ちたり、転倒したりして、けがの 原因となることがあります。また、長い間使用していると、ネジが緩んでくることがあります。随時ネジを締め直して ください。 ● このスタンドを、ぐらついた場所や傾いた場所に設置したりしないでください。 必ず安定した水平な場所に設置してく ださい。転倒した場合、けがの原因となります。 ● このスタンドの上に乗らないでください。特に、お子様のいるご家庭では注意してください。転倒した場合、けがの原 因となります。 ● このスタンドの上には、キーボードだけを設置してください。キーボード以外のものを設置した場合、バランスが崩れ て落ちたり、転倒したりして、けがの原因となることがあります。 ● キーボードを設置するときは、手をはさまないように注意してください。 ● 76 鍵以上ある重量級のキーボードは、 必ず二人以上で水平にもって設置してください。このとき、手をはさんだり、 足 の上に落とさないように注意してください。 ● お子様のいるご家庭で使用する場合、お子様の取り扱いやいたずらに注意してください。必ず、大人の方が、監視/指 導してあげてください。 ● スタンドの横幅と高さの調節は、キーボードを設置していない状態で行ってください。 ● スタンドの横幅は、キーボードの底面の鍵盤側のゴム足 2 つ(あるいは、リア・パネル側のゴム足 2 つ)が、スタンド の穴に入るよう調節してください。キーボードを設置するときには、ゴム足を穴にいれてください。 CAUTIONS This stand is equipped with spring coils. Be careful. when setting up or folding the stand, so as not to get your hands or fingers pinched.
Need help?
Do you have a question about the KS-12 and is the answer not in the manual?
Questions and answers