Advertisement
Quick Links
Quick Start Guide
Guía del comienzo rápido
Guide de début rapide
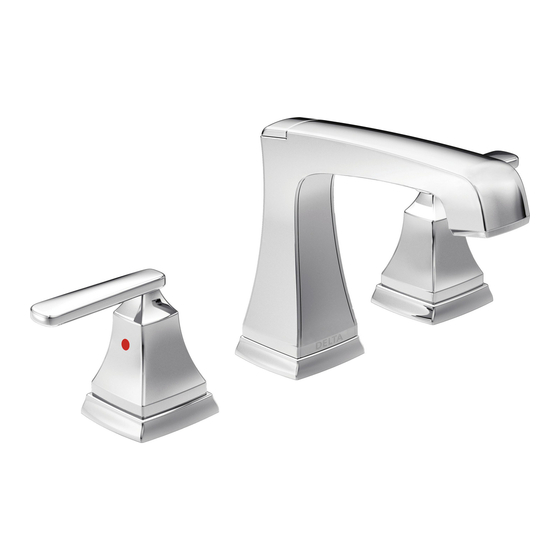
3564-MPU-DST Series/Series/Seria
With Ez Anchor
®
Installation
Con Instalación Ez Anchor
®
Avec Dispositif Ez Anchor
®
For installation and troubleshooting help see
www.deltafaucet.com/
QS-77311 Rev A
2/4/14
Advertisement

Related Manuals for Delta 3564-MPU-DST Ez Anchor Series


Summary of Contents for Delta 3564-MPU-DST Ez Anchor Series
- Page 1 Quick Start Guide Guía del comienzo rápido Guide de début rapide 3564-MPU-DST Series/Series/Seria With Ez Anchor ® Installation Con Instalación Ez Anchor ® Avec Dispositif Ez Anchor ® For installation and troubleshooting help see www.deltafaucet.com/ QS-77311 Rev A 2/4/14...
- Page 2 Table of contents What is included with my Faucet? What is included with my Faucet?............page 2 ¿Qué se incluye con mi llave de agua? Tools and supplies you will need.............. page 3 Installation Instructions................. pages 4-30 Qu’est-ce qui est inclus avec mon robinet? Tabla de contenido ¿Qué...
- Page 3 Tools and supplies you may need. Herramientas y piezas que necesitará. Outils et fournitures dont vous aurez besoin. Flashlight (Not Included) Eye Protection (Not Included) Linterna Parts for Step 1. Protección para los (no incluido) ojos (Not Included) Lampe de poche Protection oculaire (Non inclus) Piezas para el Paso 1.
- Page 4 Top View / Vista superior / Vue de dessus Align notches in anchor assemblies with lift rod. Alinee las muescas en el anclaje con la barrita del desagüe. Faites correspondre les encoches dans les encrages avec la tirette.
- Page 5 Vista superior Top View / / Vue dessus Parts for Step 2. Piezas para el Paso 2. Pièces pour l’étape 2. TORQUE CAUTION ¡CUIDADO! ATTENTION! Lightly tighten both screws on all three anchor assemblies. Cleats (1) will pop-out of anchor sides moving upward. Stop once cleats contact underside of sink.
- Page 6 Correct End Valve Orientation La Orientación de la Válvula Extrema Bonne configuration de la soupape Hot/Caliente/Chaude Cold/Fría/Froide Open Abrir Ouvert Valves shown in closed position. Las válvulas en la posición cerrada. Soupapes montrées en position fermée. Insert hot valve assembly into hot anchor side.
- Page 7 Correct End Valve Orientation La Orientación de la Válvula Extrema Bonne configuration de la soupape Hot/Caliente/Chaude Cold/Fría/Froide Parts for Step 3. Open Abrir Ouvert Piezas para el Paso 3. Valves shown in closed position. Las válvulas en la posición cerrada. Soupapes montrées en position fermée.
- Page 8 Parts for Step 4. Piezas para el Paso 4. Pièces pour l’étape 4. Align tabs on trim base with slots in spout anchor and install as shown. Alinee las lengüetas en la base de ac- cesorio con las ranuras en el ancla del surtidor e instale como se muestra.
- Page 9 FRONT FRENTE AVANT FRONT/ FRENTE/ AVANT Insert large Allen wrench (provided) into lift rod hole in spout. Align wrench with hex in mounting shank inside spout. Fully tighten until spout con- tacts trim base and resists movement. Inserte la llave Allen (incluida) grande en el orificio del tirador del desagüe en el surtidor.
- Page 10 Parts for Step 5. Piezas para el Paso 5. Pièces pour l’étape 5. Parts for Step 4. Piezas para el Paso 4. Pièces pour l’étape 4. Insert spout tubes into outlet When properly inserted, you should not connector to the first line. be able to see the line on the tube.
- Page 11 WARNING Do not use pipe dope or other sealants on water line connections. ADVERTENCIA To remove tubing from outlet connector: hold white ring (4) down against the outlet connector body while pulling the tubing outward. No utilice compuesto para tuberías o sellantes en las conexiones de la línea de agua. Para quitar los tubos del conector de salida de agua: sujete el anillo blanco (4) contra el cuerpo del conector de salida de agua mientras tira/hala el tubo hacia afuera.
- Page 12 Parts for Step 7. Piezas para el Paso 7. Pièces pour l’étape 7. Finger tighten (Both hot & cold sides). Tighten one additional turn with wrench. For information about custom fit tubes refer to the detailed installation sheet. Apriete una vuelta adicional con una llave de herramienta.
- Page 14 Install horizontal rod and stopper as removable (1) or non-removable (2). Instale la barra horizontal y el tapón de manera desmontable (1) o no-extraíble (2). Installez la tige horizontale et l’obturateur de manière qu’ils puissent être enlevés (1) ou qu’ils ne puissent pas être enlevés (2).
- Page 16 Flush for one minute. Check for leaks at arrows. Deje el agua correr por un minuto. Compruebe si hay fugas donde señalado con las flechas. Rincez pendant une minute. Vérifiez l’étanchéité aux endroits indiqués par les flèches.
Need help?
Do you have a question about the 3564-MPU-DST Ez Anchor Series and is the answer not in the manual?
Questions and answers