Table of Contents
Advertisement
Quick Links
PARTS LIST: S101325 S101326
1
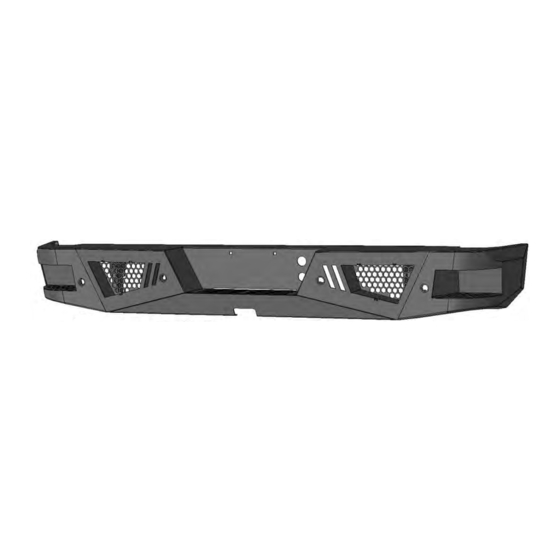
LD1 Rear Bumper Assembly
1
Driver/left Frame Bracket
1
Passenger/right Frame Bracket
1
License Plate Light
2
License Plate Plugs
4
Sensor Hole Plugs
1
Trailer Plug Bracket 07-13
1
Trailer Plug Bracket 2014+
10 Nylon Wire Ties
6
14-2.0mm x 45mm Hex Bolts
12 14mm x 28mm OD x 2.5mm Flat Washers
6
14mm Nylon Lock Nuts
(2) Plastic Nuts for License Plate
Driver/left
Frame Bracket
PROCEDURE:
REMOVE CONTENTS FROM BOX. VERIFY ALL PARTS ARE PRESENT. READ INSTRUCTIONS
CAREFULLY BEFORE STARTING INSTALLATION. BUMPER IS HEAVY, ASSISTANCE IS HIGHLY
RECOMMENDED TO AVOID POSSIBLE INJURY OR DAMAGE TO THE VEHICLE.
1. Remove the license plate. On models with bumper sensors, unplug all sensors. Remove the trailer plug
from the bumper. Release the wiring harness from the clips attached to the back of the bumper and
move harness away from bumper as necessary.
2. Place blocks or jack stands under the bumper to support it during mounting bolt removal.
3. Determine procedure for your model year:
07-13 Models.
a. Starting on the passenger/right side, remove (2) hex bolts attaching bumper to top/center of
receiver hitch if equipped.
b. Remove hex bolts from side and bottom of frame, (Figures 1—3).
c. Repeat previous Steps to remove driver/left side hardware.
d. With assistance, pull bumper and brackets straight out from vehicle, (Figures 6 & 7).
14-16 Models.
a. Starting on the passenger/right side, remove rear bolts attaching bed to frame, (Figure 2).
Loosen center bolts (if equipped). Do not loosen front bolts.
b. Remove hex bolts from side and bottom of frame, (Figures 1—3).
c. Repeat previous Steps to remove driver/left side hardware.
4
12-1.75mm x 35mm Hex Bolts
8
12mm x 37mm OD x 3mm Flat Washers
4
12mm Nylon Lock Nuts
2
10-1.5mm x 50mm Hex Bolts
4
10mm x 34mm OD x 3mm Flat Washers
2
10mm Nylon Lock Nuts
2
6mm x 16mm Hex Bolts
4
6mm ID x 12mm OD x 1.6mm Flat Washers
2
6mm Nylon Lock Nut
1
4mm Allen Wrench
8
4mm x 10mm Button Head Bolts
2014-on Trailer
Plug Bracket
2007-13 Trailer
Plug Bracket
Page 1 of 6
2007-16 CHEVY SILVERADO 1500
License Plate Light
Passenger/right
Frame Bracket
LD1 REAR BUMPER
(4) Sensor
Hole Plugs
8/26/16 (DP)
Advertisement
Table of Contents

Related Manuals for Barricade LD1

Summary of Contents for Barricade LD1
- Page 1 LD1 REAR BUMPER 2007-16 CHEVY SILVERADO 1500 PARTS LIST: S101325 S101326 LD1 Rear Bumper Assembly 12-1.75mm x 35mm Hex Bolts Driver/left Frame Bracket 12mm x 37mm OD x 3mm Flat Washers Passenger/right Frame Bracket 12mm Nylon Lock Nuts License Plate Light 10-1.5mm x 50mm Hex Bolts...
- Page 2 LD1 REAR BUMPER 2007-16 CHEVY SILVERADO 1500 d. Raise bed up slightly, only enough to clear bumper brackets. With assistance, pull bumper and brackets straight out from vehicle, (Figures 6 & 7). OPTION, 14-16 models only, bumper must be disassembled to remove to avoid raising the bed.
- Page 3 LD1 REAR BUMPER 2007-16 CHEVY SILVERADO 1500 Passenger/right side installation pictured 2014-16 models, remove rear bed to frame bolts, loosen center bolts, (if equipped). Do not loosen front bolts. (Fig 1) Remove bumper bolts from outside of frame (arrows). Passenger side pictured from below...
- Page 4 LD1 REAR BUMPER 2007-16 CHEVY SILVERADO 1500 Passenger/right side installation pictured WARNING! Before removing hardware, fully support the weight of the bumper with blocks or stands to prevent injury or damage to the vehicle. (Fig 5) OPTION 2014-16 only: Remove bumper bolts attaching bumper to inner bracket.
- Page 5 LD1 REAR BUMPER 2007-16 CHEVY SILVERADO 1500 Passenger/right side installation pictured Rear 14mm x 45mm Hex Bolt (2) 14mm Flat Washers 14mm Nylon Lock Nut (Fig 9) Attach passenger side of Bumper to frame. Model w-o receiver hitch pictured (2) 12mm x 55mm Hex Bolts...
- Page 6 LD1 REAR BUMPER 2007-16 CHEVY SILVERADO 1500 (2) License plate License plate light mounting nuts (plugs) Remove screens if necessary for additional clearance around or access to lights Fig 13 (2) 6mm Screws (4) 6mm Flat Washers (2) 6mm Nylon Lock Nuts...
Need help?
Do you have a question about the LD1 and is the answer not in the manual?
Questions and answers