Source Technologies 10 Series Installation Manual
Hide thumbs
Also See for 10 Series:
- Operator's manual (105 pages) ,
- Technical bulletin (17 pages) ,
- Manual (27 pages)

Subscribe to Our Youtube Channel
Related Manuals for Source Technologies 10 Series


Summary of Contents for Source Technologies 10 Series
- Page 1 10-Series Kiosk Installation Guide 10-Series Kiosk Installation Manual | Source Technologies...
-
Page 2: Notice
NOTICE To the best of our knowledge the information in this publication is accurate; however, Source Technologies does not assume any responsibility or liability for the accuracy or completeness of, or consequences arising from, such information. This document is intended for informational purposes only. Mention of trade names or commercial products does not constitute endorsement or recommendation for use by Source Technologies. -
Page 3: General Safety Information
The kiosk must be properly shut down and then disconnected from the AC power supply before connecting signal cables to a host computer. This kiosk is suitable for connection to IT power systems. 10-Series Kiosk Installation Manual | Source Technologies... - Page 4 Le kiosque doit être correctement fermé puis déconnecté de l'alimentation secteur avant de connecter les câbles de signal à un ordinateur hôte. Ce kiosque est approprié pour la connexion à des systèmes d'alimentation informatique. 10-Series Kiosk Installation Manual | Source Technologies...
- Page 5 This Class A digital apparatus complies with Canadian ICES-003. 10-Series Kiosk Installation Manual | Source Technologies...
- Page 6 L'utilisation de l'équipement dans une zone résidentielle est susceptible de causer des interférences nuisibles, auquel cas l'utilisateur devra corriger ces interférences à ses propres frais. Cetappareilnumérique de la classe A estconforme à la norme NMB-003 du Canada. 10-Series Kiosk Installation Manual | Source Technologies...
-
Page 7: Table Of Contents
Chapter 9 – Powering on the Kiosk ....................29 Chapter 10 – Loading Receipt Paper ....................30 Chapter 11 – Loading Check Printer Paper ..................34 Chapter 12 – Hardware Verification Test ..................36 10-Series Kiosk Installation Manual | Source Technologies... -
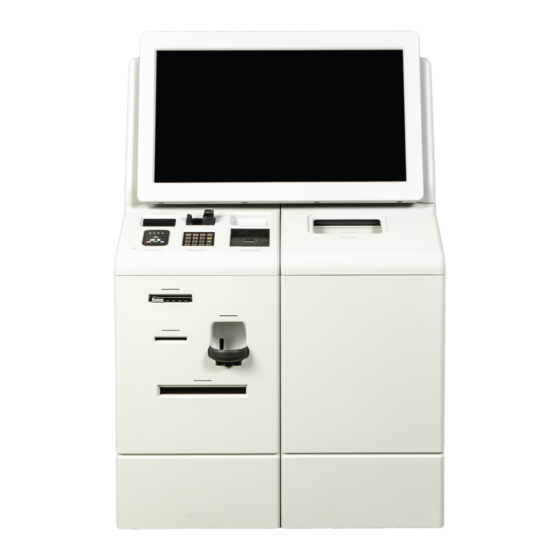
Page 8: Chapter 1 - Product Overview
Product Overview Kiosk Description Source Technologies’ 10-Series kiosk is a next-generation, self-service platform designed from the ground up to manage secure, distributed financial transactions and consumer banking. 10-Series Kiosk Installation Manual | Source Technologies... - Page 9 Kiosk Dimensions DIMENSION UNITS: mm (inches) 10-Series Kiosk Installation Manual | Source Technologies...
- Page 10 Clearance Rquirements FLOOR CLEARANCE FOR KIOSK SERVICING DIMENSION UNITS: mm (inches) 10-Series Kiosk Installation Manual | Source Technologies...
- Page 11 Clearance Rquirements FLOOR CLEARANCE FOR FRONT WHEELCHAIR ACCESS DIMENSION UNITS: mm (inches) 10-Series Kiosk Installation Manual | Source Technologies...
- Page 12 Clearance Rquirements FLOOR CLEARANCE FOR SIDE WHEELCHAIR ACCESS DIMENSION UNITS: mm (inches) 10-Series Kiosk Installation Manual | Source Technologies...
- Page 13 In an environment where the ambient temperature exceeds 90° F. Where it will be exposed to direct sunlight or hot air from an HVAC system. Within 8 feet of Electronic Article Surveillance devices that generate radio frequency energy or magnetic fields. 10-Series Kiosk Installation Manual | Source Technologies...
- Page 14 Unpacking the Kiosk • • • • • • • • 10 Series Kiosk (Accessory Kit Located Inside) Check Printer Optional Paper Tray Component Recycler Cash Cabinet Key Cassette Key Coin Dispenser Key 10-Series Kiosk Installation Manual | Source Technologies...
-
Page 15: Chapter 3 - Unpacking The Kiosk
Unpacking the Kiosk Straps Staples 10-Series Kiosk Installation Manual | Source Technologies... - Page 16 Unpacking the Kiosk 10-Series Kiosk Installation Manual | Source Technologies...
- Page 17 Unpacking the Kiosk 10-Series Kiosk Installation Manual | Source Technologies...
- Page 18 Unpacking the Kiosk Remove Lag Screws Located in Bottom of Component Cabinet on Left-Hand Side Remove Remove 10-Series Kiosk Installation Manual | Source Technologies...
- Page 19 Unpacking the Kiosk 10-Series Kiosk Installation Manual | Source Technologies...
-
Page 20: Chapter 4 - Installation
• • Approximate Weight Distribution NOTE: There are two notches on each side of the pallet that provide access to lift points that may be used to remove the kiosk from the pallet. 10-Series Kiosk Installation Manual | Source Technologies... - Page 21 Installation Open Both Front and Top Safe Doors Cover the Top and Front of the Recycler 10-Series Kiosk Installation Manual | Source Technologies...
- Page 22 Installation The anchor bolt holes will be drilled through these two mounting holes. 10-Series Kiosk Installation Manual | Source Technologies...
- Page 23 Installation Floor Anchor 10-Series Kiosk Installation Manual | Source Technologies...
- Page 24 Installation Pull bottom of latch handle (71) toward you to release the lower unit. Use handle to pull lower unit out. 10-Series Kiosk Installation Manual | Source Technologies...
- Page 25 Installation D. Remove (5) restraint brackets from top of cash cassettes. 10-Series Kiosk Installation Manual | Source Technologies...
- Page 26 Installation E. Flip lever (B25) from shipping position to normal operating position. F. Move the retaining screw shown at right to the left- hand location. 10-Series Kiosk Installation Manual | Source Technologies...
- Page 27 B. Unbox the paper tray and remove all shipping tape and packaging. Install paper tray on the printer tray mount. C. Remove the Check Printer from its box and remove the protective shipping tape and packaging. 10-Series Kiosk Installation Manual | Source Technologies...
- Page 28 E. Plug in the AC power cord, USB Cable and ethernet cable that are located on the printer tray mount. CONNECTION F. Push in the printer tray mount until it latches. 10-Series Kiosk Installation Manual | Source Technologies...
- Page 29 Installation 10-Series Kiosk Installation Manual | Source Technologies...
-
Page 30: Chapter 9 - Powering On The Kiosk
B. Power on the kiosk by pressing the UPS power switch button. Access the power button through the access hole on the left side of the kiosk. Use a small tool to press the UPS power button through the access hole 10-Series Kiosk Installation Manual | Source Technologies... - Page 31 Use cabinet key to unlock the component cabinet. B. Pull component cabinet fully open and locate receipt printer on left side. Receipt printer is located on left side of cabinet underneath the check scanner 10-Series Kiosk Installation Manual | Source Technologies...
- Page 32 C. Locate the check scanner lock plunger indicated by the arrow below and pull out to allow the check scanner to be moved. D. Slide the check scanner back to provide access to the receipt printer. 10-Series Kiosk Installation Manual | Source Technologies...
-
Page 33: Chapter 10 - Loading Receipt Paper
F. Place the paper roll and spindle into the printer paper holder as shown below. G. Route the paper into the printer paper guide and continue to push forward until the printer recognizes the paper and auto-loads. 10-Series Kiosk Installation Manual | Source Technologies... - Page 34 H. Slide the check scanner back into position until you hear the lock plunger click into place. Verify that the check scanner is locked in place. I. Push the component cabinet back into position until it is latched in place. J. Receipt paper loading is complete. 10-Series Kiosk Installation Manual | Source Technologies...
-
Page 35: Chapter 11 - Loading Check Printer Paper
A. Unlock and open the component cabinet. Use cabinet key to unlock the component cabinet. B. Pull out the component cabinet and locate the check printer on the lower right- hand side. 10-Series Kiosk Installation Manual | Source Technologies... - Page 36 C. Use the printer shelf handle to pull the printer into its service position as shown below. D. Open printer paper tray. E. Adjust the paper guides to match the size of the paper that you are loading. F. Flex, fan, and align the paper edges before loading. 10-Series Kiosk Installation Manual | Source Technologies...
- Page 37 J. Push the component cabinet back into position until it is latched in place. K. Check printer paper loading is complete. Use the 10-Series Functional Test Procedures Document P/N: 108693 to verify that the kiosk hardware is functioning properly. 10-Series Kiosk Installation Manual | Source Technologies...
Need help?
Do you have a question about the 10 Series and is the answer not in the manual?
Questions and answers