
Subscribe to Our Youtube Channel
Related Manuals for Opt Lasers PLH3D-CNC Adapter


Summary of Contents for Opt Lasers PLH3D-CNC Adapter
-
Page 1: Table Of Contents
PLH3D-CNC Adapter Table of Contents Introduction Controls and Indicators Application PLH3D-CNC Adapter Settings Connection to CNC Machines X-Carve Stepcraft Shapeoko Zmorph Workbee Smooth Stepper BlackBox Motion Control System Miscellaneous For Advanced Users Troubleshooting... -
Page 2: Introduction
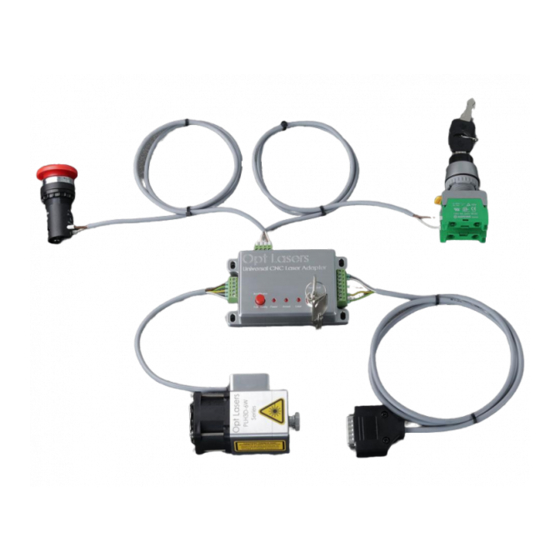
Many types of CNC machines and 3D printers with different control voltage standards and levels available on the market may be used to control the PLH3D head. The PLH3D-CNC Adapter converts all these signals to the standard compatible with the PLH3D head. The PLH3D-CNC Adapter contains widely-used, industry-standard screw connectors. A dedicated, low-noise desktop power supply unit assures compatibility and reliability as well as eliminates problems caused by using third-party power supplies. - Page 3 Key features of the PLH3D-CNC Adapter: ● Keylock for preventing use by unauthorized personnel ● Safe start ● Laser pulse test ● Stop button used also to arm, test, and set mode ● Status LEDs- power, armed, laser and setting of enable modes ●...
- Page 4 Overview Laser head terminal block External Switch terminal block Extensions connector Power supply connector Control terminal block Mode button LED status indicators Key switch...
-
Page 5: Controls And Indicators
Up to two external switches (e.g. limit switch, key switch, e-stop) that arm/disarm the laser head can be connected to the PLH3D-CNC Adapter. When not using a switch, replace it with a jumper wire. Opening any external switch disarms the laser head immediately. -
Page 6: Application
Application Main States of the PLH3D-CNC Adapter Power supply turned off Power supply turned on, laser head disarmed Laser head armed, no controlling Laser head armed, controlling... - Page 7 Dimensions...
- Page 8 Pinout...
-
Page 9: Plh3D-Cnc Adapter Settings
PLH3D-CNC Adapter settings The table below shows the settings of the “enable options” for widely used machines. The PLH3D-CNC Adapter is shipped with the enable options already matching the user’s machine. Checking and changing the enable option is explained in the section For Advanced Users. -
Page 10: Connection To Cnc Machines
Connections to CNC machines 1.1. X-Carve 1.2. Stepcraft... -
Page 11: Shapeoko
1.3. Shapeoko with Arduino Uno:... -
Page 12: Zmorph
with GShield: 1.4. Zmorph... -
Page 13: Workbee
1.5. Workbee with Duet Controller: with CNC xPro v3 Controller:... -
Page 14: Smooth Stepper
with CNC xPro v4 Controller 1.6. Smooth Stepper 1.7. BlackBox Motion Control System... -
Page 15: Miscellaneous
1.8. Miscellaneous 1.8.1. CSMIO Controller: 1.8.2. Pokey57 CNC Controller: 1.8.3. EleksMaker:... - Page 16 1.8.4. Openbuilds:...
-
Page 17: For Advanced Users
For Advanced Users Block Diagram LASER HEAD Connector Pinout pin no. name laser head input pin no. ANG IN 5V Pin #1 Not connected GROUND Pin #3 GROUND Pin #4 + HEAD SUPPLY Pin #5... - Page 18 EXTERNAL SWITCH Connector Pinout and Description Pin no. Name External switch Switch A Switch B The switches are connected in series with the arming relay and feed the power supply to the laser head. Opening any of the switches disconnects the supply of the laser head and thus disarms it. Connect the first switch to A.1 and A.2, and the second switch to B.1 and B.2.
- Page 19 Enable Options Some CNC machines issue special “disable/enable” signals for turning the laser beam off/on. The PLH3D-CNC Adapter can be set in such a way that the laser beam is enabled only at certain states on two Enable inputs and disabled in other cases.
-
Page 20: Troubleshooting
Turn the key into the upper position. The power supply unit is not attached either to Plug in the power supply. the mains (wall) or to the PLH3D-CNC Adapter. There is no mains supply (grid power). Check the mains supply (grid power). - Page 21 The laser control signal is fed to a wrong input. Attach the controlling signal to the right input. There is no control signal connected. Check the connections.
Need help?
Do you have a question about the PLH3D-CNC Adapter and is the answer not in the manual?
Questions and answers