
Subscribe to Our Youtube Channel
Related Manuals for Opt Lasers PLH3D-2W

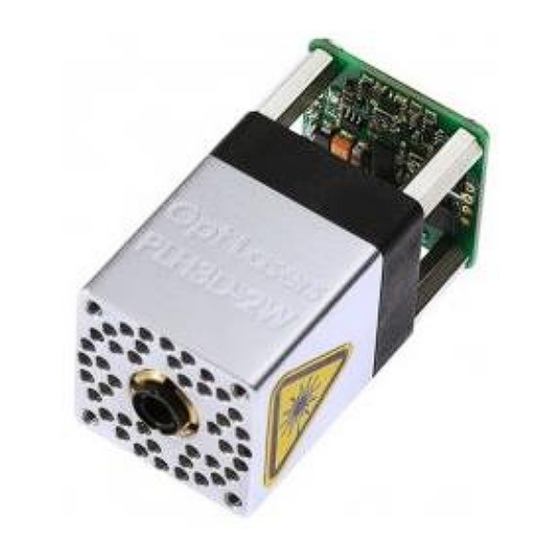
Summary of Contents for Opt Lasers PLH3D-2W
- Page 1 Quick Setup Guide for using a PLH3D-2W Laser Head with a Prusa i3 MK3S 3D Printer...
-
Page 2: Table Of Contents
Table of contents General Laser Safety Warnings and Precautions ..................3 List of parts .............................. 4 Cable description ............................. 5 How to connect ............................5 G-code ..............................17 Generating G-code ..........................18 Working area ............................20 Precautions ............................21 Appendix 1: G-Code example ........................ 22... -
Page 3: General Laser Safety Warnings And Precautions
General Laser Safety Warnings and Precautions Only person with specialized training and appropriate laser safety knowledge can use and maintain the laser head. The laser head operator must be aware of laser radiation hazard. While laser head is operating protection Laser Glasses designed for 190 – 540 nm (OD 7+) should be used. -
Page 4: List Of Parts
List of parts Name of the part Picture PLH3D-2W Laser Head for Prusa 3DP Laser Safety Glasses Prusa Signal Cable for PLH3D-2W PLH3D-2W Mount for Prusa Printer (3D file to download) M3 x 50 screws (2 pieces) M3 x 6 screws (2... -
Page 5: Cable Description
• connect to wire of front print fan • connect to front print fan connector on EINSY board How to connect 1. Download 3D file of PLH3D-2W Mount for Prusa Printer from our website and print it on your 3D printer. - Page 6 2. Connect PWR- and PWR+ (parallel to wires that have been connected already) 3. Connect laser control input to the connector on EINSY board (instead of front print fan cable).
- Page 7 4. Check with photo below, if you plugged those in correct slots.
- Page 8 5. Connect front print fan cable. 6. View of wires connected.
- Page 9 7. Unwrap the cable bundle which connects EINSY board with extruder and dismount X-carriage-back.
- Page 10 8. Pull the black nylon filament guide, P.I.N.D.A. sensor cable and hotend fan cable through the X-carriage-back to make more space. Push PLH3D-2W laser head cable through the hole, to the extruder side.
- Page 11 9. Push black nylon filament guide, P.I.N.D.A. sensor cable and hotend fan cable back. 10. Push the PLH3D-2W laser head cable in the channel together with the P.I.N.D.A. sensor and fan cables. Use zip tie to mount it firmly.
- Page 12 11. Set up X-carriage-back back to its place.
- Page 13 12. Twist textile sleeve with PLH3D-2W laser head’s cable added to the bundle and mount the bundle back.
- Page 14 13. Unscrew top right and bottom left (view from the front side) of the extruder motor.
- Page 15 14. Push two M3x50 screws through the upper holes of laser head’s holder. 15. Mount PLH3D-2W laser head to the holder (use two M3x6 screws).
- Page 16 16. Using M3x50 screws, that were set up in the 13. point, mount PLH3D-2W laser head’s holder to the extruder’s motor.
-
Page 17: G-Code
17. Before starting work with laser, connect the cable. Always remember to cover heat bed or spring steel sheet with non-reflective material that will protect it from laser. Laser beam can damage heat bed or spring steel sheet very easily! G-code To cut or engrave, it is necessary to generate the appropriate G-code that using the following commands:... -
Page 18: Generating G-Code
Before every G0, G1 commands M106 Laser ON SXXX PWM duty where XXX is number between 0 and 255 (e.g.: 0 = 0% and 255 = 100%) Footer M107 Print cooling fan off (disable laser) G92 X0 Y0 Z0 Reset selected workspace To see an example of G-code, please refer to Appendix 1. - Page 19 4. Click Generate G-Code and save it. 5. Now, you can load the generated G-code to your 3D printer and begin to use the laser.
-
Page 20: Working Area
Working area Normal working area of Prusa i3 MK3S in XY plane is 250mm x 210mm. Tool center point of the 3D Printer is the nozzle tip but TCP of the laser head is its beam spot. Because the laser head is mounted in some distance from extruder, tool center point during work with laser is moved. -
Page 21: Precautions
�� = 15 − ���������� ���������������� ������������ The lens of PLH3D-2W are focused at 60mm when shipped. So in newly manufactured laser head, value of the offset in Z axis is: �� = 15 − 60 = −45 ������������... -
Page 22: Appendix 1: G-Code Example
Laser head should be disconnected soon after finishing the work. Never use reset button when laser is connected (unplug it first). Remember that working area is 86 mm shorter in Y axis when laser is used. Appendix 1: G-Code example ;(Header) M104 S0 ;Set hotend temperature to 0... - Page 23 G0 X33.7441 Y21.5261 Z0.0000 F10000 M106 S255 G1 X53.7441 Y41.5261 F1000 M106 S0 G0 X33.7441 F10000 M106 S255 G1 X53.7441 Y21.5261 F1000 M106 S0 G0 X57.9859 Y31.5261 F10000 M106 S255 G3 X77.9859 I10.0000 J0.0000 F1000 M106 S255 G3 X57.9859 I-10.0000 J0.0000 M106 S0 G0 X6.2419 Y15.5494 F10000 M106 S255...
- Page 24 M106 S255 G1 X10.0958 Y14.3366 M106 S255 G1 X10.4515 Y14.0525 M106 S255 G1 X10.7936 Y13.7377 M106 S255 G1 X11.1137 Y13.4003 M106 S255 G1 X11.4027 Y13.0495 M106 S255 G1 X11.6622 Y12.6834 M106 S255 G1 X11.8901 Y12.3043 M106 S255 G1 X12.0884 Y11.9102 M106 S255 G1 X12.2558 Y11.5029 M106 S255...
- Page 25 G1 X12.5706 Y8.2771 M106 S255 G1 X12.4874 Y7.8106 M106 S255 G1 X12.3709 Y7.3594 M106 S255 G1 X12.2216 Y6.9230 M106 S255 G1 X12.0391 Y6.5011 M106 S255 G1 X11.8230 Y6.0935 M106 S255 G1 X11.5736 Y5.6997 M106 S255 G1 X11.2911 Y5.3213 M106 S255 G1 X10.9757 Y4.9575 M106 S255 G1 X10.6289 Y4.6099...
- Page 26 M106 S255 G1 X7.7793 Y3.0949 M106 S255 G1 X7.3129 Y3.0115 M106 S255 G1 X6.8330 Y2.9616 M106 S255 G1 X6.3398 Y2.9451 M106 S255 G1 X5.8407 Y2.9616 M106 S255 G1 X5.3574 Y3.0109 M106 S255 G1 X4.8881 Y3.0935 M106 S255 G1 X4.4342 Y3.2090 M106 S255 G1 X3.9954 Y3.3574 M106 S255...
- Page 27 G1 X1.3554 Y5.3004 M106 S255 G1 X1.0709 Y5.6763 M106 S255 G1 X0.8194 Y6.0670 M106 S255 G1 X0.6021 Y6.4708 M106 S255 G1 X0.4182 Y6.8893 M106 S255 G1 X0.2676 Y7.3216 M106 S255 G1 X0.1505 Y7.7682 M106 S255 G1 X0.0668 Y8.2301 M106 S255 G1 X0.0168 Y8.7047 M106 S255 G1 X0.0000 Y9.1932...
- Page 28 M106 S255 G1 X0.8679 Y12.4452 M106 S255 G1 X1.1174 Y12.8231 M106 S255 G1 X1.3867 Y13.1798 M106 S255 G1 X1.6758 Y13.5158 M106 S255 G1 X1.9853 Y13.8317 M106 S255 G1 X2.3148 Y14.1271 M106 S255 G1 X2.6644 Y14.4020 M106 S255 G1 X3.0348 Y14.6567 M106 S255 G1 X3.4244 Y14.8901 M106 S255...
- Page 29 G0 X6.2972 Y14.3746 F10000 M106 S255 G1 X5.7860 Y14.3516 F1000 M106 S255 G1 X5.2980 Y14.2823 M106 S255 G1 X4.8334 Y14.1669 M106 S255 G1 X4.3936 Y14.0053 M106 S255 G1 X3.9780 Y13.7979 M106 S255 G1 X3.5875 Y13.5540 M106 S255 G1 X3.2224 Y13.2858 M106 S255 G1 X2.8841 Y12.9947 M106 S255...
- Page 30 M106 S255 G1 X1.2700 Y9.7386 M106 S255 G1 X1.2482 Y9.1951 M106 S255 G1 X1.2686 Y8.7024 M106 S255 G1 X1.3300 Y8.2287 M106 S255 G1 X1.4321 Y7.7722 M106 S255 G1 X1.5748 Y7.3351 M106 S255 G1 X1.7584 Y6.9157 M106 S255 G1 X1.9830 Y6.5144 M106 S255 G1 X2.2488 Y6.1304 M106 S255...
- Page 31 G1 X4.8951 Y4.2958 M106 S255 G1 X5.3459 Y4.1936 M106 S255 G1 X5.8138 Y4.1320 M106 S255 G1 X6.2971 Y4.1117 M106 S255 G1 X6.8282 Y4.1339 M106 S255 G1 X7.3303 Y4.2007 M106 S255 G1 X7.8051 Y4.3123 M106 S255 G1 X8.2507 Y4.4680 M106 S255 G1 X8.6682 Y4.6684 M106 S255 G1 X9.0583 Y4.9057...
- Page 32 M106 S255 G1 X11.0478 Y7.2687 M106 S255 G1 X11.2004 Y7.7161 M106 S255 G1 X11.3096 Y8.1965 M106 S255 G1 X11.3750 Y8.7079 M106 S255 G1 X11.3968 Y9.2504 M106 S255 G1 X11.3748 Y9.7958 M106 S255 G1 X11.3086 Y10.3064 M106 S255 G1 X11.1983 Y10.7839 M106 S255 G1 X11.0439 Y11.2268 M106 S255...
- Page 33 G1 X9.0317 Y13.5683 M106 S255 G1 X8.6360 Y13.8091 M106 S255 G1 X8.2155 Y14.0127 M106 S255 G1 X7.7719 Y14.1709 M106 S255 G1 X7.3035 Y14.2842 M106 S255 G1 X6.8126 Y14.3520 M106 S255 G1 X6.2988 Y14.3746 M106 S0 G0 X16.0062 Y12.1229 F10000 M106 S255 G1 X14.8722 F1000 M106 S255 G1 Y0.0000...
- Page 34 M106 S255 G1 X17.8032 Y3.3716 M106 S255 G1 X17.4077 Y3.5667 M106 S255 G1 X17.0304 Y3.8043 M106 S255 G1 X16.6712 Y4.0844 M106 S255 G1 X16.3297 Y4.4071 M106 S255 G1 X16.0065 Y4.7722 M106 S0 G0 Y12.1229 F10000 M106 S255 G1 Y10.4913 F1000 M106 S255 G1 X16.3135 Y10.8798 M106 S255...
- Page 35 G1 X19.0547 Y12.3266 M106 S255 G1 X19.5300 Y12.3514 M106 S255 G1 X19.9961 Y12.3302 M106 S255 G1 X20.4445 Y12.2661 M106 S255 G1 X20.8755 Y12.1593 M106 S255 G1 X21.2894 Y12.0100 M106 S255 G1 X21.6860 Y11.8178 M106 S255 G1 X22.0652 Y11.5832 M106 S255 G1 X22.4271 Y11.3061 M106 S255 G1 X22.7722 Y10.9859...
- Page 36 M106 S255 G1 X24.0943 Y8.1790 M106 S255 G1 X24.1153 Y7.7102 M106 S255 G1 X24.0945 Y7.2319 M106 S255 G1 X24.0326 Y6.7728 M106 S255 G1 X23.9288 Y6.3312 M106 S255 G1 X23.7840 Y5.9078 M106 S255 G1 X23.5975 Y5.5023 M106 S255 G1 X23.3700 Y5.1150 M106 S255 G1 X23.1005 Y4.7453 M106 S255...
- Page 37 G1 X20.4758 Y3.1043 M106 S255 G1 X20.0285 Y3.0400 M106 S255 G1 X19.5638 Y3.0185 M106 S0 G0 X19.4401 Y11.2500 F10000 M106 S255 G1 X18.9560 Y11.2210 F1000 M106 S255 G1 X18.4979 Y11.1342 M106 S255 G1 X18.0668 Y10.9893 M106 S255 G1 X17.6626 Y10.7866 M106 S255 G1 X17.2846 Y10.5258 M106 S255...
- Page 38 M106 S255 G1 X15.9546 Y7.0996 M106 S255 G1 X16.0445 Y6.6112 M106 S255 G1 X16.1943 Y6.1721 M106 S255 G1 X16.4022 Y5.7804 M106 S255 G1 X16.6533 Y5.4245 M106 S255 G1 X16.9433 Y5.1026 M106 S255 G1 X17.2722 Y4.8142 M106 S255 G1 X17.6404 Y4.5590 M106 S255 G1 X18.0462 Y4.3431 M106 S255...
- Page 39 G1 X21.2451 Y4.5785 M106 S255 G1 X21.6013 Y4.8426 M106 S255 G1 X21.9237 Y5.1430 M106 S255 G1 X22.2127 Y5.4794 M106 S255 G1 X22.4685 Y5.8529 M106 S255 G1 X22.6847 Y6.2610 M106 S255 G1 X22.8403 Y6.6997 M106 S255 G1 X22.9339 Y7.1693 M106 S255 G1 X22.9650 Y7.6681 M106 S255 G1 X22.9340 Y8.1718...
- Page 40 M106 S255 G1 X21.2511 Y10.7473 M106 S255 G1 X20.8617 Y10.9656 M106 S255 G1 X20.4306 Y11.1235 M106 S255 G1 X19.9565 Y11.2184 M106 S255 G1 X19.4413 Y11.2500 M106 S0 G0 X28.3976 Y15.4188 F10000 M106 S255 G1 X27.2473 F1000 M106 S255 G1 Y12.1229 M106 S255 G1 X25.6892 M106 S255...
- Page 41 G1 Y12.1229 M106 S255 G1 X28.3976 M106 S255 G1 Y15.4188 M106 S0 G0 X37.9352 Y15.2475 F10000 M106 S255 G1 X36.7278 F1000 M106 S255 G1 Y3.2469 M106 S255 G1 X42.5445 M106 S255 G1 Y4.4054 M106 S255 G1 X37.9352 M106 S255 G1 Y15.2475 M106 S0 G0 X53.1004 Y3.2469 F10000 M106 S255...
- Page 42 M106 S255 G1 X49.3788 Y12.2568 M106 S255 G1 X49.8146 Y12.1413 M106 S255 G1 X50.2288 Y11.9802 M106 S255 G1 X50.6217 Y11.7734 M106 S255 G1 X50.9924 Y11.5211 M106 S255 G1 X51.3414 Y11.2233 M106 S255 G1 X51.6689 Y10.8802 M106 S255 G1 X51.9743 Y10.4916 M106 S0 G0 X53.1004 Y3.2469 F10000 M106 S255...
- Page 43 G1 X50.1729 Y3.3716 M106 S255 G1 X49.7589 Y3.2196 M106 S255 G1 X49.3270 Y3.1099 M106 S255 G1 X48.8773 Y3.0428 M106 S255 G1 X48.4099 Y3.0185 M106 S255 G1 X47.9440 Y3.0400 M106 S255 G1 X47.4967 Y3.1043 M106 S255 G1 X47.0665 Y3.2120 M106 S255 G1 X46.6545 Y3.3623 M106 S255 G1 X46.2598 Y3.5558...
- Page 44 M106 S255 G1 X44.1886 Y5.9078 M106 S255 G1 X44.0438 Y6.3312 M106 S255 G1 X43.9400 Y6.7728 M106 S255 G1 X43.8782 Y7.2319 M106 S255 G1 X43.8573 Y7.7086 M106 S255 G1 X43.8784 Y8.1790 M106 S255 G1 X43.9412 Y8.6316 M106 S255 G1 X44.0464 Y9.0670 M106 S255 G1 X44.1931 Y9.4850 M106 S255...
- Page 45 G1 X46.2866 Y11.8178 M106 S255 G1 X46.6833 Y12.0100 M106 S255 G1 X47.0971 Y12.1593 M106 S255 G1 X47.5281 Y12.2661 M106 S255 G1 X47.9766 Y12.3302 M106 S255 G1 X48.4415 Y12.3514 M106 S0 G0 X48.5313 Y11.2500 F10000 M106 S255 G1 X48.0162 Y11.2184 F1000 M106 S255 G1 X47.5420 Y11.1235 M106 S255...
- Page 46 M106 S255 G1 X45.1317 Y8.6432 M106 S255 G1 X45.0386 Y8.1718 M106 S255 G1 X45.0076 Y7.6692 M106 S255 G1 X45.0388 Y7.1687 M106 S255 G1 X45.1324 Y6.6988 M106 S255 G1 X45.2884 Y6.2599 M106 S255 G1 X45.5050 Y5.8513 M106 S255 G1 X45.7609 Y5.4779 M106 S255 G1 X46.0503 Y5.1415 M106 S255...
- Page 47 G1 X49.0259 Y4.0939 M106 S255 G1 X49.4963 Y4.1876 M106 S255 G1 X49.9332 Y4.3436 M106 S255 G1 X50.3373 Y4.5598 M106 S255 G1 X50.7042 Y4.8153 M106 S255 G1 X51.0317 Y5.1037 M106 S255 G1 X51.3208 Y5.4258 M106 S255 G1 X51.5713 Y5.7817 M106 S255 G1 X51.7790 Y6.1737 M106 S255 G1 X51.9284 Y6.6127...
- Page 48 M106 S255 G1 X51.3470 Y9.8476 M106 S255 G1 X51.0388 Y10.2074 M106 S255 G1 X50.6880 Y10.5258 M106 S255 G1 X50.3100 Y10.7866 M106 S255 G1 X49.9058 Y10.9893 M106 S255 G1 X49.4747 Y11.1342 M106 S255 G1 X49.0166 Y11.2210 M106 S255 G1 X48.5325 Y11.2500 M106 S0 G0 X59.3981 Y10.3934 F10000 M106 S255...
- Page 49 G1 X59.7192 Y11.5187 M106 S255 G1 X60.1321 Y11.1523 M106 S0 G0 X59.3979 Y10.3936 F10000 M106 S255 G1 X59.0342 Y10.7135 F1000 M106 S255 G1 X58.6736 Y10.9624 M106 S255 G1 X58.3163 Y11.1403 M106 S255 G1 X57.9623 Y11.2471 M106 S255 G1 X57.6117 Y11.2826 M106 S255 G1 X57.1997 Y11.2250 M106 S255...
- Page 50 M106 S255 G1 X57.0974 Y8.8006 M106 S255 G1 X57.4849 Y8.5573 M106 S255 G1 X57.9620 Y8.2969 M106 S255 G1 X58.4386 Y8.0345 M106 S255 G1 X58.8499 Y7.7760 M106 S255 G1 X59.1958 Y7.5215 M106 S255 G1 X59.4764 Y7.2708 M106 S255 G1 X59.6916 Y7.0242 M106 S255 G1 X59.8881 Y6.7045 M106 S255...
- Page 51 G1 X59.5293 Y3.9429 M106 S255 G1 X59.1910 Y3.6125 M106 S255 G1 X58.8121 Y3.3527 M106 S255 G1 X58.3969 Y3.1671 M106 S255 G1 X57.9450 Y3.0557 M106 S255 G1 X57.4570 Y3.0185 M106 S255 G1 X57.0257 Y3.0457 M106 S255 G1 X56.6058 Y3.1272 M106 S255 G1 X56.1962 Y3.2631 M106 S255 G1 X55.8008 Y3.4517...
- Page 52 M106 S255 G1 X56.6413 Y4.2614 M106 S255 G1 X57.0201 Y4.1431 M106 S255 G1 X57.4073 Y4.1035 M106 S255 G1 X57.8337 Y4.1514 M106 S255 G1 X58.2187 Y4.2949 M106 S255 G1 X58.5647 Y4.5338 M106 S255 G1 X58.8365 Y4.8442 M106 S255 G1 X59.0006 Y5.1929 M106 S255 G1 X59.0554 Y5.5798 M106 S255...
- Page 53 G1 X56.8525 Y7.6468 M106 S255 G1 X56.4648 Y7.8928 M106 S255 G1 X56.1384 Y8.1375 M106 S255 G1 X55.8734 Y8.3810 M106 S255 G1 X55.6699 Y8.6230 M106 S255 G1 X55.4807 Y8.9356 M106 S255 G1 X55.3456 Y9.2696 M106 S255 G1 X55.2646 Y9.6250 M106 S255 G1 X55.2375 Y10.0016 M106 S255 G1 X55.2809 Y10.4893...
- Page 54 M106 S255 G1 X57.6681 Y12.3514 M106 S0 G0 X70.5913 Y5.6862 F10000 M106 S255 G1 X69.6287 Y6.1920 F1000 M106 S0 G0 X66.2516 Y4.0628 F10000 M106 S255 G1 X66.7377 Y4.0916 F1000 M106 S255 G1 X67.1945 Y4.1780 M106 S255 G1 X67.6213 Y4.3207 M106 S255 G1 X68.0104 Y4.4983 M106 S255 G1 X68.3593 Y4.7036...
- Page 55 G1 X70.0138 Y4.7469 M106 S255 G1 X69.7037 Y4.3827 M106 S255 G1 X69.3785 Y4.0829 M106 S255 G1 X69.0334 Y3.8200 M106 S255 G1 X68.6673 Y3.5902 M106 S255 G1 X68.2812 Y3.3938 M106 S255 G1 X67.8726 Y3.2314 M106 S255 G1 X67.4180 Y3.1131 M106 S255 G1 X66.9101 Y3.0422 M106 S255 G1 X66.3497 Y3.0185...
- Page 56 M106 S255 G1 X63.3226 Y4.0737 M106 S255 G1 X62.9963 Y4.3968 M106 S255 G1 X62.7003 Y4.7550 M106 S255 G1 X62.4434 Y5.1281 M106 S255 G1 X62.2257 Y5.5155 M106 S255 G1 X62.0478 Y5.9166 M106 S255 G1 X61.9095 Y6.3316 M106 S255 G1 X61.8107 Y6.7606 M106 S255 G1 X61.7514 Y7.2036 M106 S255...
- Page 57 G1 X62.4928 Y10.2855 M106 S255 G1 X62.7675 Y10.6705 M106 S255 G1 X63.0705 Y11.0235 M106 S255 G1 X63.3954 Y11.3346 M106 S255 G1 X63.7421 Y11.6044 M106 S255 G1 X64.1108 Y11.8326 M106 S255 G1 X64.5018 Y12.0195 M106 S255 G1 X64.9144 Y12.1648 M106 S255 G1 X65.3489 Y12.2684 M106 S255 G1 X65.8053 Y12.3307...
- Page 58 M106 S255 G1 X68.9018 Y11.5863 M106 S255 G1 X69.2591 Y11.3099 M106 S255 G1 X69.5940 Y10.9913 M106 S255 G1 X69.9058 Y10.6303 M106 S255 G1 X70.1619 Y10.2703 M106 S255 G1 X70.3789 Y9.8862 M106 S255 G1 X70.5575 Y9.4772 M106 S255 G1 X70.6973 Y9.0438 M106 S255 G1 X70.7984 Y8.5854 M106 S255...
- Page 59 G1 X63.3521 Y5.7965 M106 S255 G1 X63.5896 Y5.4193 M106 S255 G1 X63.8750 Y5.0717 M106 S255 G1 X64.2057 Y4.7633 M106 S255 G1 X64.5616 Y4.5111 M106 S255 G1 X64.9436 Y4.3150 M106 S255 G1 X65.3525 Y4.1750 M106 S255 G1 X65.7888 Y4.0908 M106 S255 G1 X66.2506 Y4.0628 M106 S0 G0 X69.6286 Y8.5828 F10000...
- Page 60 M106 S255 G1 X67.6926 Y10.9778 M106 S255 G1 X67.2612 Y11.1337 M106 S255 G1 X66.7970 Y11.2270 M106 S255 G1 X66.3007 Y11.2582 M106 S255 G1 X65.8751 Y11.2349 M106 S255 G1 X65.4709 Y11.1649 M106 S255 G1 X65.0866 Y11.0481 M106 S255 G1 X64.7229 Y10.8847 M106 S255 G1 X64.3796 Y10.6748 M106 S255...
- Page 61 G1 X69.6287 M106 S0 G0 X73.7488 Y12.1229 F10000 M106 S255 G1 X72.5822 F1000 M106 S255 G1 Y3.2469 M106 S255 G1 X73.7488 M106 S255 G1 Y6.2491 M106 S0 G0 X73.9608 Y9.3164 F10000 M106 S255 G1 X73.9046 Y9.0680 F1000 M106 S255 G1 X73.8571 Y8.7565 M106 S255 G1 X73.8181 Y8.3814 M106 S255...
- Page 62 M106 S255 G1 X74.0838 Y11.2690 M106 S255 G1 X74.4376 Y11.6417 M106 S255 G1 X74.8072 Y11.9439 M106 S255 G1 X75.2035 Y12.1703 M106 S255 G1 X75.6190 Y12.3061 M106 S255 G1 X76.0572 Y12.3514 M106 S255 G1 X76.3802 Y12.3179 M106 S255 G1 X76.7175 Y12.2173 M106 S255 G1 X77.0691 Y12.0495 M106 S255...
- Page 63 G1 X74.5779 Y10.5675 M106 S255 G1 X74.3309 Y10.2134 M106 S255 G1 X74.1254 Y9.7967 M106 S255 G1 X73.9611 Y9.3169 M106 S0 G0 X81.7691 Y10.3934 F10000 M106 S255 G1 X82.5033 Y11.1521 F1000 M106 S0 G0 X80.0398 Y12.3514 F10000 M106 S255 G1 X80.4481 Y12.3181 F1000 M106 S255 G1 X80.8572 Y12.2182 M106 S255...
- Page 64 M106 S255 G1 X80.6874 Y11.1403 M106 S255 G1 X80.3332 Y11.2471 M106 S255 G1 X79.9826 Y11.2826 M106 S255 G1 X79.5708 Y11.2250 M106 S255 G1 X79.2055 Y11.0524 M106 S255 G1 X78.8949 Y10.7718 M106 S255 G1 X78.7010 Y10.4371 M106 S255 G1 X78.6364 Y10.0591 M106 S255 G1 X78.7180 Y9.6367 M106 S255...
- Page 65 G1 X81.2209 Y7.7760 M106 S255 G1 X81.5667 Y7.5215 M106 S255 G1 X81.8474 Y7.2708 M106 S255 G1 X82.0627 Y7.0242 M106 S255 G1 X82.2591 Y6.7045 M106 S255 G1 X82.3993 Y6.3654 M106 S255 G1 X82.4834 Y6.0069 M106 S255 G1 X82.5115 Y5.6293 M106 S255 G1 X82.4733 Y5.1561 M106 S255 G1 X82.3588 Y4.7174...
- Page 66 M106 S255 G1 X79.8279 Y3.0185 M106 S255 G1 X79.3967 Y3.0457 M106 S255 G1 X78.9767 Y3.1272 M106 S255 G1 X78.5671 Y3.2631 M106 S255 G1 X78.1719 Y3.4517 M106 S255 G1 X77.8117 Y3.6841 M106 S255 G1 X77.4907 Y3.9584 M106 S255 G1 X77.2089 Y4.2745 M106 S255 G1 X77.9266 Y5.0907 M106 S255...
- Page 67 G1 X80.5897 Y4.2949 M106 S255 G1 X80.9378 Y4.5338 M106 S255 G1 X81.2076 Y4.8442 M106 S255 G1 X81.3716 Y5.1929 M106 S255 G1 X81.4264 Y5.5798 M106 S255 G1 X81.3469 Y6.0431 M106 S255 G1 X81.1084 Y6.4529 M106 S255 G1 X80.8992 Y6.6529 M106 S255 G1 X80.5903 Y6.8772 M106 S255 G1 X80.1814 Y7.1261...
- Page 68 M106 S255 G1 X77.8517 Y8.9356 M106 S255 G1 X77.7165 Y9.2696 M106 S255 G1 X77.6356 Y9.6250 M106 S255 G1 X77.6085 Y10.0016 M106 S255 G1 X77.6519 Y10.4893 M106 S255 G1 X77.7821 Y10.9324 M106 S255 G1 X77.9990 Y11.3317 M106 S255 G1 X78.3027 Y11.6871 M106 S255 G1 X78.6707 Y11.9776 M106 S255...
- Page 69 G1 X27.8161 M106 S255 G1 Y21.5261 M106 S0 G0 X0.0000 Y0.0000 F10000 ;(Footer) M107 ;Print cooling fan off (disable laser) ;Absolute positioning G92 X0 Y0 Z0 ;Reset selected workspace to 0, 0, 0 G0 X0 Y0 ;(Footer end)
Need help?
Do you have a question about the PLH3D-2W and is the answer not in the manual?
Questions and answers