Table of Contents
Advertisement
Quick Links
Operating and installation instructions
EWFS Weather station eco
Keep for future use!
Valid from 01 October 2019
General information
1
2
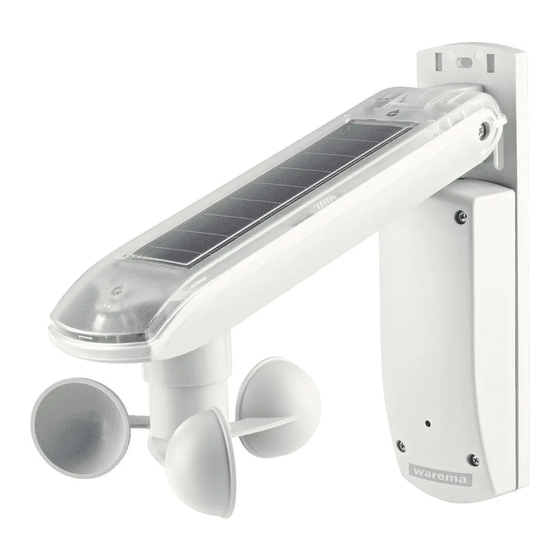
Fig. 1
EWFS Weather station eco
1 Solar panel
2 Photo diodes (photo sensor)
3 Wind wheel (wind sensor)
4 Joint
5 Mounting plate with cover
A USB connecting cable to the alternative power
supply during commissioning is found under the cover.
The EWFS Weather station eco enables the wireless
control of sun shading drives and is equipped with
sensors for brightness and wind speed. The station is
solar powered. The device sends move commands to
EWFS-compatible receivers.
Tntended use
The EWFS Weather station is an electronic device
to control sun shading systems. The approval of the
manufacturer must be obtained for uses outside of the
purposes listed in these instructions.
Safety instructions
W
CAOTOG
Cn automatically controlled mechanism
may begin to move unexpectedly!
Therefore, never place any objects in the area of
movement of an automatically controlled mechanism.
Disconnect the power supply of the controlled sun
shading products before maintaining or cleaning the
products.
890463_k•en•2019-10-01
4
5
3
C
CAUTIO
Never activate buttons on your transmitter
arbitrarily without visual contact to the sun
shading product. Children may not play
with this product - Remote controls or
transmitters may not get into the hands of
children!
The receiver (e.g. the radio plug receiver,
O
IUTCCE
radio tubular motor) cannot function in the
event of a power failure. Therefore, raise the
sun shading system early enough in case of
an approaching storm.
The radio control range is limited by legal regulations for
radio systems and by structural factors. Adequate radio
reception must be taken into consideration when planning
the system. This is particularly important when the radio
signal must pass through walls and ceilings. The control
unit should not be installed in the immediate vicinity of
metal components (steel beams, steel-reinforced concrete,
fire door).
Therefore, check that the receiver is functioning
properly before the final installation.
Strong local transmitter systems (e.g. baby monitors or
neighbouring transmitters) can interfere with the reception.
Tnstallation
This device is designed for surface mounting on a building
facade. It can also be mounted on a pole using the
included cable ties.
Included fixing materials:
2 screws 4.5 x 40 mm
2 dowels 6 mm
2 spacers for wall and ceiling installation (Fig. 2)
2 steel cable ties 360 mm
Use suitable fixing materials only. Depending on the
substructure (e.g. plastered outer insulation), other screws
and dowels may need to be used.
Tmportant information on the installation location
Attach the device outdoors at a readily accessible but
raised location.
Metal-clad buildings, domestic interference sources
(unshielded household appliances, television sets,
computers), supply lines and metallic objects such
as sheet metal enclosures must have a distance of at
least 0.5 m from the weather station.
Install the device in a position in which the wind
wheel is horizontal (housing inclination of 15°). When
installing the device on sloped surfaces, the sensor
can be positioned horizontally using the joint (Fig. 1).
We reserve the right to carry out improvements
1
Advertisement
Table of Contents

Related Manuals for WAREMA EWFS Weather station eco


Summary of Contents for WAREMA EWFS Weather station eco
- Page 1 Strong local transmitter systems (e.g. baby monitors or neighbouring transmitters) can interfere with the reception. The EWFS Weather station eco enables the wireless control of sun shading drives and is equipped with Tnstallation sensors for brightness and wind speed.
- Page 2 Wall mounting When selecting the installation location, ensure that the solar panel is sufficiently supplied with sunlight. For example, an overhanging roof may shade the panel at certain times of the day. Also avoid installing it on the north face of buildings. Before installing the device, consider that trees, bushes or parts of the building may shade the photo sensor during the course of the day.
- Page 3 Remove the thin (triangular) pieces at the top and Wait approx. 5 minutes for the weather station to bottom edge of the mounting plate using a wire cutter charge fully. (Fig. 6 *). Then press the button for at least 5 seconds. Pass the included steel cable ties through the The status LED lights up green once.
- Page 4 Learning in the weather station Learn in the weather station as an auxiliary channel: The weather station sends wind- or brightness-related Press the button on the move commands to an EWFS receiver. It must be learned weather station and hold it into the receiver first.
- Page 5 If the sun shading system does not move up, the wind sensor may not have been learned. To test whether the wind sensor was correctly learned into the receiver: Learn in wind monitoring: Press the button on the Move the "Wind" switch on the weather station to any weather station and hold it position other than TEST.
- Page 6 Changing the limit values Switching the sun control on/off permanently Set the switch for the sun control on the weather CAUTIO station to OFF. Changing these settings may impair The weather station stops sending brightness-related the safety of the system or reduce its move commands.
- Page 7 This device meets the EMC directives for use in residential and commercial areas. WAREMA Renkhoff SE declares herewith that this radio system type [EWFS Weather station eco] is in compliance with the current guidelines. Cmbient conditions Operating and storage °C...
- Page 8 Uroubleshooting Uype of malfunction Possible cause Aemedy The sun shading system does not wave The receiver is not in learn mode Place the receiver into learn mode when the button is pressed (the status No operating voltage at the receiver Switch on the mains voltage LED flashes green while the button is...
Need help?
Do you have a question about the EWFS Weather station eco and is the answer not in the manual?
Questions and answers