Table of Contents
Advertisement
Quick Links
Satellite LED Plus Pro
Instructions
To avoid injury and possible electric shock, it is imperative you:
READ AND FOLLOW ALL SAFETY INSTRUCTIONS AND WARNINGS
Important Warnings | Save these Instructions
This is NOT a page of legalese. It contains important safety information that you should read and save for future
reference. Remember you can always quickly reference instructions for all Ecoxotic products on our website.
ver attempt repairs yourself; return the appliance to an authorized service facility for service or discard the appliance.
ver plug in a wet cord. If a plugged in unit or socket does get wet, DON'T touch it. Instead, promptly disconnect the fuse or circuit
service facility.
rvision is necessary when any appliance is used by or near children.
from the GFCI outlet.
manufacturer may cause an unsafe condition and will void your warranty.
Do not operate at temperatures above 50º Celsius or 122º Fahrenheit.
If an extension cord is necessary, a cord with a rating of at least 15 amperes should be used. A cord rated for less amperes or watts than
Do not look directly into the LEDs.
Important Warnings: Drip Loops
Drip Loops should always be used to help prevent water from traveling along the cord and coming into contact with an electrical outlet.
Drip loops must always be below the level of the outlet. If the plug or outlet does get wet, DO NOT TOUCH the cord. Disconnect the fuse
or circuit breaker that supplies power to the system. After disconnecting the power, unplug and examine for the presence of water. To
help protect the transformer, use the included Velcro tape attachment to secure it either inside the aquarium stand or anywhere it is safe
from potential water spills.
Grounding Instructions:
This LED system must be powered with a UL approved 24VDC transformer. To
avoid possible electric shock, this transformer must be plugged into a GFCI
protected AC outlet that is installed and grounded in accordance with all appropriate codes
and ordinances.
Maintenance:
We recommend cleaning your light xture once per week using a slightly damp towel or shammy with a bit of freshwater. Remove any
mineral deposits and salt creep which may build up on your xture. Remove from service if any rust or corrosion is found. Always clean
your light with it removed from your aquarium and unplugged from the transformer and wall outlet.
www.current-usa.com
GFCI
Outlet
Drip
Loop
PAGE 1 of 6
Advertisement
Table of Contents

Related Manuals for Current Satellite LED Plus Pro

Summary of Contents for Current Satellite LED Plus Pro
- Page 1 Satellite LED Plus Pro Instructions To avoid injury and possible electric shock, it is imperative you: READ AND FOLLOW ALL SAFETY INSTRUCTIONS AND WARNINGS Important Warnings | Save these Instructions This is NOT a page of legalese. It contains important safety information that you should read and save for future reference.
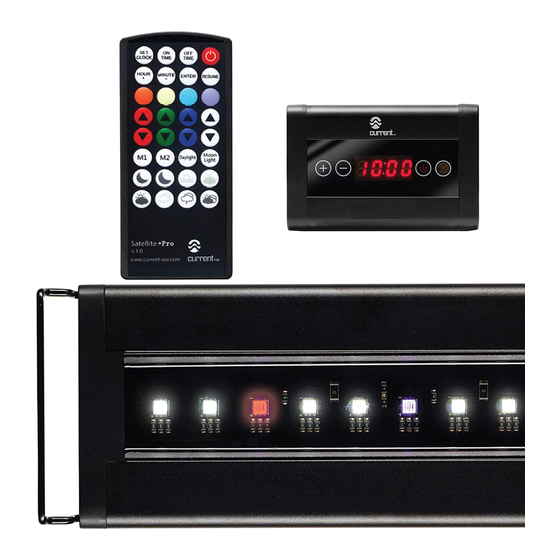
- Page 2 Slide the adjustable docking legs on the side of the fixture to match the length of your aquarium. Set fixture on your aquarium and adjust docking mounts to ensure a snug fit. Figure 1 RGBW Controller 03:00 LED Strip www.current-usa.co m 12VDC Transformer Wireless LED Remote v.1.0 www.current-usa.co m Connect the 12VDC transformer to the DC plug on the RGBW controller.
- Page 3 Wireless IR Remote Guide Set Clock On/Off Time Main On/Off CLOCK TIME Used for setting the Sets daylight time Turns light on/off current time of day on and off Factory default. TIME Hour+/Minute- Enter HOUR Resume ENTER RESUME Used for changing...
- Page 4 24:00 day (i.e. do not program the lights to turn on/off on different days) 1. Press Set Clock, screen will blink for 3-5 seconds. CLOCK 2. Press Hour+ until current hour is reached HOUR 3. Press Minute - MINUTE until current minutes reached 4.
- Page 5 Note: The RESUME key can be used as a toggle between timing mode and color/dynamic modes. RESUME Please ensure to press RESUME whenever you want the light to go back into the normal timing mode. www.current-usa.com PAGE 5 of 6...
- Page 6 5 seconds. Light will blink and moonlight setting is saved. Moon Light Note: If you do not wish to have moonlight, simply follow the steps above and once all colors are at their lowest (off) setting, press the Moonlight for 5 seconds. Moon Light www.current-usa.com PAGE 6 of 6...
Need help?
Do you have a question about the Satellite LED Plus Pro and is the answer not in the manual?
Questions and answers