Advertisement
Quick Links
Advertisement

Subscribe to Our Youtube Channel
Related Manuals for Tama STARPHONIC


Summary of Contents for Tama STARPHONIC
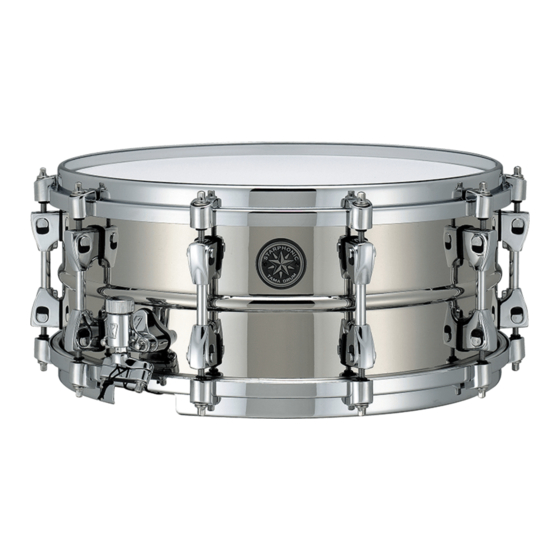
- Page 1 STARPHONIC Concert Snare Drum Instruction Manual...
- Page 2 STARPHONIC Bravura Model features its innovative new “Multi Snare Frame,” equipped with a mechanism that adjusts the contact of the snare side head and wires allowing up and down movement as well as TAMA’s unique snare wire individual tension adjustment of 3 different kinds of wires. Follow the instructions below and get your Thank you for purchasing TAMA’s Concert Snare Drum.
- Page 3 1-1. ADJUSTING WITH THE STRAINER Image10 STARPHONIC Concert Snare Drum model features Hybrid snare wires – A combination of two different wires, six guitar strings sandwiched with three nylon coated stainless wires, producing its unique sound. In order to adjust the tension of the entire snare wires, turn the knobs on the strainer and butt until you get your desired sound.
- Page 4 Replacing Snare Heads Handling the Multi Snare Frame [STARPHONIC Bravura Model] STARPHONIC Bravura Model features the “Multi Snare Frame,” with dual Image19 adjustable mechanisms: one that tailors the head-to-wire contact and the 1.REPLACING BATTER HEADS Image15 other that allows individual tension adjustment of three kinds of wires .
- Page 5 Tension Watch TW100 <CHECKING TENSION WITH TENSION WATCH> For more precise tuning TAMA offers their unique Tension Watch products, the TW100 and TW200. They allow tuners to see the degree of tension in numbers and help create maximum performance.
- Page 6 2-2. 3 つのスネアワイヤー・テンションを均等に調整する スターフォニック・コンサート・スネアドラムでは、スネアワイヤー全体 バット側の調整ノブ D では 3 本のスネアワイヤーのテンションを均等に調 の調整機能に加え、 ハイブリッド ・ スネアワイヤーの中央にある 6 本のギター 整することができます。上記「2-1. それぞれのスネアワイヤー・テンショ ストリングスだけを独立して調整するファインアジャスター機能がありま ンを調整する」の手順にて、それぞれのスネアワイヤーのテンションを調整 す。 した後、調整ノブ D を回してテンションバランスを維持したまま 3 本同時 ストレイナー全体でのテンション調整を行った後、写真 10 の調整ノブ F にテンションを調整することができます。 を回すことで中央のギターストリングスの強弱を調整してください。 10 STARPHONIC Snare Drum Instrucion Manual STARPHONIC Snare Drum Instrucion Manual...
- Page 7 プレートをストレイナーおよびバットに写真 14 のようにはめ込み、固定プ す時と逆の手順でスネア本体に取り付けてください。その際、黒いスネア レートを被せます。固定プレートはチューニングキーを使ってしっかりと コードを黒いフックを倒してセットしてください。フックでの固定を行わ 固定してください。 写真 14 ない場合、演奏中にフレームが脱落することがあります。 ※ストレイナー側にはファインアジャスターが装備されています。スネア ワイヤーを交換する際には、このファインアジャスターを忘れずにストレ イナー側の固定プレートに取り付けてください。 [STARPHONIC モデル ] スターフォニック・コンサートスネアドラムでは、ドラムヘッドの交換の 写真 18 際にテンションボルトをフープから抜き取る必要のないフリーダムラグが 採用されています。 ドラムヘッド交換時には、テンションボルトを緩めた後、写真 18 のように フープを固定しているフックごとテンションボルトを斜めに倒し、フープ を取り外してください。テンションボルトをラグから取り外す必要はあり ません。 新しいドラムヘッドに交換した後は再びフープを取り付けて、テンション ボルトの先端についたフックをフープの溝にはめ込むように固定します。 すべてのテンションボルトの取り付けが終わりましたら、通常のスネアド ラムのようにチューニングを行ってください。 12 STARPHONIC Snare Drum Instrucion Manual STARPHONIC Snare Drum Instrucion Manual...
- Page 8 この 4 箇所のテンションボルトを規定の場所以外にセットすると、マルチ スネアフレームを保護するための機能が十分に発揮されないことがありま テンションウォッチ TW200 す。これらのテンションボルトは既定の場所以外に使用しないようにして < スネアサイドヘッドのチューニング > ください。 スネアドラムのチューニングでは、打面側 ( バターサイド ) と裏側 ( スネア サイド ) のバランスを整えることが重要です。基本的にはバターサイドの ※マルチスネアフレームは側面 4 か所に、スネアコードをひっかけるメタ チューニングを行った際には、スネアサイドのチューニングも行うように ルフックと黒いロックレバーが設置されています。ロックレバーをオフに してください。 してスネアコードを外せば、スネアフレーム自体を取り外すことができま す。スネアコードを取り外すと再度長さを調整する必要がありますので、 必要な時以外はスネアコードを外さないでください。 14 STARPHONIC Snare Drum Instrucion Manual STARPHONIC Snare Drum Instrucion Manual...
- Page 9 星野楽器株式会社 〒461-8717 愛知県名古屋市東区橦木町 3-22 http://www.tama.com/ ■ This instruction manual was issued in November 2019. Specifications and design are subject to change without notice. ■ この取扱説明書は2019年 11 月現在の物です。 商品改良のため予告なく仕様を変更するこ とがありますので、 あらかじめご了承ください。...
Need help?
Do you have a question about the STARPHONIC and is the answer not in the manual?
Questions and answers