Advertisement
Quick Links
Advertisement

Related Manuals for Festo Bionic Fish


Summary of Contents for Festo Bionic Fish
- Page 1 Bionic Fish Assembly Instructions...
- Page 2 4. Small, waterproof servo motor (marked with a sticker) 5. Connecting element 6. Cable ties 7. Sealing rings – 2 8. Tube (clear) 9. Electronic board with microcontroller 10. Material for fish tail and body (plastic poster board) Festo AG & KG Festo Didactic SE...
- Page 3 Equipment and Supplies, continued Additionally required: Water basin 4-AA batteries Scissors Items to balance the fish (nuts, bolts, coins, etc.) Phillips head screwdriver Festo AG & KG Festo Didactic SE...
-
Page 4: Start Here
Align the screw holes and connect the pieces together using the 2 screws and a screwdriver. Assemble the small fins using the small support pieces, the shorter screws, nuts, and tools. Festo AG & KG Festo Didactic SE... - Page 5 Place the two sealing rings on each end of the connecting element. Required items: assembled tail fin (large) Attach the large tail fin to one side of the connecting element. Twist to lock it in place. Festo AG & KG Festo Didactic SE...
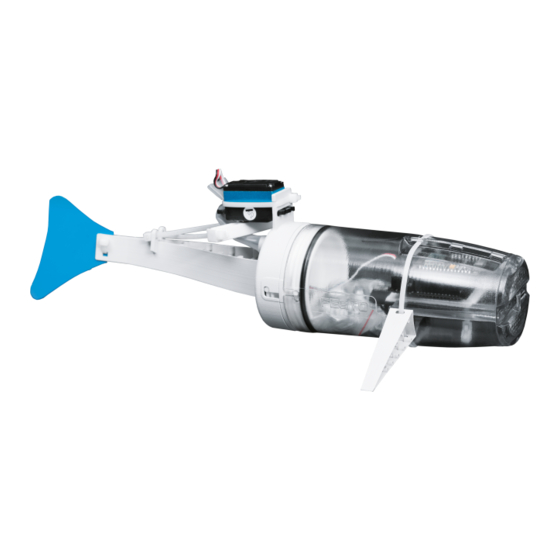
- Page 6 Attach the waterproof servo motor to the holder on the large tail fin, such that the rudder horn of the motor points downwards. Guide the cable of the servo motor through the clear tube. Festo AG & KG Festo Didactic SE...
- Page 7 Required items: 1 cable tie While holding the clear tube against the servo motor, connect it to the large tail fin with a cable tie. Shorten the cable tie, if necessary. Festo AG & KG Festo Didactic SE...
- Page 8 Carefully move the rudder horn back and forth with your finger to check the tension of the cable ties. If the fin does not move evenly, the length or the tension of the cable ties may have to be corrected. Festo AG & KG Festo Didactic SE...
- Page 9 Insert the batteries, 2 on each side of the electronic board with microcontroller. Required items: electronic board with microcontroller, small waterproof servo motor Insert the plug of the servo motor into one of the electronics board’s set of pins. Festo AG & KG Festo Didactic SE...
- Page 10 Turn the switch “on”. The small light on the electronics board turns on. Required items: tail fin (large) Attach the connecting element onto the transparent corpus (body). Twist to lock it into place. Festo AG & KG Festo Didactic SE...
- Page 11 Pass the cable tie through the openings located on the tail fins and also on the corpus (body). The two small tail fins serve as lateral fins. Shorten the cable tie, if necessary Festo AG & KG Festo Didactic SE...
- Page 12 Draw your desired fin shape on the material and cut it out. Then make two small holes in the fin so that it can be attached to the large tail fin. Festo AG & KG Festo Didactic SE...
- Page 13 Attach your fin to the small end of the tail fin (large) using a cable tie. Shorten the cable tie, if necessary. Optional: make a body for your bionic fish Would you like to add a body to your robotic fish? Simply print the body template...
- Page 14 Congratulations! Your Bionic Fish is ready. Continue with the next steps in the Getting Started section on the bionics4education website to learn how to adjust your fish’s weight and control your bionic fish. Festo AG & KG Festo Didactic SE...
Need help?
Do you have a question about the Bionic Fish and is the answer not in the manual?
Questions and answers