Table of Contents
Advertisement
Quick Links
Advertisement
Table of Contents
Troubleshooting

Subscribe to Our Youtube Channel
Related Manuals for Ultra electronics HYPERSPIKE HS-14 RAHD

Summary of Contents for Ultra electronics HYPERSPIKE HS-14 RAHD
- Page 1 OPERATION AND MAINTENANCE MANUAL ® HYPERSPIKE MODEL HS-14 RAHD...
-
Page 3: Table Of Contents
® HyperSpike HS-14 RAHD Operation and Maintenance Manual TABLE OF CONTENTS Contents 1. Hardware ..........................1 1.1. Hardware ...........................1 1.2. Included in Box ........................2 2. Hardware Specifications ......................3 2.1. Physical Characteristics .....................3 2.2. Electrical Specifications .....................3 2.3. Acoustic Specifications ......................3 3. RAHD and Electronics Assembly Setup ...................4 3.1. - Page 4 ® HyperSpike HS-14 RAHD Operation and Maintenance Manual 8.2. Limitation of Implied Warranties ..................35 8.3. Exclusion of Certain Damages ..................35 Copyright © "RSB Group", Moscow, Krzhizhanovskogo str., 14/2 Rev A 90169A-MAN-HS14RAHD...
- Page 5 ® HyperSpike HS-14 RAHD Operation and Maintenance Manual SAFETY PRECAUTIONS ® The HyperSpike HS-14 RAHD uses high operating voltages and sound levels. The primary safety risks are: 1) electrical shock and 2) hearing damage or loss. Only properly trained personnel should operate the HS-14 RAHD and abide by the critical safety warnings identified in this manual to prevent injury or death during operation.
-
Page 6: Hardware
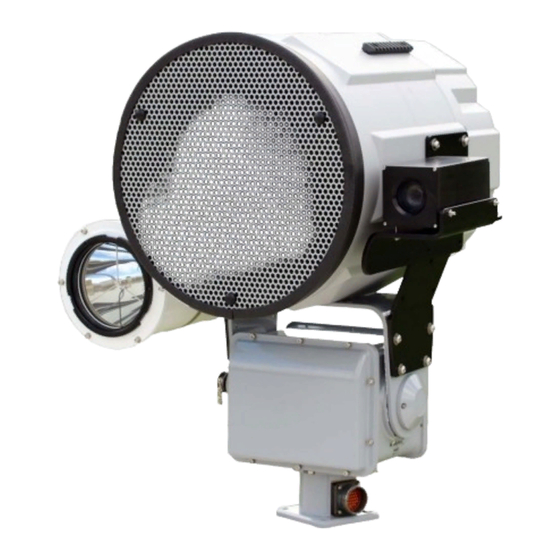
® HyperSpike HS-14 RAHD Operation and Maintenance Manual 1. Hardware 1.1. Hardware ® The HyperSpike HS-14 RAHD (Remote Acoustic Hailing Device) is designed for ease of assembly. It is suitable for both static and mobile applications. The RAHD unit can be equipped with optional accessories including but not limited to cameras, spotlights, and laser dazzlers per customer requirements. -
Page 7: Included In Box
® HyperSpike HS-14 RAHD Operation and Maintenance Manual 1.2. Included in Box Included Items are: 1x HS-14 RAHD Assembly, P/N 90169A-801-XX 1x Power/Data Cable, P/N 42222A-801 1x Interconnect Cable, P/N 42206A-801 Figure 1.2-1 HS-14 RAHD – In Packaging CAUTION: The HS-14 RAHD ASSEMBLY IS A MINIMUM TWO PERSON LIFT HEAVY OBJECT - OVER 50 lbs Straps connected to the mounting bracket and pan/tilt base may be used to assist lifting Copyright ©... -
Page 8: Hardware Specifications
® HyperSpike HS-14 RAHD Operation and Maintenance Manual 2. Hardware Specifications 2.1. Physical Characteristics HS-14 RAHD WEIGHT Complete System 83.6 lbs (37.9 kg) HS-14 RAHD DIMENSIONS System Width 15.4 in (39.1 cm) System Height 27.1 in (68.8 cm) System Depth 18.6 in (47.2 cm) Front Wind Load Area 260 in... -
Page 9: Rahd And Electronics Assembly Setup
® HyperSpike HS-14 RAHD Operation and Maintenance Manual 3. RAHD and Electronics Assembly Setup 3.1. RAHD Installation and Mounting Secure the Sound Emitting Assembly and transformer box (if equipped) to a stable surface. To maximize water protection, the recommended orientation of the transformer box is with connectors facing down. - Page 10 ® HyperSpike HS-14 RAHD Operation and Maintenance Manual Figure 3.1-2 HS-14 RAHD Interface Mounting Dimensions Figure 3.1-3 Transformer Box Interface Mounting Dimensions Copyright © "RSB Group", Moscow, Krzhizhanovskogo str., 14/2 Rev A 90169A-MAN-HS14RAHD...
-
Page 11: System Wiring
® HyperSpike HS-14 RAHD Operation and Maintenance Manual 3.2. System Wiring WARNING: AC INPUT POWER MUST BE DISCONNECTED OR REMOVED FROM THE SYSTEM PRIOR TO CONNECTING OR DISCONNECTING ANY CABLES There are six sealed, weather resistant, connectors on the HS-14 RAHD, and one connector on the transformer enclosure. -
Page 12: Connection #1: Interconnect Cable
® HyperSpike HS-14 RAHD Operation and Maintenance Manual To wire your HS-14 RAHD for operation, refer to the following wiring instructions: 3.2.1. Connection #1: Interconnect Cable Connect the Interconnect Cable, P/N 42206A-801, from connector C to connector E. This cable passes data and AC power to the Emitter’s electronics housing. Tighten each end of the cable firmly to ensure a weather tight seal. -
Page 13: Wiring Diagram For 110 Vac Installation- With Transformer
® HyperSpike HS-14 RAHD Operation and Maintenance Manual 3.3. Wiring Diagram for 110 VAC Installation- With Transformer Copyright © "RSB Group", Moscow, Krzhizhanovskogo str., 14/2 Rev A 90169A-MAN-HS14RAHD... -
Page 14: Wiring Diagram For 220 Vac Installation- With Transformer
® HyperSpike HS-14 RAHD Operation and Maintenance Manual 3.4. Wiring Diagram for 220 VAC Installation- With Transformer 3.5. Connection #3 Auxiliary Connections (optional) Accessories such as search lights, laser dazzlers and cameras can be powered and controlled via connectors A, B, and D. Some accessories require unique interfaces with the HS-14 RAHD; therefore, please connect your accessories according to the following recommendations. -
Page 15: Networking And Device Setup
® HyperSpike HS-14 RAHD Operation and Maintenance Manual 4. Networking and Device Setup The HS-14 RAHD is designed to be controlled over a TCP/IP based network equipped with a DHCP server. When powered on, the HS-14 RAHD should receive an IP address from the network’s DHCP server. -
Page 16: Controls And Operations
® HyperSpike HS-14 RAHD Operation and Maintenance Manual 5. Controls and Operations The following subsections will guide you through the use of the HS-14 RAHD’s Command and Control Interface (CCI). While all necessary user functions are readily accessible through the CCI, if a user desires to write custom control software, a Software Development Kit (SDK) is also available. -
Page 17: Login Page
® HyperSpike HS-14 RAHD Operation and Maintenance Manual Figure 5.1-1 Device Setup Click on the blue “Setup” button to continue to the login screen. Once one HS-14 RAHD has been configured, follow the procedure listed in section 5.3 to setup any additional HS-14 RAHDs. -
Page 18: Simultaneously Controlling Multiple Rahds
® HyperSpike HS-14 RAHD Operation and Maintenance Manual If login was completed successfully, the CCI Home Page will be presented. If the username or password is forgotten, click on “Forgot Password?” to initiate the reset process. In the text boxes, enter the following information: Reset Token- The full serial number of the device. - Page 19 ® HyperSpike HS-14 RAHD Operation and Maintenance Manual Figure 5.3-1 Add Device “+” Button Enter the IP address of the device you would like to add in the “IP Address/Hostname” field, and enter an identifying name for the device in the “Name” field. If you don’t know the IP address of the device, consult your network manager.
-
Page 20: Removing A Device
® HyperSpike HS-14 RAHD Operation and Maintenance Manual Figure 5.3-3 Multiple Connected Devices After adding a new HS-14 RAHD, inspect the Status Indicator. If it is not green, refresh your browser page. If the indicator remains red, refer to Section 7- Troubleshooting. 5.4. -
Page 21: Volume Panel
® HyperSpike HS-14 RAHD Operation and Maintenance Manual 5.5. Volume Panel Figure 5.5-1 Volume Panel Adjust the slider to vary the master Volume Level of the system. When the slider is all the way to the left, the volume of each RAHD is set to 0% of its individual maximum volume. When the slider is all the way to the right, the volume of each RAHD is set to 100% of its individual maximum volume. -
Page 22: Uploading Audio Files
® HyperSpike HS-14 RAHD Operation and Maintenance Manual Figure 5.6-2 Playing a File 5.6.1. Uploading Audio Files To add an audio file, click on the “+” button in the “Tracks” pane of the Side Panel. This will open the Add Track menu. Drag and drop files into the popup window, or use the file browser to select desired files. -
Page 23: Editing Or Deleting A Track
® HyperSpike HS-14 RAHD Operation and Maintenance Manual 5.6.3. Editing or Deleting a Track To edit or delete a track, click on the “Information” circle next to the track name. This will bring up the Edit Track menu. Figure 5.6-4 Edit Track Menu The name of a track can be changed by replacing the text in the “Name”... -
Page 24: Points Of Interest (Poi)
® HyperSpike HS-14 RAHD Operation and Maintenance Manual Figure 5.7-2 Live Microphone Active 5.8. Points of Interest (POI) POIs are preset pan and tilt coordinates. Users may use this feature of the CCI to quickly position the acoustic hailing device to a frequently targeted area. Points of Interest can be designated by selecting the “+”... - Page 25 ® HyperSpike HS-14 RAHD Operation and Maintenance Manual Figure 5.8-2 Add POI Popup Window-2 Multiple devices can share POI’s that have the same name, but with different angular positions. This allows multiple devices to simultaneously target the same area, even if the RAHDs are located in different areas.
-
Page 26: Tours
® HyperSpike HS-14 RAHD Operation and Maintenance Manual Figure 5.8-4 Restore Deleted POI ” To move to a POI, simply select the “ button to the right of the POI name. Figure 5.8-5 POI Start Button 5.9. Tours When desired, an HS-14 RAHD can execute automated, pre-designated, tours. The user has the ability to define movements in the pan and tilt axes, audio output, and accessory controls. - Page 27 ® HyperSpike HS-14 RAHD Operation and Maintenance Manual Figure 5.9-1 Add Tour Popup Start by entering a name for the tour you are about to create. If you have multiple RAHDs connected, you can create a tour with the same name, but different actions, for each device. This means that with one key press you can trigger multiple devices to do independent designated routines.
- Page 28 ® HyperSpike HS-14 RAHD Operation and Maintenance Manual Tours are defined in the following manner: • Start This is the point where the tour begins. Regardless of the HS-14 RAHDs angular position at the time it is commanded to begin a tour, it will always move to this position before continuing.
- Page 29 ® HyperSpike HS-14 RAHD Operation and Maintenance Manual Figure 5.9-4 Edit Tour Popup-C To complete the leg, a leg time duration must be specified, or a travel velocity supplied. The direction in which the HS-14 RAHD will travel to reach its destination can also be set as clockwise, counterclockwise, or the fastest direction.
-
Page 30: Dead Zones
® HyperSpike HS-14 RAHD Operation and Maintenance Manual After the system has sequentially executed each of the defined legs, it will return to the start position and repeat the tour in a loop. When finished editing, click on the blue “Save” button as shown in Figure 5.9-1 to create the tour. - Page 31 ® HyperSpike HS-14 RAHD Operation and Maintenance Manual Figure 5.10-1 Edit Device Popup –Dead Zone Creation Enter a name for the Dead Zone you wish to create in the “Name” field of the “Dead Zones” section. A Dead Zone is defined by a range of pan and tilt coordinates.* Enter the desired coordinates within the “Pan”...
-
Page 32: Pan/Tilt Control
® HyperSpike HS-14 RAHD Operation and Maintenance Manual Figure 5.10-2 Dead Zone Warning 5.11. Pan/Tilt Control The HS-14 RAHD is equipped with a rugged Pan/Tilt unit for precise angular positioning. Each connected HS-14 RAHD will appear on the Home Screen with an independent set of controls and status indicators. -
Page 33: All/Select Mode
® HyperSpike HS-14 RAHD Operation and Maintenance Manual Figure 5.11-2 Velocity Slider and Move-By Drop Down If desired, keyboard arrow keys can be used in the same fashion as the on screen buttons. To enable keyboard control, click in the box enclosing the device name. Use Ctrl+Click to select multiple devices. -
Page 34: Account Options And Logout
® HyperSpike HS-14 RAHD Operation and Maintenance Manual Figure 5.12-1 Playing a Track in Select Mode 5.13. Account Options and Logout To change the current master Username or Password, click on the “gear” System Settings icon as shown in Figure 5-1 to pull up the Settings menu. Figure 5.13-1 Settings Menu Clicking on “Account”... -
Page 35: Factory Reset
® HyperSpike HS-14 RAHD Operation and Maintenance Manual Figure 5.13-2 Change Username/ Password Menu To log out of the system, click on the “Logout” button. 5.14. Factory Reset If at any point it is desired to completely remove all tracks, tours, POI’s, dead zones, and user information from a device, a factory reset can be performed. -
Page 36: Preventative Maintenance And Cleaning
® HyperSpike HS-14 RAHD Operation and Maintenance Manual Figure 5.14-1 Factory Reset Before continuing with the Factory Reset, be sure to read the warning that appears. IT IS NOT POSSIBLE TO UNDO A FACTORY RESET. 6. Preventative Maintenance and Cleaning The HS-14 RAHD is a multi-environment device. -
Page 37: Ground Operations And Sandy Environments
® HyperSpike HS-14 RAHD Operation and Maintenance Manual Remember to always inspect the HS-14 RAHD before powering up the unit. Also, check all cables for frays, tears, and rips. If a cable is damaged, do not use it. If the unit or cables require service beyond the methods described in this section, refer to the warranty information in Section 4. -
Page 38: Testing For Network Connectivity
® HyperSpike HS-14 RAHD Operation and Maintenance Manual DO NOT connect the Power/Data cable to the HS-14 RAHD if AC Voltage is not present in accordance with the provided pinout. Function Eth, RJ-45 Pin 1. Wh/Org Eth, RJ-45 Pin 2. Org Eth, RJ-45 Pin 3. -
Page 39: Warranty
If your product should require service, write, phone, fax or e-mail Ultra Electronics USSI at: "RSB Group", Moscow, Krzhizhanovskogo str., 14/2... -
Page 40: Failures Not Covered By This Warranty
8.2. Limitation of Implied Warranties All implied warranties, including warranties of merchantability, are limited in duration to a period of one (1) year from the date of shipment from Ultra Electronics USSI. 8.3. Exclusion of Certain Damages Ultra’s liability is limited to the repair or replacement, at our option, of any defective product, and shall in no event include incidental or consequential commercial damages of any kind.
Need help?
Do you have a question about the HYPERSPIKE HS-14 RAHD and is the answer not in the manual?
Questions and answers