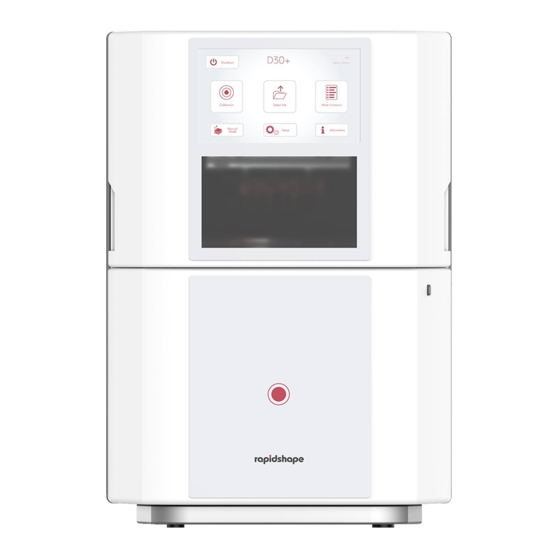
E NV IRO N MEN TA L P ROT E C TI ON! This combination of symbol and signal word indicates potential dangers to the environment. 5 │ 44 Rapid Shape GmbH │ DOCR000231...
— Operation with unauthorised spare parts — Operation with non-wavelength and printing materials not suitable for DLP processing. — Remove or change the attached safety markings — Improper conversions, modifications, repairs and maintenance Rapid Shape GmbH │ DOCR000231 6 │ 44...
UV radiation. They must not be removed or opened during operation. Check that all safety covers are firmly installed and can be completely closed. 7 │ 44 Rapid Shape GmbH │ DOCR000231...
The machine is designed and manufactured according to the state of the art and according to current safety requirements. Nevertheless, residual risks remain, which require prudent action. The following lists the residual risks and the resulting behaviour and measures. Rapid Shape GmbH │ DOCR000231 8 │ 44...
— The machine may only be operated with the protective hood closed. — During the printing process and the manual procedure of the building platform, no fingers or hands may be inserted into the building space of the machine. 9 │ 44 Rapid Shape GmbH │ DOCR000231...
— It is necessary to provide sufficient fresh air. — Wear appropriate protective clothing and carry out the work with ventilation if necessary. — Follow the dosing instructions of the respective manufacturer. — Read the appropriate safety data sheets carefully. Rapid Shape GmbH │ DOCR000231 10 │ 44...
The operator has been trained by the manufacturer in handling the machine and the necessary accessories and can recognise possible dangers independently and avoid hazards. 11 │ 44 Rapid Shape GmbH │ DOCR000231...
The following describes the personal protective equipment: UV protective goggles Wearing UV goggles protects the eyes from harmful UV radiation. Protective gloves Wearing protective gloves protects the skin from contact with skin damaging materials. Rapid Shape GmbH │ DOCR000231 12 │ 44...
Improper disposal of printing materials and cleaning agents can cause considerable damage to the environment. — Dispose of all materials according to local waste disposal regulations. Please take note of the safety data sheets of the respective materials. 13 │ 44 Rapid Shape GmbH │ DOCR000231...
Operating instructions D30+ │ P30+ │ SheraPrint 30 Serial plate The serial plate is situated on the machine rear It shows the most important technical data and the serial number of the machine. Figure 2: Serial plate D30+ (sample) 15 │ 44 Rapid Shape GmbH │ DOCR000231...
(ShockWatch®) immediately upon receipt for visible damage. Damage must be recorded in written and image form and then immediately reported to the transport company and Rapid Shape. Transport Lift the machine by two people and carry it to the destination. When using lifting and transport means, these must be designed for the weight of the machine.
The standard delivery includes the following parts: — 3D printing system — Starter package Optionally, additional accessories can be supplied. For more information, please contact Rapid Shape. Storing the machine Store the machine — in a dry, dust-free and frost protected room.
— UV-protected exposure — stable base (table) — Internet connection (LAN/WLAN) The following optional requirements are recommended: — Sink with fresh water — Compressed air supply — Air conditioned environment Rapid Shape GmbH │ DOCR000231 18 │ 44...
Be careful not to trip over cables lying around. Recommended: Connect the network cable to the Ethernet port on your machine (back of the machine) and to your network interface. 19 │ 44 Rapid Shape GmbH │ DOCR000231...
For the production of print data (CAD design, nesting and slicing), as well as for service purposes, you need the following software on your — netfabb Rapid Shape (→ USB stick or www.rapidshape.de/kc) — TeamViewer Host (→ www.teamviewer.com) 21 │ 44...
Netfabb The slicing software 'netfabb' is needed for the further processing of your print file. For further information on the operation of netfabb, refer to the separately available operating instructions. → netfabb Rapid Shape GmbH │ DOCR000231 22 │ 44...
Delayed' button. Enter the day and time for the delayed start. Equip the machine with a material reservoir with sufficient printing material and a clean building platform. Leave the machine switched on. 3. Start your job selection by pressing the 'Start' button. 23 │ 44 Rapid Shape GmbH │ DOCR000231...
(→ Figure 6) 1. Main menu: Change directly to the menu level by pressing the 'Calibration' button. 2. Perform the calibration according to the instructions in this manual and the instructions on the machine. Rapid Shape GmbH │ DOCR000231 24 │ 44...
3. Change to the network settings by pressing the 'Network Settings' button. 4. For further settings, and for service purposes, you can log into the service menu. Some settings can only be done by Customer service (password protected). Figure 7: ‚Setup’ 25 │ 44 Rapid Shape GmbH │ DOCR000231...
1. Main menu: Change directly to the menu level by pressing the 'Information' button. 2. Switch between the 'General Info', 'Network Info' and 'Light Sensor' displays by pressing the respective buttons. Figure 8: ‚Information’ Rapid Shape GmbH │ DOCR000231 26 │ 44...
N O TE! Wearing protective gloves protects the skin from contact with skin damaging materials. During work steps in which you work with printing materials, we therefore always recommend the wearing of protective gloves. 27 │ 44 Rapid Shape GmbH │ DOCR000231...
To protect the printing material against the effects of light and dust, the machine automatically closes after a preset time (During printing after 30 seconds, in the main menu after 60 seconds.) Rapid Shape GmbH │ DOCR000231 28 │ 44...
6. After filling in the reservoir, carefully mix the material with a silicone spatula. N O TE! Never use sharp objects to mix the material in the reservoir. This can lead to damage to the silicone surface. 29 │ 44 Rapid Shape GmbH │ DOCR000231...
Insert the building platform into the To insert the material reservoir into the machine, please proceed as machine follows: 1. Orient the building platform with the mark 'Front' towards the machine opening. Rapid Shape GmbH │ DOCR000231 30 │ 44...
When starting a print job, supporting messages may appear, such as compatibility information for the job regarding the selected material. Figure 9: ‚Job-Queue’ 31 │ 44 Rapid Shape GmbH │ DOCR000231...
(empty). Then the machine is ready for the next peeling process. Avoid negative effects on your print job due to too long subsequent UV radiation. This can polymerise liquid residue and affect the quality of your job. Rapid Shape GmbH │ DOCR000231 32 │ 44...
After the cleaning and curing process, check the component for the desired result. If you notice that the print result deviates from the desired result, please repeat the workflow or contact Customer service. 33 │ 44 Rapid Shape GmbH │ DOCR000231...
For the long-term shutdown of the machine, please proceed as follows: 1. Switch off the machine. → Chapter 9.1 2. Disconnect the power supply. 3. Store the machine in a dry, dust-free and frost protected room. → Chapter 3.5 Rapid Shape GmbH │ DOCR000231 34 │ 44...
N O TE! Wearing UV goggles protects the eyes from harmful UV radiation. During work steps in which the exposure unit is active, we always recommend wearing UV protection goggles. 35 │ 44 Rapid Shape GmbH │ DOCR000231...
All other maintenance work may only be carried out by Rapid Shape Customer service. For further information please contact Customer service. 10.2.1 Clean protective glass To prevent components from sticking incorrectly to the building platform, the protective glass must always be clean, free from streaks, dust and grease.
Never rub! 7. Clean the underside of the material reservoir with a microfibre cloth soaked in isopropanol. 8. Then clean the underside of the reservoir with a microfibre cloth soaked in glass cleaner 37 │ 44 Rapid Shape GmbH │ DOCR000231...
5. Insert the calibration plate into the machine. 6. Insert the calibration device into the machine. 7. Insert the sensor head into the calibration device. Rapid Shape GmbH │ DOCR000231 38 │ 44...
7. After the time has elapsed, open the machine and remove the reservoir. 8. Use a corner of the paper card to release the hardened layer on the bottom of the reservoir and remove it from the reservoir. 39 │ 44 Rapid Shape GmbH │ DOCR000231...
(Allen key) set, paper card │ Operator Preparation To prepare the parallelism adjustment, please proceed as follows: 1. If not already switched on, switch on the machine. → Chapter 8.2 2. Open the machine. → Chapter 8.3 Rapid Shape GmbH │ DOCR000231 40 │ 44...
Page 41
2. Run the platform back up to its reference point. 3. Pull the calibration plate out of the machine and put it back safely into the packaging. 41 │ 44 Rapid Shape GmbH │ DOCR000231...
2. Disconnect the power supply. 3. If necessary, remove any remaining accessories from the machine, e.g. building platform, reservoir with printing material. 4. If present, remove any soiling. 5. Disassemble the machine properly. Rapid Shape GmbH │ DOCR000231 42 │ 44...
Incorrect disposal of electronic waste, electronic components, lubricants and other additives can be hazardous to the environment. Therefore, please dispose of machine components and auxiliary materials as intended via your waste disposal company or authorised specialist companies. 43 │ 44 Rapid Shape GmbH │ DOCR000231...
* All values are approximate. 12.3 Connections Electrical systems [V AC] 100-240 [Hz] 50/60 Ethernet [Mbit/s] 10/100 Media USB-Ports USB 2.0 * All values are approximate. 12.4 Serial plate → Chapter 2.2 Rapid Shape GmbH │ DOCR000231 44 │ 44...