
Related Manuals for Option Audio CloudGate


Summary of Contents for Option Audio CloudGate
- Page 1 CloudGate Technical documentation Copy taken from CloudGate Universe on: 13/09/2013...
-
Page 2: Table Of Contents
Internal Power Circuits ........................108 SIM Card Requirements ........................110 Certification and Operator Approvals ....................111 Provisioning Server Guide ........................114 Introducing the Provisioning Server ....................115 Creating an Account ..........................116 Activating a CloudGate Using the Provisioning Server ............... 118... - Page 3 Disabling Automatic Update ......................134 Changing the Device Name and Description .................. 135 Deactivating Devices ........................136 Managing Images ..........................137 Managing CloudGate Firmware ...................... 138 Managing Developer Images ......................139 Managing Configurations ....................... 140 Uploading a Config File ......................142 Managing Gobi Firmware .......................
-
Page 4: User Guide
1 / 166 User Guide Welcome! The CloudGate User Guide explains how to install and activate your CloudGate base unit, install custom expansion cards, and configure your device for use. This guide is designed for: Distributors System integrators Field engineers... -
Page 5: Introducing The Cloudgate
2 / 166 Introducing the CloudGate The CloudGate M2M Gateway from Option provides LAN to WWAN routing and GPS functionality in a simple, cost-effective base unit. The CloudGate can be configured locally or remotely from a PC, tablet, or smartphone, and is certified on all major U.S. cellular operators (CDMA/EvDO and WCDMA/HSPA+). - Page 6 Provisioning Cloud-based Provisioning Server allows for efficient deployment of firmware, configuration file and developer image updates to mutliple CloudGates at once More Resources Product Specifications Introduction Video CloudGate Datasheet (US) CloudGate Datasheet (WCDMA) Option CloudGate - Last updated on 13/09/2013...
-
Page 7: Base Unit Hardware
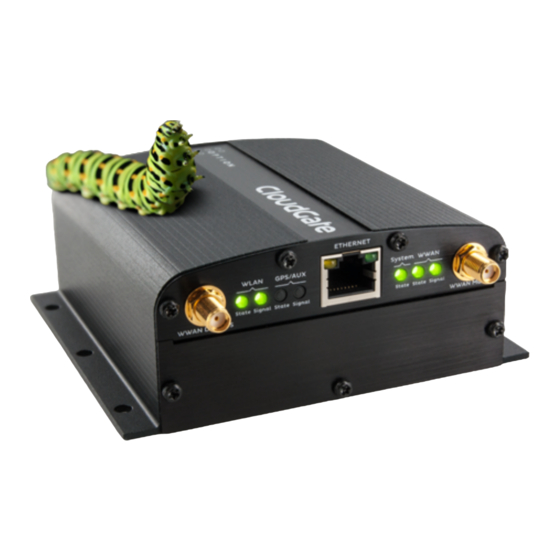
Internal main board with WWAN module, Ethernet interface and GPS Freescale i.MX280 450MHz Processor 64 MB Ram 128 MB Flash GTM68X WWAN module Base Unit Versions Two versions of the base unit exist: CG0192 Option CloudGate - Last updated on 13/09/2013... - Page 8 Contains the GTM681 which can handle only WCDMA technology. Used in Europe and has the correct certification and approvals for these countries. Related Topics Expansion Cards Mounting the CloudGate Mechanical Drawings Front and Back Panels Option CloudGate - Last updated on 13/09/2013...
-
Page 9: Expansion Cards
Wi-Fi Expansion Card - CG2101 Provides 802.11abgn Simultaneous Access Point and Station mode for providing service or connection as a wireless LAN Failover to Wi-Fi client for WAN connectivity Dual SSID Low Cost Serial Card - CG1101 Option CloudGate - Last updated on 13/09/2013... - Page 10 2 KV isolated RS-485 serial port, 921.6 kbaud, full duplex or half duplex; 2 wire or 4 wire with switchable termination. Basic Ethernet Switch - CG1104 4-port 10/100Base-T µSD card PoE Ethernet Switch - CG1103 Option CloudGate - Last updated on 13/09/2013...
- Page 11 Extended format with headers on all interfaces to attach to development equipment Pre-wired RS-232 port, GPIO connected temperature sensor, a relay and SD card slot. Related Topics Installing Expansion Cards Configuring Expansion Cards Option CloudGate - Last updated on 13/09/2013...
-
Page 12: Custom Developer Images
9 / 166 Custom Developer Images To extend the base unit functionality provided by the CloudGate firmware, you can install developer software images onto an overlay file system and adapt the CloudGate to specific needs. Developer images can be created for custom applications and middleware, and to control third-party expansion cards. -
Page 13: Provisioning Server
The Provisioning Server is the configuration and deployment mechanism for the CloudGate. From the factory, CloudGate base units have no customization. On power-up, the CloudGate connects to the Provisioning Server over the wired Ethernet port and automatically downloads the appropriate update. If the Ethernet interface is unavailable, then the... -
Page 14: Network Interfaces
CloudGate continues to use this network interface to connect to the WAN/internet. If the connection to the internet fails, the CloudGate tries the second interface in the priority list and so on. The priority list is defined in the on device web interface on the Home page. - Page 15 12 / 166 Ethernet Tab 3G Connection Tab WAN/LAN switchover feature Option CloudGate - Last updated on 13/09/2013...
-
Page 16: Installing The Cloudgate
13 / 166 Installing the CloudGate To install the CloudGate base unit out of the box, review the installation requirements and then follow the installation steps listed below. For information about customizing the base unit, learn about installing expansion cards and provisioning the device with a custom developer image. - Page 17 Learn more about 3G network settings For CDMA based operators (for Sprint or Verizon, no SIM card is required), click Start programming to start the activation sequence. Learn more about CDMA network settings Option CloudGate - Last updated on 13/09/2013...
-
Page 18: Attaching The Antennas
15 / 166 Attaching the Antennas The CloudGate base unit has two SMA-female antenna connectors on the front panel. Before attaching the antennas, make sure they meet these specifications. Also refer to these antenna recommentations for a list of specific models. -
Page 19: Installing The Sim
Using a T6 Torx screwdriver, remove the four screws from the top plate on the back panel, and then remove the plate. Insert the SIM into the SIM slot. Replace the top cover plate and screws. Related Topics Selecting a Wireless Operator SIM Card Requirements Option CloudGate - Last updated on 13/09/2013... -
Page 20: Activating The Cloudgate
17 / 166 Activating the CloudGate When you activate the CloudGate, you add the device to the Provisioning Server. The Provisioning Server allows you to configure one or more devices with the same firmware, configuration, and developer images. Using a Smartphone To activate the CloudGate using a smartphone: Install a QR scanner application on your smartphone. - Page 21 On the Activate device page, select the User group (your personal user group is the same as your username), and the type of activation. Click Activate. Using a Laptop To activate a CloudGate using a laptop: Option CloudGate - Last updated on 13/09/2013...
- Page 22 Sign in and complete the Activate Device page. Select or enter a User group, (your personal user group is the same as your username), the type of activation, the serial number, and activation code. Click Activate. Related Topics Creating an Account on the Provisioning Server Option CloudGate - Last updated on 13/09/2013...
- Page 23 20 / 166 Activating the CloudGate Using the Provisioning Server Option CloudGate - Last updated on 13/09/2013...
-
Page 24: Powering On The Cloudgate
Observe the LEDs on the front panel. The CloudGate attempts to connect automatically with the Provisioning Server and download the appropriate firmware, developer image, and configuration file. When the power-on sequence is complete, the System and WAN LEDs on the front panel turn green. -
Page 25: Selecting A Wireless Provider
7 on this page. To connect the CloudGate to a laptop and select a wireless provider: Connect an Ethernet cable to the Ethernet port on the CloudGate front panel and a network port on a laptop or computer. - Page 26 Settings section and check the APN, Username, and Password fields. Update if necessary and click Save changes. If the service plan requires a PIN code, scroll down to the PIN Settings section, enable and enter the PIN code, and click Save changes. Option CloudGate - Last updated on 13/09/2013...
- Page 27 24 / 166 Related Topics Configuring the Base Unit 3G Connection Tab Option CloudGate - Last updated on 13/09/2013...
-
Page 28: Installing Expansion Cards
Make sure the screw holes line up. Push gently until the card is flush with the housing. Secure the card with the screws. The following table lists the expansion cards available from Option and the slot. Option CloudGate - Last updated on 13/09/2013... - Page 29 26 / 166 Removing Expansion Cards Removing an expansion card requires different steps depending on the type of card. Contact Option Customer Support for assistance. Related Topics Configuring Expansion Cards Option CloudGate - Last updated on 13/09/2013...
-
Page 30: Mounting The Cloudgate
Mounting on a wall The CloudGate can be mounted on a wall with six screws. The mounting holes in the base of the CloudGate have a diameter of 4.3 mm. Option recommends using screws with a minimum width of 4 mm and a minimum length of 30 mm (M4x30mm). - Page 31 28 / 166 DSB Marketing Hammond Option CloudGate - Last updated on 13/09/2013...
-
Page 32: Configuring The Base Unit
29 / 166 Configuring the Base Unit When the CloudGate is connected to a laptop through an Ethernet cable, you can configure the device locally using the on-device web interface. The web interface allows you to configure one device at a time. - Page 33 30 / 166 Click this tab To do these tasks System Setting up the Time Zone Setting up Remote Access to the CloudGate Setting up a Dynamic DNS Service Changing the Username and Password Creating Log Files Download a configuration file...
-
Page 34: Logging On To The Base Unit
In a web browser, go to the URL: 192.168.1.1. Enter the user name and password, and then click Login. Use the default username admin and password admin. You can change the default username and password later if necessary. Option CloudGate - Last updated on 13/09/2013... -
Page 35: Home Tab
WAN interface. Priority based In priority based mode the CloudGate will first try to make a WAN connection with the interface on the top row of the table. When the first interface is unable to make a connection to the internet the second interface will be taken when the second interface fails the next line will be taken. - Page 36 ADSL or cable modem. Note that a wired Ethernet connection to a laptop with internet access does not provide the CloudGate with an Internet connection. to a laptop with internet access does not provide the CloudGate with an Internet connection.
- Page 37 Optionfirmware. Configuration version This is the version of the configuration file. A configuration file is not mandatory, it's a way to provision CloudGate settings to multiple units. Option CloudGate - Last updated on 13/09/2013...
-
Page 38: Ethernet Tab
The Ethernet tab configures the behavior of the Ethernet port on startup and manages IP nework settings. Enabled Enables (Yes) the ethernet interface on the main board of the CloudGate or disables (No) the ethernet interface Option CloudGate - Last updated on 13/09/2013... - Page 39 If set to Yes the Cloudgate tries to connect to the internet through the ethernet connection, such as an ADSL or cable modem. If a connection is unavailable, the port switches to LAN mode and acts as a LAN interface.
- Page 40 DNS 1 and DNS 2 When the CloudGate is in LAN mode the DNS fields will be empty by default. As a result the CloudGate itself will act as a DNS server. All the connected ethernet devices will receive an DNS address which is equal to the CloudGates IP address (by default 192.168.1.1) When the DNS server inside the Cloudgate...
- Page 41 38 / 166 Related Topics WAN/LAN Switchover Feature Option CloudGate - Last updated on 13/09/2013...
-
Page 42: 3G Connection Tab
39 / 166 3G Connection Tab The 3G Connection tab configures the CloudGate WWAN interface, as well as 3G and CDMA network settings. Click the left sidebar to jump to the following sections: Connection Status General Network Settings PIN Settings... - Page 43 40 / 166 Operator Name Displays the name of the wireless operator the CloudGate is connected to. Signal Strength Displays the received signal strength. ECIO Displays the energy per chip over the interference. This is a typical way to indicate the quality of 3G networks.
- Page 44 Voice number Displays the voice number linked to the SIM card for 3G wireless operators, General The General section configures the WWAN interface on the CloudGate. Enabled Enables and disables the WWAN (3G) interface, Set to Yes (default) to enable the WWAN interface. If there is no Internet connection available on the Ethernet interface, the device automatically connects to the network using the WWAN interface on startup.
- Page 45 Selects the wireless operator firmware the device will use on the network. IMPORTANT: When using the CloudGate WCDMA (CG0112) base unit (this is the version without IMPORTANT: When using the CloudGate WCDMA (CG0112) base unit (this is the version without CDMA technology), you don't have to select the wireless operator.
- Page 46 Whenthe APN is manually chnaged, the CloudGate will remember this and will use this APN Whenthe APN is manually chnaged, the CloudGate will remember this and will use this APN every time it detects this individual SIM card.
- Page 47 Manual: Scans for networks and then lets you select a network different from your home network. PIN Settings When you select AT&T or UMTS Generic as the wireless operator, you may have to enter a PIN code. Option CloudGate - Last updated on 13/09/2013...
- Page 48 Enables the PIN code and displays a field for entering the value. Save PIN Automatically saves the PIN code. CDMA If Verizon Wireless or Sprint is the chosen wireless operator, click Start programming to provision the CloudGate. Option CloudGate - Last updated on 13/09/2013...
- Page 49 46 / 166 Option CloudGate - Last updated on 13/09/2013...
-
Page 50: Firewall Tab
Firewall Tab The Firewall tab controls how data passes from one type of interface to another. There are three different sources or destinations for CloudGate data: A WAN interface, which is a connection to the Internet A LAN connection, which is a connection to a laptop or other computer on the same network... - Page 51 Rejected: the data is not allowed to pass form one interface type to the other interface type; the CloudGate drops the data packets and sends a reject message to the source of the packets. Dropped: the data is not allowed to pass from one interface type to the other interface type; the CloudGate drops these data packets without sending a reject message.
- Page 52 Click Add to create a forwarding rule. Enter the port information and target IP address in the dialog box and click Save. Outbound Port Filtering The Outbound Port Filtering section defines the data allowed to pass from the Local or LAN interface to the WAN interface. Option CloudGate - Last updated on 13/09/2013...
- Page 53 Click Add to create a filtering rule. Enter the port range and select whether to Allow, Reject or Drop the data sent over the chosen port and click Save. Outbound Trusted IPs The Oubound Trusted IPs section defines IP addresses that can be contacted when LAN-to-WAN traffic is not allowed. Option CloudGate - Last updated on 13/09/2013...
- Page 54 LAN to the WAN network. The outbound trusted IP list defines the IP addresses that can be contacted even when LAN-to-WAN traffic is not allowed. Enter an IP address and click Add. Option CloudGate - Last updated on 13/09/2013...
-
Page 55: Connection Persistence
The Connection Persistence tab configures the watchdogs that monitor CloudGate operation and performance. The following actions can be configured to make sure the CloudGate works properly. Connection watchdog: resets or reconnects the WWAN module when no data has been transferred over a certain amount of time. - Page 56 WWAN module can take about 2 minutes, reconnecting to the wireless network will take about 20 seconds. Timed Reset The Timed Reset section sets up the device to reset on a daily, weekly or monthly basis. Enabled Option CloudGate - Last updated on 13/09/2013...
- Page 57 54 / 166 Set to Yes to enable the Timed Reset watchdog. The CloudGate will reset at the specificed time interval. Frequency Set to Daily and select the time of the day at which you want to perform the reset.
-
Page 58: Provisioning Tab
The Provisioning tab configures how and when the CloudGate checks for updates from the Provisioning Server. By default, the CloudGate base unit connects to the Provisioning Server each time the device is powered on, and checks for an updated image. The device downloads and installs the update over the WAN interface. - Page 59 Set to Yes to automatically check for updates. This happens: Each time the unit is powered on. Depending on the "check in frequency" parameter on the provisioning server. Set to No to disable automatic provisioning. Option CloudGate - Last updated on 13/09/2013...
-
Page 60: System Tab
Remote Access through HTTPS The Remote Access section configures a port on the CloudGate for remote access. With remote access, you can log into the to the one-device web interface from a remote PC or laptop. Option CloudGate - Last updated on 13/09/2013... - Page 61 Set the Remote access through HTTPS field to Yes. Enter the port number for which remote login is allowed. Click Save changes. To log in to the CloudGate remotely: On a remote laptop, go to the URL: https://IPaddress:portnumber. Enter the user name and password.
- Page 62 Defines the host name for the DNS service provider account. User name Defines the user name you have set up with the DNS service provider. Password Defines the password you have set up with the DNS service provider. Use HTTPS Option CloudGate - Last updated on 13/09/2013...
- Page 63 Click Update to refresh the status. Username and Password Username Sets a new username for logging on to the on-device web interface. Password Resets the password. Logging Option customer support may request logfiles to diagnose a problem. Option CloudGate - Last updated on 13/09/2013...
- Page 64 Reproduce the CloudGate problem. Download the log file by clicking Download log file. Enable logging If set to Yes, the unit logs all CloudGate activity. Maximum log file size Sets the maximum log file size. Option recommends 256 kB. Select log levels Sets the log levels.
- Page 65 Click to save the device configuration to a file on a laptop. The configuration file can then be uploaded to the Provisioning Server and used for provisioning multiple devices. System Reboot and Factory Reset Two different manual resets are possible on the CloudGate: system reboot and factory reset. TIP: TIP:...
- Page 66 63 / 166 Click System reboot. In the confirmation dialog box, click Reboot to confirm. Note: This is the same as pressing the hardware reset button on the back of the CloudGate for one second. Factory Reset To reset the CloudGate to the factory default settings and overwrite all custom configuration changes: Click Factory Reset to restart the device with the original firmware version from the factory.
-
Page 67: Configuring Expansion Cards
64 / 166 Configuring Expansion Cards If the CloudGate is installed with an Option expansion card, the device automatically detects and identfies the card and displays the appropriate configuration tab in the menu bar. The additional configuration tabs are: WLAN Access Point: configures the access point of the Wi-Fi expansion card... -
Page 68: Configuring The Wi-Fi Card
The Wi-Fi expansion card from Option acts as both a Wi-Fi access point and Wi-Fi client. The Wi-Fi access point allows the CloudGate to connect other wireless devices to a wired or 3G network. The Wi-Fi client allows the CloudGate to send and receive data over a Wi-Fi network. -
Page 69: Wlan Access Point Tab
66 / 166 WLAN Access Point Tab The WLAN Access Point tab lets you to manage the broadcast settings of the wireless access point. You can see tab only when the CloudGate is installed with the WiFi expansion card. General Enabled... - Page 70 Network name (SSID) Allows you to change the SSID. Broadcast SSID If set to Yes, the SSID will be broadcasted. Encryption Allows you to choose the type of encryption. Password Sets the password. IP Config Option CloudGate - Last updated on 13/09/2013...
- Page 71 68 / 166 IP address Sets the IP address of the Wi-Fi access point. Netmask Sets the netmask of the Wi-Fi access point. Enable DHCP server Enables the DHCP server. DHCP range Option CloudGate - Last updated on 13/09/2013...
- Page 72 DNS 1 and DNS 2 When the CloudGate is in LAN mode the DNS fields will be empty by default. As a result the CloudGate itself will act as a DNS server. All the connected ethernet devices will receive an DNS address which is equal to the CloudGates IP address (by default 192.168.1.1) When the DNS server inside the Cloudgate...
-
Page 73: Wlan Client Tab
WLAN Client Tab The WLAN Client tab allows the device to send and receive data over a Wi-Fi network. The tab is available only when the CloudGate is installed with a Wi-Fi expansion card. Using this tab you can: Enable the WLAN client... - Page 74 Click the Refresh icon to refresh the network list. Connecting to a Wi-Fi Network To connect to a Wi-Fi network: Click the network name. Enter the network password and click Connect. Option CloudGate - Last updated on 13/09/2013...
- Page 75 If the Wi-Fi network you want to use is not in the list of known networks, you can create a manual connection. Click Manual connection. Enter the network SSID, select an encryption type and enter the network password. Click Save. Option CloudGate - Last updated on 13/09/2013...
- Page 76 73 / 166 Disconnecting from a Wi-Fi Network Click the Wi-Fi network to disconnect. Click Forget network. Option CloudGate - Last updated on 13/09/2013...
-
Page 77: Hardware Guide
CloudGate firmware, configuration and software updates is available in the Provisioning Server Guide. Option also licences the CloudGate design to third party hardware and software developers who want to create custom expansion cards and software images for specific needs. For information on the developer program, contact Option Customer Support. -
Page 78: Mechanical Drawings
75 / 166 Mechanical Drawings 3D file of the CloudGate. Below you can find the dimensions of the CloudGate. Option CloudGate - Last updated on 13/09/2013... - Page 79 76 / 166 Option CloudGate - Last updated on 13/09/2013...
-
Page 80: Ip-65 Requirement
All these parts can be ordered by TAKACHI: 1x box BACK 203013G or BCPK 203013S, 1x plate BMP 2030P, 1 x screws (20pcs) MT4-8T, 1x bracket (2x4 pcs) BLF-2G(PC-GF) or CK-26P (metal SS) 3x cable gland MG-12S (3 inputs) Option CloudGate - Last updated on 13/09/2013... - Page 81 78 / 166 Option CloudGate - Last updated on 13/09/2013...
-
Page 82: Front And Back Panels
79 / 166 Front and Back Panels The front and back of the CloudGate case consist of a top panel and a bottom panel secured with Torx T6 screws. The top panels are designed by Option and cannot be changed. The bottom panels can be customized based on the requirements of the expansion card. - Page 83 Option provides a custom panel for the following expansion cards: Low Cost Serial Card Industrial Serial Card Basic Ethernet Switch PoE Ethernet Switch Back Panel Connectors Power connector • 9-33 VDC • Micro-Fit 3.0, dual row, 4 circuits Option CloudGate - Last updated on 13/09/2013...
- Page 84 The bottom back panel covers the opening for the back expansion slot and is removed when installing an expansion card. Option provides a custom panel for the following expansion cards: Wi-Fi Card Developer Card Option CloudGate - Last updated on 13/09/2013...
-
Page 85: Led Descriptions
Orange: moderate signal strength Red: bad signal strength Green: good signal strength Green flashing: GPS/Aux State Indicates the GPS operation Off: off Orange: on, no fix Red: error Green: on, has fix Green flashing: Option CloudGate - Last updated on 13/09/2013... - Page 86 Green flashing: Data traffic WWAN Signal Strength Indicates WWAN or 3G interface signal strength Off: no power or not connected Orange: On, not connected Red: bad signal strength Green: good signal strength Green flashing: Option CloudGate - Last updated on 13/09/2013...
-
Page 87: Main Board Specifications
84 / 166 Main Board Specifications The CloudGate is designed with one main board and two additional expansion boards. Main Board The main board is identical for each base unit and is designed around a micro-controller which controls a WWAN module and the Ethernet interface. - Page 88 85 / 166 Secondary Expansion Board The secondary expansion board has the following interfaces: Power supply: V_PWR, 3V4, 3V3 24 Mhz clock signal Master reset signal High speed USB interface SDIO interface GPIO signals Option CloudGate - Last updated on 13/09/2013...
-
Page 89: Expansion Card Specifications
86 / 166 Expansion Card Specifications Wi-Fi Card Low Cast Serial Card Industrial Serial Card Basic Ethernet Switch PoE Ethernet Switch Developer Card Option CloudGate - Last updated on 13/09/2013... -
Page 90: Wi-Fi Card Specifications Cg2101
Note: Note: The Wi-Fi client of the CloudGate connected to a Wi-Fi access point configured with WPA and group The Wi-Fi client of the CloudGate connected to a Wi-Fi access point configured with WPA and group ke-keying disabled is currently not supported. -
Page 91: Low Cost Serial Card Specifications
88 / 166 Low Cost Serial Card Specifications Specifications: Female DB9 connector One serial port RS-232, 921.6 Kbaud maximum speed Note: Note: The serial card is DCE device! The serial card is DCE device! Option CloudGate - Last updated on 13/09/2013... - Page 92 89 / 166 Connect the CloudGate with a DTE device (laptop) In order to connect the CloudGate to a laptop or any other DTE device you should use a regular straight cable Connect the CloudGate with another DCE device (modem, PLC,...) In order to connect the CloudGate to another DCE device you should use a cross cable.
-
Page 93: Industrial Serial Card Specifications
Termination switch: With this switch you can choose to terminate the RS485 network with a 120 Ohm resistor Wire selection: This switch allows you to use a 4 wire network or a 2 wire network Option CloudGate - Last updated on 13/09/2013... -
Page 94: Basic Ethernet Switch Specifications
Active when operating speed is 100Mbps Inactive when operating speed is 10 Mbps or when not connected Green LED: Active when valid links is detected Blinks when activity is detected Inactive when not connected Option CloudGate - Last updated on 13/09/2013... - Page 95 92 / 166 IMPORTANT: The auto-MDIX feature is always activated on the CloudGate. This feature IMPORTANT: The auto-MDIX feature is always activated on the CloudGate. This feature automatically detects the required cable connection type (straight or crossed), and configures automatically detects the required cable connection type (straight or crossed), and configures the connection appropriately, removing the need for crossover cables.
-
Page 96: Poe Ethernet Switch Specifications
Can function as a 2 ports Class 4 PoE or a 4-port Class 3 PoE Auto-MDIX Pinout Yellow LED: PoE indicator Green LED: Active when valid links is detected Blinks when activity is detected Inactive when not connected Option CloudGate - Last updated on 13/09/2013... - Page 97 Warning: When the PoE ethernet board is inserted in the CloudGate the CloudGate must be powered from the PoE power supply. The main power input on the back of the CloudGate will powered from the PoE power supply. The main power input on the back of the CloudGate will...
-
Page 98: Developer Card Specifications
The Developer card has the next functions available. One RS232 interface (8 pin) One SD card interface Two USB interfaces (one normal, one OTG) One temperature sensor One relay One analog input signal I2C bus Optocoupler Option CloudGate - Last updated on 13/09/2013... -
Page 99: Rf Specifications
The main antenna is labelled WWAN Main on the front panel. Learn about antenna recommendations. Connectors The RF connector on the CloudGate is SMA female. The antenna itself or the connector to the antenna should be SMA male. Option CloudGate - Last updated on 13/09/2013... - Page 100 Receive diversity only works on WCDMA and CDMA bands Only WCDMA and CDMA bands have to be supported by the diversity antenna. The GPS frequency must also be supported if GPS functionality is desired on the CloudGate. Option CloudGate - Last updated on 13/09/2013...
- Page 101 Envelope correlation coefficient: < 0.5 GPS Antenna The CloudGate only supports passive GPS antennas. There is no power supply for active antennas on the RF connector. For accurate GPS operation make sure the GPS antenna has a clear view of the sky.
- Page 102 In addition the product shall be installed in a way that a distance of at least 20 cm is maintained between the antenna and the user's body. between the antenna and the user's body. Option CloudGate - Last updated on 13/09/2013...
-
Page 103: Antenna Recommendations
100 / 166 Antenna Recommendations A number of good antennas are available on the markeet for use with the CloudGate. Below is a list of antennas which can be used as a reference for each functionality. All antennas listed below are made by... - Page 104 Recommended for high band diversity antenna Acceptable as low band (700-800-850-900MHz) Diversity antenna Recommended for GPS antenna Wi-Fi Antenna Taoglas GW.59.3153 Recommanded for both 2.4 Ghz and 5 Ghz bands Related Topics RF Specifications 3G Connection Tab Option CloudGate - Last updated on 13/09/2013...
-
Page 105: Ethernet Specifications
Active when operating speed is 100Mbps Inactive when operating speed is 10 Mbps or when not connected Green LED: Active when valid links is detected Blinks when activity is detected Inactive when not connected Option CloudGate - Last updated on 13/09/2013... - Page 106 When it does not receive a DHCP offer it resends the DHCP discover message five times. If no DHCP offer is received after five tries, the CloudGate starts running a DHCP server on the Ethernet interface and act as a LAN interface.
- Page 107 (WAN or LAN) until a power cycle or reset has happend. same state (WAN or LAN) until a power cycle or reset has happend. WAN/LAN Switchover Flow Diagram Related Topics Ethernet Tab Option CloudGate - Last updated on 13/09/2013...
-
Page 108: Environmental Specifications
105 / 166 Environmental Specifications Operating temperature: -30°C to 70°C Storate temperature: -40°C to 85°C Humidity operational: 5% - 95% non condensing Option CloudGate - Last updated on 13/09/2013... -
Page 109: Power Requirements
Input voltage must be between 9V - 33V DC Internal electronic fuse limits the input current to 1.2A Option recommands to use a wire between the CloudGate and the external power supply of Option recommands to use a wire between the CloudGate and the external power supply of... - Page 110 If the fifth digit is not a C, the fuse of your CloudGate will not get broken due to these charge If the fifth digit is not a C, the fuse of your CloudGate will not get broken due to these charge currents.
-
Page 111: Internal Power Circuits
108 / 166 Internal Power Circuits The voltage applied by the power adapter to the CloudGate is converted into different voltage levels by the main board. Two different power circuits make five different voltage rails. Dedicated high current power circuit Provides two different voltage rails which both can deliver high current levels: V_PWR: Is the voltage level of the power adapter limited to 1.2A. - Page 112 109 / 166 Internal Power Circuits Block Diagram Option CloudGate - Last updated on 13/09/2013...
-
Page 113: Sim Card Requirements
3GPP standard defines three operational voltages for the supply voltage of the SIM card: 1.8V, 3V and 5V. The CloudGate supports two voltages: 1.8V and 3V. The 5V-only SIM cards are rarely used and are not supported by the CloudGate. -
Page 114: Certification And Operator Approvals
Certification and Operator Approvals Certification FCC authorization FCC authorization is done for the basic configuration of the CloudGate and has to be done on each expansion board separately. The following is a list of what is FCC approved: The basic config of the CloudGate (=CG0192) - Page 115 112 / 166 CE Certification Declaration of Conformity WEEE leaflet CE certification is done for the CloudGate-WCDMA and has to be done on each expansion board separately. The following is a list of what is CE certified: The CloudGate-WCDMA (=CG0112)
- Page 116 The basic configuration of the CloudGate is approved for the Telus network. (CG0192) Expansion boards do not need Telus approval. Bell Mobility The basic configuration of the CloudGate is approved for the Bell Mobility network. (CG0192) Expansion boards do not need Bell Mobility approval. Option CloudGate - Last updated on 13/09/2013...
-
Page 117: Provisioning Server Guide
CloudGate hardware specifications and technical information are available in the Hardware Guide. Option also licences the CloudGate design to third party hardware and software developers who want to create custom expansion cards and software images for specific needs. For information on the developer program, contact Option Customer Support. -
Page 118: Introducing The Provisioning Server
The Provisioning Server is the configuration and deployment mechanism for the CloudGate. From the factory, CloudGate base units have no customization. On power-up, the CloudGate connects to the Provisioning Server over the wired Ethernet port and automatically downloads the appropriate update. If the Ethernet interface is unavailable, then the... -
Page 119: Creating An Account
Creating an Account To create an account: In a web browser, enter the URL: http://cloudgate.option.com. On the login page, click on the Sign up button. Enter your user details on the Sign up page and click Create new account. Your account will be created and a confirmation email sent to you. - Page 120 Click I have received a group invitation code if someone else has given you access to their devices by sending you a group invitation code. Enter the code and click Sign up to create an account. Option CloudGate - Last updated on 13/09/2013...
-
Page 121: Activating A Cloudgate Using The Provisioning Server
Using your smartphone. Activating a Device While Creating an Account To activate a CloudGate at the same time as creating an account: In a web browser, enter the URL: http://cloudgate.option.com. On the login page, click on the Sign up button. - Page 122 119 / 166 Enter the device serial number and activation code. Click Create new account to activate your unit and create an account. Option CloudGate - Last updated on 13/09/2013...
- Page 123 120 / 166 TIP You don't have to activate the CloudGate right away. If you have several units to provision, TIP You don't have to activate the CloudGate right away. If you have several units to provision, you can create an account and activate devices later from within the Provisioning Server.
-
Page 124: Logging On To The Provisioning Server
Logging on to the Provisioning Server To log on to the Provisioning Server: In a web browser, enter the URL: http://cloudgate.option.com. Enter your username and password and click Sign In. Click Forgot your password? and follow the instructions to reset your password. -
Page 125: Editing Your User Profile
Language settings To edit your user profile: Click the username in the menu and select Edit Profile. Edit the fields as required. If changing the email address or password, enter the current password. Option CloudGate - Last updated on 13/09/2013... - Page 126 123 / 166 Click Save. Option CloudGate - Last updated on 13/09/2013...
-
Page 127: Quick Tour
Type: displays the device type assigned by the system depending on the serial number. Serial number: displays the serial number given to the device during production. Check in frequency: defines when the device contacts the Provisioning server to check for updates. Option CloudGate - Last updated on 13/09/2013... - Page 128 The Content page lists the images available on the Provisioning Server: CloudGate Firmware: required firmware developed by Option. CloudGate Config: configuration settings for one or more devices; can be a custom config or default Option config. CloudGate Developer Image: optional, customized software on top of the mandatory Option firmware created by third party developers or integrators for additional functionality, or for controling third-party expansion cards;...
- Page 129 Users: lists the user accounts attached to the group. Admins: lists the user accounts with permission to create groups and templates. Device templates: defines the set of firmware, configuration and developer images assigned to the group. Option CloudGate - Last updated on 13/09/2013...
-
Page 130: Updating Devices
127 / 166 Updating Devices The main function of the Provisioning Server is to provide an easy-to-use mechanism for updating CloudGate devices before and after deployment in the field. You can do the following tasks: Sort and select devices by group, serial number and other criteria so that you can quickly find the... -
Page 131: Displaying And Sorting The Device List
Displaying and Sorting the Device List The Device list is an inventory of all CloudGate base units for which the user has provisioning access (this includes devices activated by the current user and devices in groups the user belongs to). - Page 132 Finds devices with a specific text string in the Name field Filter by type Finds either the North American or European CloudGate models using the type field Filter by serial number Finds devices with a specific text string in the serial number field...
-
Page 133: Setting The Check-In Frequency
Even if the check-in frequency is changed later, the device will not connect with the Provisioning Server and download the new setting. the device will not connect with the Provisioning Server and download the new setting. Option CloudGate - Last updated on 13/09/2013... - Page 134 131 / 166 4. Click Save. Option CloudGate - Last updated on 13/09/2013...
-
Page 135: Enabling Automatic Update
To assign a specific image, select Override Template and then select on in the Assigned Release field. If you want to provision the device using the image presets defined in the device template, do not select Override Template and instead select a device template in the Template field. Option CloudGate - Last updated on 13/09/2013... - Page 136 TIP This field is only available if there is a device template created for the group to which the selected device(s) belong. selected device(s) belong. Assigned release Selects the specific image release for download to the selecte device(s). 4. Click Save. Option CloudGate - Last updated on 13/09/2013...
-
Page 137: Disabling Automatic Update
Provisioning Server. Each image can be disabled separately. For example, you can enable automatic updates for CloudGate Firmware but disable it for the Config File. To disable automatic update: Click Provisioning in the menu. -
Page 138: Changing The Device Name And Description
Option recommends changing the name and description to something meaningful for your CloudGate deployment. To change the device name and description: Click Provisioning in the menu. Edit the Name and Description fields as required. Click Save. Option CloudGate - Last updated on 13/09/2013... -
Page 139: Deactivating Devices
NOTE Deactivation means the you will no longer have access to the device through the Provisioning Server. Provisioning Server. To deactivate a device: Click Provisioning in the menu. Select a device. Click the Deactivate button on the Device Properties tab. In the confirmation dialog box, click Deactivate. Option CloudGate - Last updated on 13/09/2013... -
Page 140: Managing Images
137 / 166 Managing Images The Provisioning Server allows you to manage the firmware and software images for the CloudGate base unit. Each image can have multiple releases. You can do the following tasks: Manage CloudGate firmware provided by Option... -
Page 141: Managing Cloudgate Firmware
The list of CloudGate firmware is displayed by clicking Content in the menu, followed by the CloudGate Firmware button or tab. Below the tab, the Products list contains the collections of firmware or software available. -
Page 142: Managing Developer Images
For more information, contact Option Customer Support. For information on displaying and uploading developer images, log on to your developer account, click Developer tools in the menu, and select Software Developer Kit. Option CloudGate - Last updated on 13/09/2013... -
Page 143: Managing Configurations
CloudGate base unit and expansion cards. Config files are displayed by clicking Content in the menu followed by the CloudGate Config button or tab. Below the tab, the Products list shows the collections of config files available. There are two types: custom configs and Option default configs. - Page 144 141 / 166 Option CloudGate - Last updated on 13/09/2013...
-
Page 145: Uploading A Config File
In the Products list, click Custom Configs. The product may be named something different depending on your solution. You can rename the product by clicking Edit product details. Click Upload release. Select the file and enter a Version, Name and Description. Option CloudGate - Last updated on 13/09/2013... - Page 146 TIP The Provisioning Server does not automatically increment version numbering. You must TIP The Provisioning Server does not automatically increment version numbering. You must specify the correct version number in the Upload dialog box. specify the correct version number in the Upload dialog box. Option CloudGate - Last updated on 13/09/2013...
-
Page 147: Managing Gobi Firmware
Gobi firmware from the Provisioning Server versions of Gobi firmware from the Provisioning Server Gobi firmware is displayed by clicking Content on the menu, followed by the CloudGate Gobi Firmware button on tab. Below the tab, click Option Gobi Firmware in the Products list. -
Page 148: Downloading Images
145 / 166 Downloading Images In some cases, you may have to manually update CloudGate base units. Manual updates require the image files to be downloaded to a laptop or hard drive. To download all the firmware, config files and developer images assigned to a device at once: Click Provisioning on the menu. - Page 149 146 / 166 Learn about manually uploading an image to a device using the on-device web interface. Option CloudGate - Last updated on 13/09/2013...
-
Page 150: Managing Groups Of Devices
147 / 166 Managing Groups of Devices For provisioning multiple devices at once, the Provisioning Server allows you to organze CloudGate base units into groups. Groups have preset firmware and config file assignments. When a new device is added to the group, these presets are automatically assigned to the device. The next time the device checks in, the Provisioning Server downloads the images all at once. -
Page 151: Creating Groups
Click Groups in the menu. Select a group to highlight it. Click Add Subgroup. Enter a name and description, and then click Add. The subgroup appears in the hierarchy below your personal user group. Option CloudGate - Last updated on 13/09/2013... - Page 152 149 / 166 Option CloudGate - Last updated on 13/09/2013...
-
Page 153: Adding Devices To A Group
TIP If a group is greyed out in the list, it means that you do not have permission to add the selected device to that group. selected device to that group. 6. Click Save. Option CloudGate - Last updated on 13/09/2013... -
Page 154: Creating A Device Template
151 / 166 Creating a Device Template When provisioning a number of CloudGate base units with identical settings, you can create a device template to speed up the process. A template contains preset firmware, confiuration and developer image assignments for a specific user group. - Page 155 Displays the number of devices in the group currently NOT using the template. Click Details to display a list of devices that do not follow the group's template. To assign the template, select each device and click Update. Option CloudGate - Last updated on 13/09/2013...
- Page 156 153 / 166 Change release Changes the release version. You must click Save after selecting a new release. Option CloudGate - Last updated on 13/09/2013...
-
Page 157: Displaying Group Content
To display the release assignment, click Device Templates. Click Manage products to go to the Content page where you can upload new config files and developer images (for members of the Option developer program). Option CloudGate - Last updated on 13/09/2013... -
Page 158: Managing Users And Group Administrators
TIP When you create an account, you are automatically made Admin of your own personal group. group. For managing users and admins, you can do the following tasks: Assign users to a group Remove users from a group Create a group admin Option CloudGate - Last updated on 13/09/2013... -
Page 159: Assigning Users To A Group
Admins can assign users. If you are an Admin and the Invite button is still not available, try refreshing your browser. refreshing your browser. 5. Enter the user's email address. Click Make admin to make the user an administrator. Click Send Invitation. Option CloudGate - Last updated on 13/09/2013... - Page 160 Provisioning Server sign up form. Once the user completes the sign up process and logs on to the Provisioning server, he or she is added to the group. Option CloudGate - Last updated on 13/09/2013...
-
Page 161: Creating A Group Admin
NOTE To assign users to a group, you must be an Admin for that group. To create an Admin for a group: Follow the steps for assigning a user. Make sure you click Make admin in the Add User dialog box. Option CloudGate - Last updated on 13/09/2013... -
Page 162: Removing Users From A Group
NOTE Removing a user from a group does not delete the user or the account from the NOTE Removing a user from a group does not delete the user or the account from the Provisioning Server. Provisioning Server. Option CloudGate - Last updated on 13/09/2013... -
Page 163: Troubleshooting
What is the priority order between port forwarding rules, DMZ and remote login in the internal routing table? How does the automatic upgrade feature work on the Provisioning Server? Why does the page display incorrectly? Option CloudGate - Last updated on 13/09/2013... -
Page 164: Priority Order Between Remote Login, Dmz, And Port Forwarding Rules
Default By default, the DMZ and remote login are not active, and the CloudGate rejects all external IP traffic wanting access to the unit. This is also the reason why the WAN -> Local default policy is set to Reject in firewall rules. - Page 165 Port 1800 is open for HTTPS IP forwarding rule 1 IP forwarding rule 2+ Send all incoming data to the address specified in the DMZ Port 443 is open for HTTPS Reject everything Option CloudGate - Last updated on 13/09/2013...
-
Page 166: When Do Automatic Updates Occur
163 / 166 When Do Automatic Updates Occur? The CloudGate tries to connect to the Provisioning Server every time it powers on, and when it is configured to reset at regular time intervals. Automatic updates occur when the following settings are enabled:... - Page 167 164 / 166 Option CloudGate - Last updated on 13/09/2013...
-
Page 168: Why Does The Page Display Incorrectly
165 / 166 Why Does the Page Display Incorrectly? If the Provisioning Server or CloudGate on-device web interface does not display correctly, reports error messages, or does not display at all, make sure that your PC meets the following minimum browser... -
Page 169: Licenses
166 / 166 Licenses Most of the source code used in the CloudGate is available under free, open source license. The following licenses are used: GPLv2 GPLv3 LGPLv2 LGPLv2.1 DROPBEAR GOBISERIAL LIBCURL LIBGCC LIBJSON LIBUUID LIGHTTPD OPENSSH OPENSSL PCRE ZLIB...
Need help?
Do you have a question about the CloudGate and is the answer not in the manual?
Questions and answers