Table of Contents
Advertisement
Advertisement
Table of Contents

Summary of Contents for Ferrofish B4000+
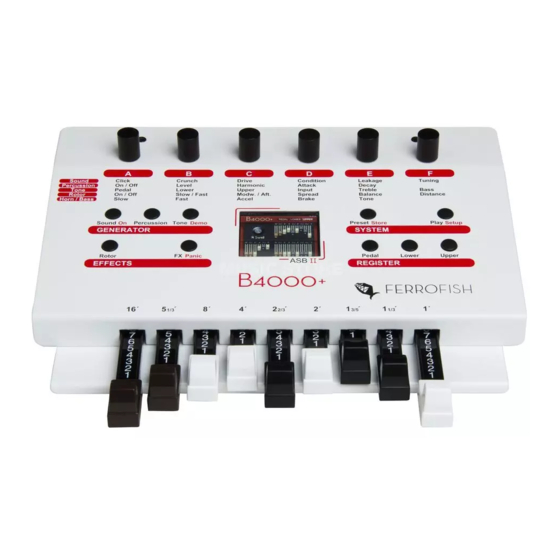
- Page 1 Manual B4000+ authentic organ modeller FERROFISH advanced audio applications...
- Page 2 . All features of the glorious ancestor have been modeled with the highest accuracy: 91 tonewheels, full polyphony, keyclicks and percussion, scanner vibrato, overdrive, the rotating Leslie speaker, and many more! Accessories, Software and Updates For further information and current software please visit our website: www.ferrofish.de...
- Page 3 To get a first impression of the sound capabilities, start the Demo demosong by pressing the key long. If you have any questions or problems, please contact us via email (info@ferrofish.de) first, before sending the unit in. Our support team will be happy to assist you!
- Page 4 Operation Operation Operating the B4000+ is very easy thanks to the TFT display. However, all functions of the B4000+ can be controlled directly at the device. More than 80 parameters influence the sound. Have fun playing with them! To keep track of things, we grouped the functions as follows: GENERATOR Here the sound is generated and mixed.
- Page 5 Operation REGISTER Using the three keys Pedal, Lower, Upper you choose which register is attached to the drawbars. The actual setting is shown in the top part of the display. By long pressing one of these keys you can copy the drawbar positions in the corresponding register.
- Page 6 Sound Sound When pressing this key the six most important sound parameters of the emulation are shown: EMULATION FEATURE Click On a Hammond B3 , the mechanical triggering of the sound by the keyboard creates a noticeable, rather ’spitty’ click. While this side effect was initially regarded as undesirable, it became accepted in time as a characteristic part of the Hammond sound and eventually came to be pretty popular!
- Page 7 Sound EMULATION FEATURE Condition As time passes, the condition of the tonewheels of a Hammond organ tends to degrade, which affects the sound quality and tuning integrity. With this control you magically alter the condition of the tonewheels from brand new (’NEW’) to ’needs repair’...
- Page 8 Percussion Percussion As with a Hammond organ, the percussion effect is available only on the upper register and sounds only when a detached fingering style is used. If you play legato style (i.e. with overlapping notes), only the first note played triggers the percussion.
- Page 9 Percussion ADDITIONAL FEATURE Attack Controls the duration of the percussion. Since this feature isn't available on the original, set this value to minimum for the original sound. EMULATION FEATURE Decay Controls the duration of the percussion.
- Page 10 Tone Tone Here you mix the registers and external input: EMULATION FEATURE Pedal - Lower - Upper Adjust the volume of the corresponding register. ADDITIONAL FEATURE Input You can feed an external signal in the Audio In plug. This signal can either be fed directly to the mix or via the effects section.
- Page 11 external Input external Input When pressing the Tone key a second time, this screen will be shown. Here you see the chain of the sound generator and the effects. The external input signal can be inserted at arbitrary points. This way the signal is inserted before a specific effect, or can also be fed as dry signal to the output, or a combination of both.
- Page 12 Rotor Rotor This screen control the motion of the rotating speaker ). When you press the Rotor key again, the Horn and (Leslie then the Bass screen is shown. Here you adjust the speeds of the Rotor, and also control break and acceleration. EMULATION FEATURE On / Off Enables the rotor.
- Page 13 Rotor ADDITIONAL FEATURE Modwheel / Aftertouch When enabled, you're able to switch the rotor between slow and fast by using the modwheel and aftertouch. So, if you press the key harder (aftertouch) or turning the modwheel, the rotor switches between slow, brake, and fast. The MIDI threshold for modwheel and aftertouch can be adjusted in the Settings.
- Page 14 Horn / Bass Horn / Bass After pressing Rotor again, the Horn- and then the Bass- screen is shown. These controls are used to adjust various rotor settings. Many rotary speaker systems used a speaker for bass frequencies and a horn for treble signals, which rotated at different speeds. This rich, complex sound is faithfully reproduced and fully programmable in the B4000+.
- Page 15 Horn / Bass EMULATION FEATURE Brake Controls the braking when switching from ’Fast’ to ’Slow’. EMULATION FEATURE Tone The bass speaker and horn each have a tone control. By adjusting these you change the overall tone color and resonance of the rotor effect.
- Page 16 Chorus / Vibrato Chorus / Vibrato More effects are implemented in the B4000+, which you control using the FX key: Chorus/Vibrato, reverb and compressor EMULATION FEATURE Vibrato Lower On/Off - Vibrato Upper On/Off This effect can be switched on for the upper and lower register seperately.
- Page 17 Reverb Reverb With this screen you can switch on and adjust the reverb effect. ADDITIONAL FEATURE On/Off Enables the reverb ADDITIONAL FEATURE Dry/Wet Sets the mix between the original (dry) and the reverb sound (wet) ADDITIONAL FEATURE Size Sets the size of the room ADDITIONAL FEATURE Time Sets the amount of reverb that is fed back in the reverb loop...
- Page 18 Compressor Compressor Since you're able to play up to 250 voices on the B4000+, the dynamics of this device is very high. The compressor is used to get a stronger sound. Press FX three times to get to the compressor screen. ADDITIONAL FEATURE On / Off Enables the compressor...
- Page 19 Presets Presets Press the Preset key to call up the a preset. Select a preset by using knob A, and the bank by knob B. To find a preset of a specific category, set the category filter with knob C. Bank 1 is used for the 128 factory presets, which are not writable.
- Page 20 Play Play Use this key when playing live. Here you have an overview of the drawbars, and you can adjust the volume by using knobs A and B. Knob A controls the volume of the B4000+ simulation. If you enabled the tube-amplifier emulation, you will hear tube- distortion when turning up this volume.
- Page 21 Pedal - Lower - Upper Pedal - Lower - Upper Press one of these keys to connect the drawbars to the corresponding register. The active register is always shown in the top right border of the screen. To prevent accidental changing of the drawbar settings you also can disconnect the drawbars.
- Page 22 Pedal - Lower - Upper ADDITIONAL FEATURE Attack This controls the attack time of the organ signal. When turned fully left (minimum position) the organ sounds immediately at full strength, while turning it fully right (maximum position) makes it fade in smoothly. ADDITIONAL FEATURE Release This controls the decay time of the signal.
- Page 23 Settings Settings MIDI Setup To adjust the MIDI setting, press long the key. Here you select the channels for the three registers, adjust the octave position, and select keyboard splits, for playing more than one register on one keyboard. To attach a second keyboard easily, there is an additional MIDI input.
- Page 24 Settings So, easiest is to set both keyboards to MIDI channel 1, and plug in the upper-register keyboard to MIDI A, and the lower- register keyboard to MIDI B. MIDI controller messages are processed on the “Ctrl” MIDI channel. Usually this is the same channel as you use for the upper keyboard.
- Page 25 Settings Settings ADDITIONAL FEATURE Aftertouch Threshold You can also switch the speed of the rotor by using aftertouch. The higher the number the more you have to press the key on your keyboard to switch the rotor to fast speed. ADDITIONAL FEATURE Modwheel If you like to control the Rotor using the Modwheel, set this...
- Page 26 Settings ADDITIONAL FEATURE Switch: 2state ↔ 3state 2state switches (On-Off) are commercially available. However, since the Rotor has three positions, you can also connect a special switch with three positions, using a stereo- phone jack. This switch should connect tip with sleeve, and ring with sleeve.
- Page 27 Settings The minimum and maximum value can be set with the knobs A and B. The arrows show the actual position of the pedal. The pedal function can be inverted with knob C. Version Here you find the firmware version and the serial number of your B4000+.
- Page 28 additional functions additional functions Demosong Demo Start the song by pressing the key long. Panic Panic No panic when a MIDI note gets stuck. Press the long to stop all playing notes. On / Off Press the key long to switch the B4000+ off. If possible, please switch off the B4000+ using this key and not by removing the power plug.
- Page 29 Electronic Equipment – RL for electrical and electronical devices ) RL2002/96/EG this device has to be reused or recycled after its usage. Trademarks All trademarks are properties of their respective owners, and only used here for description. FERROFISH advanced audio applications...
- Page 30 This documentation describes the actual state of development. Ferrofish does not grant any warranty, neither explicit nor implicit, for the correctness of this documentation. I.e. Ferrofish isn't be liable for loss of data in assiciation with this product or this documentation. In particular Ferrofish is not liable for consequential damage, which are result from using the product or documentation.
Need help?
Do you have a question about the B4000+ and is the answer not in the manual?
Questions and answers