
Related Manuals for Hanna Instruments HI9126


Summary of Contents for Hanna Instruments HI9126
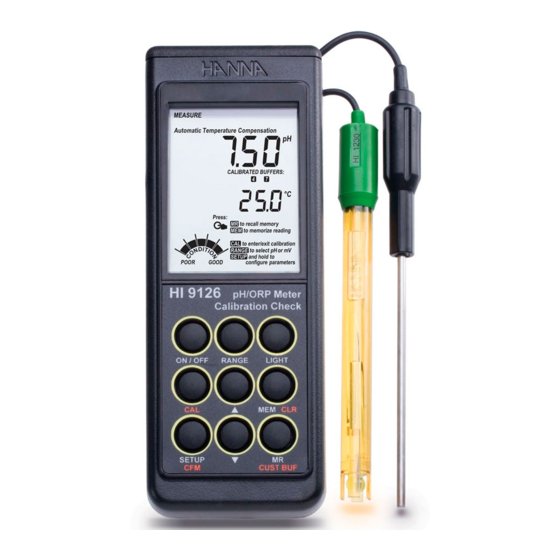
- Page 1 Instruction Manual HI9126 Calibration Check Waterproof pH/mV/°C Meter w w w . h a n n a i n s t . c o m...
-
Page 2: Table Of Contents
Dear Customer, Thank you for choosing a Hanna Instruments product. Please read this instruction manual carefully before using the instrument. This manual will provide you with the necessary information for correct use of the instrument, as well as a precise idea of its versatility. -
Page 3: Preliminary Examination
• Monitoring of the electrode aging • User‑selectable “calibration time‑out” to remind you when a new calibration is necessary HI9126 can also measure for Oxidation Reduction Potential in the mV range with a resolution of 0.1 mV. It offers an extended temperature range from:... -
Page 4: Functional Description
FUNCTIONAL DESCRIPTION 1) Liquid Crystal Display (LCD). 2) RANGE key, to select pH or mV. 3) ON/OFF key, to turn the meter ON and OFF. 4) CAL key, to enter or exit calibration mode. 5) SETUP/CFM key, to enter SETUP mode or to confirm calibra‑ tion. -
Page 5: Specifications
SPECIFICATIONS –2.00 to 16.00 pH Range ±699.9 mV / ±1999 mV ‑20.0 to 120.0 °C (–4.0 to 248.0 °F) 0.01 pH Resolution 0.1 mV / 1 mV 0.1 °C (0.1 °F) ±0.01 pH Accuracy ±0.2 mV / ±1 mV @ 20 ºC / 68 ºF ±0.4 °C (±0.8 °F) (excluding probe error) ±0.02 pH Typical EMC Deviation... -
Page 6: Operational Guide
OPERATIONAL GUIDE INITIAL PREPARATION The meter is supplied with batteries (for details see page 19). To prepare the instrument for use, connect the pH electrode and the temperature probe to the BNC and temperature sockets on the top of the instrument. The temperature probe can be used independently to take temperature measurements, or it can be used in conjunction with the pH electrode to utilize the meter’s Automatic Temperature Compensation (ATC) mode. - Page 7 The LCD will show the pH measurement and the temperature of the sample. In order to take more accurate pH measurements, make sure that the instrument is calibrated (see page 10 for details). The glass bulb and the junction on your electrode should always be moist, never allow it to dry out.
- Page 8 ORP MEASUREMENTS To perform ORP measurements, connect an optional ORP electrode (see “Accessories“ section) to the meter and turn it ON. If necessary, enter the “mV” mode by pressing RANGE. Submerse the ORP electrode 3 cm (1 ”) into the sample to be tested and wait for the reading to stabilize.
- Page 9 A stored value can be recalled by pressing MR: the display will show the memorized reading and the “RECALL MEMORIZED” tag, as long as the MR key is pressed. Note: MR will only display the range that was active when MEM was pressed.
-
Page 10: Ph Calibration
pH CALIBRATION It is recommended to calibrate the instrument frequently, if high accuracy is required. The instrument should be recalibrated: • Whenever the pH electrode is replaced. • At least once a week. • After testing aggressive chemicals. • When extreme accuracy is required. •... - Page 11 • Press the CFM key to confirm the calibration: the meter stores the first calibration point; the primary LCD will show the calibrated reading, while the secondary LCD will show the second buffer to be used for calibration (“pH 4.01”). If you’re going to calibrate with a different buffer, select the desired value by pressing the arrow keys.
- Page 12 Notes:During calibration, the secondary LCD shows the selected buffer value; press RANGE to display the buffer temperature. To clear a previous calibration and return to the default values, press CLR at any time after entering the calibration mode. The LCD will show “CLr CAL” for one second, and then will return to normal measurement mode.
- Page 13 Note: To increase the speed, continuously press the ARROW keys. • Once the desired value is reached, press CFM to confirm the value. The meter will continue calibration as with memorized buffers. • The meter will display “C2”. Use the arrow keys to change the value of the second custom buffer, or press CUST BUF to select a memorized buffer.
- Page 14 CONDITION The display is provided with a 5‑dot bargraph (unless disabled) which gives an indication of the electrode status after calibration: Bargraph indication Condition value All 5 dots steady 81 to 100% of life 4 dots steady 61 to 80% 3 dots steady 41 to 60% 2 dots steady...
-
Page 15: Ph Buffer Temperature Dependence
pH BUFFER TEMPERATURE DEPENDENCE The temperature has an effect on pH. The calibration buffer solutions are affected by temperature changes to a lesser degree than normal solutions. During calibration the instrument will automatically calibrate to the pH value corresponding to the measured or set temperature TEMP pH BUFFERS °C... -
Page 16: Setup Menu
SETUP MENU The instrument allows the user to configure several parameters through the Setup Menu. To enter the Setup Menu, while in measurement mode, press and hold the SETUP key for about 5 seconds. Once the menu is entered, each parameter can be changed by using the arrow keys;... - Page 17 4. Calibration segments: On (default) or Off. This enables or disables the bargraph, the “CLEAN ELECTRODE” message and the buffer segments. 5. Calibration time‑out: 1 (default) to 14 days or disabled (0 days) After the last parameter, press the CFM key to confirm the setting and return to measurement mode.
-
Page 18: Mv Calibration
CALIBRATION HI9126 has been precalibrated for mV range at the factory. For optimum accuracy, it is recommended to recalibrate the meter for mV readings at least once a year. Contact your local Hanna Instruments Office for more information. TEMPERATURE CALIBRATION HI9126 has been precalibrated for temperature at the factory. -
Page 19: Batteries Replacement
BATTERIES REPLACEMENT The instrument is supplied with batteries. First time you start working with the instrument, insert the supplied batteries in the battery compart‑ ment observing the correct polarity (see page 20). At start‑up the battery percentage is displayed. If the batteries become weak, the display will flash the battery symbol to advise the user that approximately 1 hour of working time remains. - Page 20 To replace the batteries, follow the next steps: • Turn OFF the instrument. • Open the battery compartment cap (located on the top of the instrument). • Remove old batteries. • Insert three new 1.5V AAA batteries in the battery compartment, observing the polarity on the rear of the instrument.
-
Page 21: Lcd Message Guide
LCD MESSAGE GUIDE TAGS & SYMBOLS • Mode tags light up for indicating the corresponding active mode, and blink for warning the user. SETUP on: setup menu mode has been entered. MEASURE on: measurement mode. CALIBRATION on: calibration mode has been entered. CALIBRATION blinking: user calibration has been removed. -
Page 22: Temperature Correlation For Ph Sensitive Glass
TEMPERATURE CORRELATION FOR pH SENSITIVE GLASS The resistance of glass electrodes partially depends on the temperature. The lower the temperature, the higher the resistance. It takes more time for the reading to stabilize if the resistance is higher. In addition, the response time will suffer to a greater degree at temperatures below 25 °C. -
Page 23: Electrode Conditioning & Maintenance
ELECTRODE CONDITIONING & MAINTENANCE Not present in gel electrodes. PREPARATION PROCEDURE Remove the electrode protective cap. DO NOT BE ALARMED IF ANY SALT DEPOSITS ARE PRESENT. This is nor‑ mal with electrodes and they will disappear when rinsed with water. During transport tiny bubbles of air may have formed inside the glass bulb. - Page 24 Soak in Hanna Instruments HI7074 Inorganic Cleaning Solution for 15 min. • Oil/grease Rinse with Hanna Instruments HI7077 Oil & Fat Cleaning Solution for 1 min. IMPORTANT: After performing any of the cleaning procedures, rinse the electrode thoroughly with distilled water and soak it in HI70300...
-
Page 25: Troubleshooting Guide
TROUBLESHOOTING GUIDE SYMPTOMS PROBLEM SOLUTION Slow reponse/exces‑ Dirty pH electrode. The electrode needs to be clean. sive drift. Follow the Cleaning Procedure Clean Electrode prompt. on page 24. Reading fluctuates up Clogged/dirty Clean the electrode. and down (noise). junction. Refill with fresh electrolyte Low electrolyte (refillable electrodes only). -
Page 26: Accessories
ACCESSORIES pH CALIBRATION SOLUTIONS HI70004P pH 4.01 Buffer Solution, 20 mL sachet, 25 pcs. HI70007P pH 7.01 Buffer Solution, 20 mL sachet, 25 pcs. HI70010P pH 10.01 Buffer Solution, 20 mL sachet, 25 pcs. HI7004L pH 4.01 Buffer Solution, 500 mL bottle HI7004M pH 4.01 Buffer Solution, 230 mL bottle HI7006L... - Page 27 pH ELECTRODES All electrodes part numbers ending in B are supplied with a BNC connector and 1 m (3.3’) cable, as shown below: HI1043B Glass‑body, double junction, refillable, combination pH electrode. Use: strong acid/alkali. HI1053B Glass‑body, triple ceramic, conic shape, refillable, double junction combination pH electrode.
- Page 28 HI1330B Glass‑body, semimicro, single junction, refillable, combination pH electrode. Use: laboratory, vials. HI1331B Glass‑body, semimicro, single junction, refillable, combination pH electrode. Use: flasks. HI1230B Plastic‑body (PES), double junction, gel‑filled, combination pH electrode. Use: general, field. HI2031B Glass‑body, semimicro, conic, refillable, combination pH electrode. Use: semisolid products.
- Page 29 FC100B Plastic‑body (PVDF), double junction, refillable, combination pH electrode. Use: general purpose for food industry. FC200B Plastic‑body (PVDF), open junction, conic, Viscolene, non‑refillable, combination pH electrode. Use: meat & cheese. FC210B Glass‑body, double junction, conic, Viscolene, non‑refillable, combina‑ tion pH electrode. Use: milk, yogurt.
- Page 30 Plastic‑body (PES), gel‑filled, combination platinum ORP electrode. Use: general purpose. HI4430B Plastic‑body (PES), gel‑filled, combination gold ORP electrode. Use: general purpose. Consult the Hanna Instruments General Catalog for a complete and wide selection of electrodes. OTHER ACCESSORIES HI721317 Rugged carrying case HI740157 Plastic electrode refilling pipet (20 pcs.)
- Page 31 If the repair is not covered by the warranty, you will be notified of the charges incurred. If the instruments is to be returned to Hanna Instruments, first obtain a Returned Goods Authorization (RGA) number from the Technical Service department and then send it with shipping costs prepaid.
- Page 32 Hanna Instruments Inc. Highland Industrial Park 584 Park East Drive Woonsocket, RI 02895 USA Technical Support for Customers Tel. (800) 426 6287 Fax (401) 765 7575 E‑mail tech@hannainst.com www.hannainst.com Printed in ROMANIA MAN9126 09/17...
Need help?
Do you have a question about the HI9126 and is the answer not in the manual?
Questions and answers