
Summary of Contents for Venus Treasure Island PureDrop PDR-T33
- Page 1 PureDrop Reverse Osmosis Water Filter Systems INSTALLATION INSTRUCTION & OWNER’S MANUAL Ver 2018-10 Copyright ©2018 Venus Treasure Island, LLC. All rights reserved.
- Page 2 Please keep this owner’s manual for future reference. It includes the information on how to properly operate and maintain the system. TABLE OF CONTENTS Before Installation Inspect the package Recommended tools list Operating conditions Components Identification How to use Quick-Connect fitting To connect: To disconnect: How to drill a hole on sink or counter-top...
-
Page 3: Before Installation
Thank you for choosing the PureDrop Reverse Osmosis Water Filtration System. Before Installation Inspect the package Please open the box, and take all the components and tool kit out. Inspect them to ensure that nothing was damaged during shipping. If any part is cracked or broken, please immediately contact PureDrop Customer Support for a replacement. -
Page 4: Components Identification
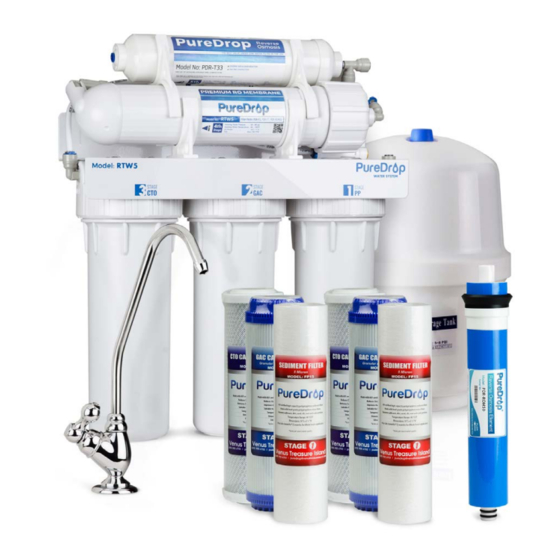
Components Identification Pre-filter housings, cartridges, RO machine head with 5 stage Storage tank (pre-pressurized * (membrane not yet installed) and RO membrane in sealed bag at 7-10 psi) 2×Feed Water Adapter (AFW) Housing wrenches 4-color tubing set (5 feet each) Tank valve Drain saddle ¼”... -
Page 5: Installation Tips
Installation Tips How to use Quick-Connect fitting To connect: 1. Check and cut the tubing end squarely and cleanly with utility knife or scissors. 2. Make a mark ½ inch from the end of the tubing, this mark will help guide the tubing installation. - Page 6 To disconnect: 1. Remove the blue Lock Clip. 2. With the blue lock clip removed, use your thumb and index finger to hold down the lock sleeve. This will release the metal teeth holding the tube in place. While holding the lock sleeve down with that hand, use your other hand to remove the tube from the fitting.
- Page 7 Sample Installation A. Source water from Feed Water Adapter → B. Source water to water inlet next to 1st stage C. Waste water from Flow Restrictor →D. Waste water to Drain Saddle E. RO water from Automatic Shut-off Valve → F. RO water to Storage Tank G.
-
Page 8: Installation Steps
Installation Steps Note: Steps 1 – 7 are independent, and can be performed in any order. Step 1: Installing the Feed Water Adapter (AFW) 1.1 Turn off the Cold Water Line via the Cold Water Shutoff Valve (CWSV) under the sink. Open the kitchen faucet to release pressure and make sure water has stopped before proceeding to the next step. -
Page 9: Step 3: Installing The Drain Saddle
Step 3: Installing the Drain Saddle 3.1 Choose a spot on the drain pipe that is convenient for installing the drain saddle and tubing. It is recommended that you install in a horizontal pipe to minimize dripping sounds. 3.2 Drill a 1 /4” hole on the drain pipe; paste the black sticky pad around the hole. 3.3 Cut the WHITE tubing end to make a 45 degree angle. -
Page 10: Step 7: Tubing Hook Up
Step 6: Installing the Reverse Osmosis Membrane 6.1 Open the membrane housing screw cap. First, you will need to disconnect the white 1 / 4” tubing from the Inlet quick- fitting on the membrane housing cap (refer to How to Use Quick-Fitting section), and then unscrew (counter- clockwise) the cap. -
Page 11: Step 8: System Start Up
7.3 Connect the Flow Restrictor (point C), which is a 3-inch long cylinder with a FLOW sign laying besides the membrane housing, to the Drain Saddle (point D) with the White tubing. 7.4 On the right side of the Post Carbon Filter (FT15 5 stage), connect the Tee-fitting (point E) and the Tank Valve (point F) with the YELLOW tubing. - Page 12 8.8 Check for leaks daily for the first two weeks after installation. Furthermore, a pan or tray can be put under the system in case of any leaks, and a Flood Alarm can be used together for better protection. Congratulations! You have successfully installed your PureDrop RO system.
- Page 13 system out, lay it down, and remove the housings at that point. Be careful with the tubing connections when removing the system. 3. Twist off the filter housing in a counter-clockwise direction when looking from the bottom. Use a housing wrench (the bigger one) if necessary. Refer to Installation Step 1.1 to install the new vertical filter cartridges and twist the housings back on.
- Page 14 Extra Installation - Refrigerator Connection Kit (ICEK) Page 13 www.purifiltration.com | (678) 900-4702 | support@purifiltration.com...
-
Page 15: Section 1: Knowledge Base
OWNER’S MANUAL Please read this manual for useful reverse osmosis system and maintenance information. Section 1: Knowledge Base What Is Reverse Osmosis? Reverse osmosis, also known as hyper filtration, is a membrane filtration process that separates undesirable materials from water by using pressure to force the water molecules through a semi- permeable membrane. -
Page 16: Section 2: Troubleshooting Guide
Note: You may or may not have these contaminants in your water. The percentage rejection rate is for reference only. Percentages may vary since water chemistry varies in each water supply. Does Reverse Osmosis remove pharmaceuticals from water? Yes, the 5-stage RO with carbon pre-filters can remove most of pharmaceuticals from water. An activated carbon filter gives these contaminants a charge so they are absorbed and removed. -
Page 17: Continuous Drain
● Get a bucket under the tank and remove tank by disconnecting the ball valve. ● Dump the water from the tank by turning it upside down (through the top stem). You may add air from the front valve to help emptying the water. ●... -
Page 18: Warranty
Faucet Leaks or Drips Possible Causes and Solution for water leaks from faucet spout: Adjust faucet by turning the tee bar located under the handle to provide a small amount of free play in the handle when it’s shut off. Should this not work, repair or replace the faucet. - Page 19 not limited to, services related to the removal, replacement, installation, adjustment, maintenance, and/or repair of the unit or its components items. excludes all non-Manufacturer labor required for any servicing of the unit, including, but not limited to, servicing related to installation, adjustment, maintenance, and repair of the unit.
-
Page 20: Warranty Registration
Thank you! How to reach us: Local / International: 678-900-4702 Office Hours: Monday-Friday 9:00 a.m. - 5 p.m. EST Technical Support Hours: Monday-Friday 9:00 a.m. - 5:00 p.m. EST Venus Treasure Island, LLC Page 19 www.purifiltration.com | (678) 900-4702 | support@purifiltration.com...
Need help?
Do you have a question about the PureDrop PDR-T33 and is the answer not in the manual?
Questions and answers