Table of Contents
Advertisement
Available languages
Available languages
ATTACH YOUR RECEIPT HERE
Serial Number
Questions, problems, missing parts? Before returning to your retailer, call our customer
service department at 1-866-994-4148, 7:30 a.m. - 5:00 p.m., EST, Monday - Friday.
AB171145
Purchase Date
1
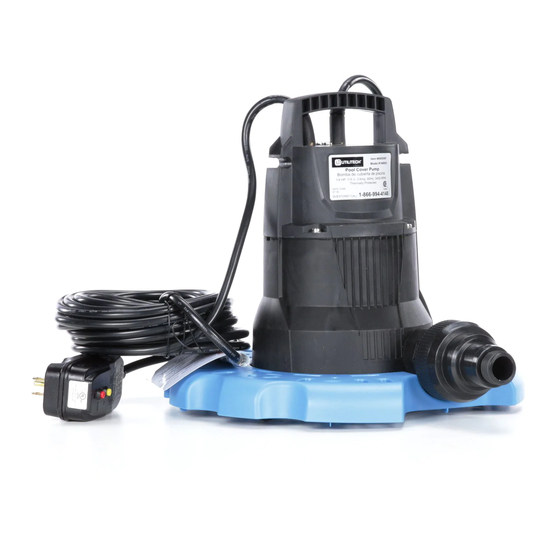
POOL COVER PUMP
ITEM #0955587
UTILITY
MODEL #148003
Español p. 9
Advertisement
Table of Contents

Subscribe to Our Youtube Channel
Related Manuals for Utilitech 148003


Summary of Contents for Utilitech 148003
- Page 1 ITEM #0955587 UTILITY POOL COVER PUMP MODEL #148003 Español p. 9 ATTACH YOUR RECEIPT HERE Purchase Date Serial Number Questions, problems, missing parts? Before returning to your retailer, call our customer service department at 1-866-994-4148, 7:30 a.m. - 5:00 p.m., EST, Monday - Friday.
- Page 2 ABOVE PUMPING LEVEL MAX LIFT NUMBER NUMBER 0 FT. 5 FT. 10 FT. 15 FT. 0955587 148003 2,400 2,280 1,800 1,320 23 FT. SAFETY INFORMATION Please read and understand this entire manual before attempting to assemble, operate, or install the product.
- Page 3 WARNING • ELECTRICAL SHOCK ALERT. Before installing this product, have the electrical circuit checked by an electrician to ensure proper grounding. All electrical installations must conform to the National Electric Code and all local codes. • ELECTRICAL SHOCK ALERT. Connect this product to a properly-grounded 115 volt circuit 3 wire GFCI outlet. •...
-
Page 4: Installation Instructions
PREPARATION Before beginning assembly of product, make sure all parts are present. Compare parts with package contents list. If any part is missing or damaged, do not attempt to assemble the product. Estimated Assembly Time: 5 minutes No Tools Required for Assembly. INSTALLATION INSTRUCTIONS For best performance, use discharge hose of 50 ft. - Page 5 3. If using garden hose (not included), thread the female end of the garden hose into the male end of the garden hose adapter (B). For best performance, unwind the hose before starting the pump. 4. Place pump (A) in an upright position on the pool cover where water will collect.
-
Page 6: Care And Maintenance
OPERATING INSTRUCTIONS 1. The pump (A) will turn on when the water level around the pump reaches approximately 2 in. Water must contact the pump sensors in order for it to turn on. When the water level drops to approximately .4 in., pump (A) will run for 10 additional seconds and then turn off. -
Page 7: Troubleshooting
2. If pump (A) clogs, unplug the pump from the power supply and remove snap-on strainer (C). Base 3. Turn pump (A) upside down and inspect probes for debris. Clean if needed. Inspect for debris TROUBLESHOOTING PROBLEM POSSIBLE CAUSE CORRECTIVE ACTION Pump won’t start or Blown fuse or circuit breaker. -
Page 8: Warranty
PROBLEM POSSIBLE CAUSE CORRECTIVE ACTION Pump operates but Low line voltage. Call power company. delivers little or no Impeller is clogged. Unplug pump and clean out impeller. water. Garden hose diameter is too small or Use larger diameter garden hose or 1 too long. - Page 9 ARTÍCULO #0955587 MULTIUSO BOMBA DE CUBIERTA PARA PISCINA MODELO #148003 ADJUNTE SU RECIBO AQUÍ Fecha de compra Número de serie ¿Preguntas, problemas, piezas faltantes? Antes de volver a la tienda, llame a nuestro Departamento de Servicio al Cliente al 1-866-994-4148, de lunes a viernes de 7:30 a.m. a...
- Page 10 POR ENCIMA DEL NIVEL DE BOMBEO MÁX. ARTÍCULO MODELO 1,52 M 3,04 M 4,57 M 0955587 148003 9,084 8,630 6,814 4,997 7,01 M INFORMACIÓN DE SEGURIDAD Lea y comprenda completamente este manual antes de intentar ensamblar, usar o instalar el producto.
- Page 11 • ALERTA DE DESCARGA ELÉCTRICA. Conecte este producto a un tomacorriente con circuito de GFCI 115 voltios con la debida puesta a tierra de 3 clavijas. • ALERTA DE DESCARGA ELÉCTRICA. No manipule la bomba o el motor de la bomba con las manos húmedas ni cuando esté parado en una superficie húmeda o en el agua.
-
Page 12: Instrucciones De Instalación
PREPARACIÓN Antes de comenzar a ensamblar el producto, asegúrese de tener todas las piezas. Compare las piezas con la lista del contenido del paquete. No intente ensamblar el producto si falta alguna pieza o si estas están dañadas. Tiempo estimado de ensamblaje: 5 minutos No se necesitan herramientas para el ensamblaje. - Page 13 3. Si desea utilizar una manguera para jardín (no se incluye), enrosque el extremo hembra de la manguera para jardín en el extremo macho del adaptador de la manguera para jardín (B). Para obtener el mejor rendimiento, desenrolle la manguera antes de arrancar la bomba. 4.
-
Page 14: Instrucciones De Funcionamiento
INSTRUCCIONES DE FUNCIONAMIENTO 1. La bomba (A) se encenderá cuando el nivel de agua alrededor de la bomba alcance aproximadamente 5,08 cm. El agua debe tener contacto con los sensores de la bomba para que se encienda. Cuando el nivel de agua disminuye a aproximadamente 1,01 cm, la bomba (A) funcionará... -
Page 15: Solución De Problemas
2. Si la bomba (A) se atasca, desenchúfela del suministro de electricidad y retire el colador a presión (C). Base 3. Gire la bomba (A) de manera invertida e inspeccione las sondas en busca de desechos. Límpielas si es necesario. Inspeccione en busca de desechos SOLUCIÓN DE PROBLEMAS... - Page 16 PROBLEMA CAUSA POSIBLE ACCIÓN CORRECTIVA La bomba El protector de sobrecarga está apagando la bomba debido a que: se apaga El voltaje de línea es bajo. Llame a la compañía de electricidad. repetidamente. El impulsor está obstruido. Desenchufe la bomba y limpie el impulsor. Hay demasiada contrapresión en la Verifique que la manguera no esté...
Need help?
Do you have a question about the 148003 and is the answer not in the manual?
Questions and answers
Is there a parts list for this pump?
Yes, the parts list for the Utilitech pump model #148003 includes:
- Pump (Quantity: 1)
- Garden hose adapter/check valve (Quantity: 1)
- Snap-on strainer (Quantity: 1)
This answer is automatically generated