Advertisement
M anu al o f th e
B aad er D i g i sco pi ng A d ap ter M i cro S tag e I I
– # 2450330 –
Take your B aader D i gi scopi ng-A dapt er M i croS t age I I out of i t s prot ect i ve cover .
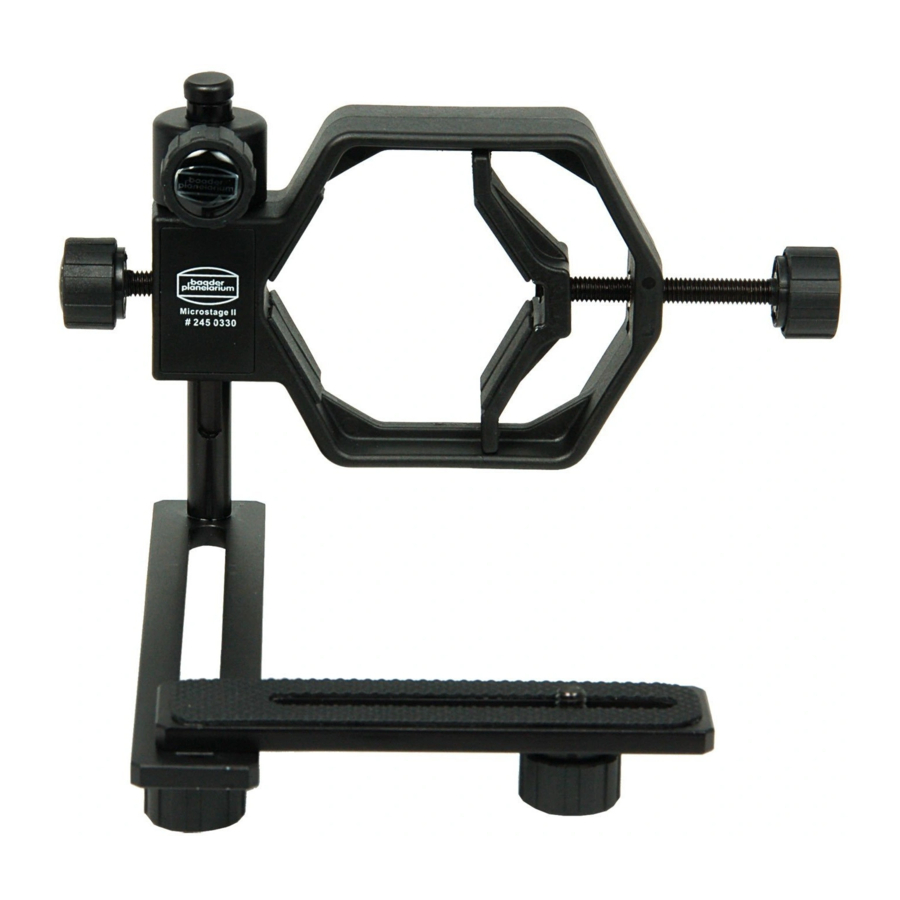
T he B aader D i gi scopi ng-A dapt er M i croS t age I I i s del i vered i n hom e posi t i on, as i n pi ct ure I . T hi s
i s best f or st orage as t he D i gi scopi ng-A dapt er M i croS t age I I uses t he l east space i n t hi s
posi t i on.
To get your M i croS t age I I ready f or use, pl ease proceed as f ol l ow s:
T he cl am p screw s (C S ), w hi ch are part of t he process, are num bered i n each pi ct ur e.
B aader D i gi scopi ng-A dapt er M i crost age I I i n i t s H om e P osi t i on
E yepi ece bracket
C S 1
C S 5
C S 2
C rossbar
C S 4
cent ral axi s
cam er a gui de r ai l
C S 3
F i g . I
F i rst , open cl am p screw s 1 and 2 – as i n F i gure I .
D O K : G \ A nl \B aa\Zub\ M i croS tage2\ E _A nl -M i croS tage2-0413-w d.doc
Advertisement
Table of Contents

Related Manuals for Baader Planetarium MicroStage II


Summary of Contents for Baader Planetarium MicroStage II
- Page 1 M anu al o f th e B aad er D i g i sco pi ng A d ap ter M i cro S tag e I I – # 2450330 – Take your B aader D i gi scopi ng-A dapt er M i croS t age I I out of i t s prot ect i ve cover . T he B aader D i gi scopi ng-A dapt er M i croS t age I I i s del i vered i n hom e posi t i on, as i n pi ct ure I .
- Page 2 C S 1 C S 2 C S 5 C ent r al axi s w i t h pl anar m i l l i ng C S 4 C S 3 F i g . I I N ext , t urn t he cam era gui de rai l t oget her w i t h t he crossbar by 180 degrees t o t he back and t he si de –...
- Page 3 B aader D i gi scopi ng-A dapt er M i croS t age I I i s now i n i t s w orki ng posi t i on and ready t o carry your cam era. C S 5 C S 5 C S 1 C S 2...
- Page 4 B y al t ernat el y l ooseni ng rot ary knobs 1, 2, 3 and 4 – as i n F i gure V I I I – you can posi t i on your cam era i n f ront of t he eyepi ece i n such a w ay t hat t he opt i cal axi s of t he eyepi ece corresponds w i t h t hat of t he cam era l ens and t he di spl ay det ai l you are ai m i ng at appears on t he di spl ay or i n t he vi ew f i nder .
Need help?
Do you have a question about the MicroStage II and is the answer not in the manual?
Questions and answers