Table of Contents
Advertisement
C10A
Installation and Users
Manual for C10A ,
C10A Flushmount
and Key Switch Variants:
C21B, C41B
C23B, C43B
C21D-2, C43D-2
grifco.com.au
grifco.co.nz
D-M-ACG/086
Electronic Wall
Controller
Chamberlain Australia Pty Ltd
PO Box 1446, Lane Cove
NSW 1595, Australia
Phone toll free 1800 474 326
Chamberlain New Zealand Ltd
PO Box 100-221
Auckland 0745, New Zealand
Phone toll free 0800 653 667
191118
Advertisement
Table of Contents

Related Manuals for Grifco C10A


Summary of Contents for Grifco C10A
- Page 1 Electronic Wall C10A Controller Installation and Users Manual for C10A , C10A Flushmount and Key Switch Variants: Chamberlain Australia Pty Ltd PO Box 1446, Lane Cove C21B, C41B NSW 1595, Australia C23B, C43B Phone toll free 1800 474 326 C21D-2, C43D-2...
-
Page 2: Table Of Contents
TABLE OF CONTENTS Safety instructions Introduction Identifying your Controller Planning Installation Operation 7-10 Checking power Door direction Changing Door Direction Limit Confirmation (Jog Direction) Setting Limits Optional Third Limit (extended open position) Setting Limits (Smoke Baffle Feature eDrive +2.0) ... -
Page 3: Safety Instructions
SAFETY SYMBOL AND SIGNAL WORD REVIEW Safety symbol and signal word review This commercial door controller has been designed and tested to offer safe service provided it is installed, operated, maintained and tested in strict accordance with the instructions and warnings contained in this manual. When you see these Safety Symbols and Signal Words on the WARNING following pages, they will alert you to the possibility of... -
Page 4: Introduction
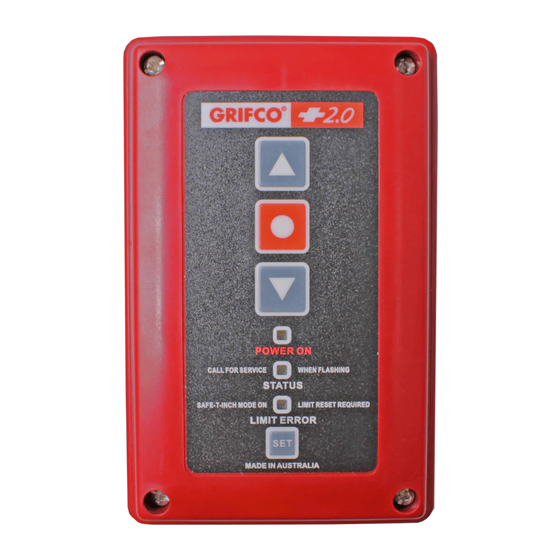
INTRODUCTION Congratulations on your purchase of a Grifco® Electronic Wall Controller. This controller is the user interface for the opener. It consists of four buttons for control and setup, as well as three indicators to display the opener status. IDENTIFYING YOUR CONTROLLER... -
Page 5: C21D-2 C41D-2
(Off-Auto-Auto/Man) The C10A controller will not operate from any source. WARNING!! THIS IS NOT POWER ISOLATION!! AUTO Isolates the C10A front panel UP and DOWN buttons to prevent tampering (typical mode for car park environments) All other inputs remain active... -
Page 6: Planning
Plug the RJ45 end into the socket located within the controller assembly. Use the space provided within the controller enclosure to neatly coil any excess cable. Note: If the supplied 6m controller cable is not long enough for your installation, use a Grifco® Controller Extension Kit, available from your local dealer or Chamberlain (P/N ESK01). -
Page 7: Operation
OPERATION Once the installation of the opener and controller is complete it is time to test the operation. Make sure the door is away from the ground or the top door stops (mid open position). This will prevent damage to the door in the event that the door direction is reversed in relation to the controller (see below changing door direction). -
Page 8: Limit Confirmation (Jog Direction)
OPERATION READ CAREFULLY BEFORE SETTING LIMITS! (not applicable to roller shutters) The eDrive + 2.0 features a limit confirmation routine that occurs after a power outage upon the first push of any operate button. By default, the routine will “jog” slightly downward in order to confirm door position before proceeding in the intended direction. -
Page 9: Optional Third Limit (Extended Open Position)
OPERATION Optional third limit (extended open position) The third limit is a handy option for high doors that rarely need to be fully opened. The third limit is a door position above the open limit position which can be accessed when needed. Having this upper stopping position allows a mid height limit to be set as a first opening point, while a further press of the open button takes the door to a higher set position. - Page 10 OPERATION To operate the door Press the UP button on the controller to open the door, press and hold DOWN to close. Optional Door Behaviour Latch up / Inch down mode (default): The door will travel upwards with only a single press and release of the UP button. The door will stop at the set limit. This mode is latch up.
-
Page 11: Controller Interface
Once the resistor is removed, the C10A front control panel is disabled, leaving only remote controls and other control inputs connected to either the EB1 (if fitted) or the rear of the C10A, or MCB toggle inputs to operate the opener. -
Page 12: Open
When connecting auxiliary control devices, it is possible to connect a Momentary Normally Open voltage free contact to operate the opener. Door behavior should be considered when utilizing the connection terminals on the C10A. * The door must only be set to latch DOWN if there is a suitable Entrapment Protection Device installed. -
Page 13: Edrive +2.0 Advanced Programming
The green light will go out indicating exit of learn mode. LEARN THE E840G WIRELESS Press and hold the SET button on the GRIFCO® controller, then KEYPAD FROM THE CONTROLLER While holding the SET button, press the STOP button 5 times The green status light will light then continue flashing. - Page 14 EDRIVE +2.0 ADVANCED PROGRAMMIMG Action Button Sequence SET AUTO TIMER TO CLOSE FROM Press and hold the SET button, then whilst holding press the DOWN button 3 times THE CONTROLLER The green status light will be ON solid Note: This option is using the main ...
-
Page 15: Schematics
SCHEMATICS C21B eDrive +2.0 Controller with basic Key Isolator (On-Off) C41B eDrive +2.0 Controller with basic Key Isolator (On-Off) Remove ESTP Resistor... -
Page 16: C23B C43B
SCHEMATICS C23B eDrive +2.0 Controller with “Lock-it-Well” Isolator (On-Off) C43B eDrive +2.0 Controller with “Lock-it-Well” Isolator (On-Off) Remove ESTP Resistor... - Page 17 SCHEMATICS C21D-2 eDrive +2.0 Controller with Multi-Mode Isolator (Off-Auto– Auto/Manual) C41D-2 eDrive +2.0 Controller with Multi-Mode Isolator (Off-Auto– Auto/Manual) Remove AUTO Resistor And ESTP resistor AUTO COMM ESTP...
-
Page 18: Troubleshooting
If a problem is found with an installation, be sure to read the troubleshooting guide thoroughly. If the problem persists call Chamberlain for technical assistance on 1800 GRIFCO® or email customerservice@chamberlainanz.com in Australia or in New Zealand call 0800 653 667. -
Page 19: Notes
NOTES... -
Page 20: Warranty
Chamberlain’s warranty Chamberlain warrants to the original purchaser of the Grifco product (Unit) that: 1 The Unit (excluding the electric motor) is free from defects in materials and workmanship for a period of 24 months from the date of purchase.
Need help?
Do you have a question about the C10A and is the answer not in the manual?
Questions and answers