Table of Contents
Advertisement
Quick Links
Advertisement
Table of Contents

Related Manuals for Bush LSBGHP


Summary of Contents for Bush LSBGHP
- Page 1 Instruction manual Bulit-in Gas Hob LSBGHP...
- Page 2 We’re here to help you get the most from your . Should you require any guidance, a simple solution can often be found online at: www.bush-support.com If you still require further assistance, call one of our experts on 01759 487838.
-
Page 3: Table Of Contents
Installation premises Declaration of conformance to product standards Discharge of flue gases Gas Connection Electrical connection Changing the nozzles Using your Using the or online at www.bush-support.com If you still require further assistance, call one of our experts on 01759 487838... -
Page 5: Safety Information
Safety information... - Page 6 Safety information Important - Please read these instructions fully before installing or operating or online at www. -support.com If you still require further assistance, call one of our experts on 01759 487838 Safety information...
- Page 7 Safety information Important - Please read these instructions fully before installing or operating WARNING: Please take care during the handling as the bottom may have sharp edge. If you require any technical guidance or find that your product is not operating as intended, a simple solution can often be found in the Troubleshooting section of these instructions, Safety information...
- Page 9 Getting to know yo...
-
Page 10: Getting To Know Your
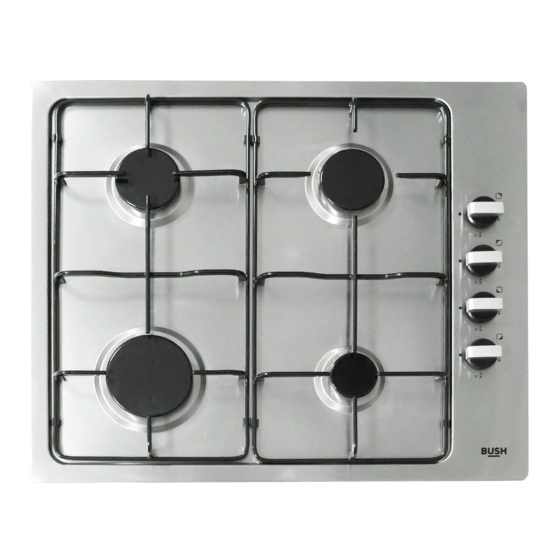
For full details, refer to the product support section at the end of these instructions. or online at www.bush-support.com If you still require further assistance, call one of our experts on 01759 487838 Getting to know your... - Page 11 Getting to know your You’ll be up and running in no time Overview 1. Hob 2.Auxiliary burner 3.Semi-Rapid burner 4.Rapid burner 5. Control knobs Knob Symbols All operation positions must be set between the maximun and minimun flow settings, and never between the maximun setting and the off position.
- Page 12 You’ll be up and running in no time Burner A-Burner cap B-Burner Head C-Burner Bowl D-Thermocouple E-Electrode Accessories Bracket or online at www.bush-support.com If you still require further assistance, call one of our experts on 01759 487838 Getting to know your...
-
Page 13: Installing Your
Installing your... -
Page 14: Installation Premises
3-5 times its volume. In both instances, the use of flues already used by other appliances to discharge the flue gases is forbidden. or online at www.bush-support.com If you still require further assistance, call one of our experts on 01759 487838 Getting to know your... - Page 15 Installing your Bringing it all together Connection to the gas supply The gas connection must be made in accordance with the local standards. When installing, fit a safety tap at the end of the pipeline. The appliance leaves the factory tested and set for the type of gas indicated on the plate inside the bottom guard, close to the gas connection pipe.
-
Page 16: Electrical Connection
Installing your Bringing it all together Electrical connection The connection must be made in accordance with the regulations and laws in force. Before making the connection, make sure that: The safety circuit-breaker and the electrical system are able to withstand the load of the appliance (see nameplate). -
Page 17: Changing The Nozzles
Installing your Bringing it all toget Adapting to the different types of gas Changing the nozzles Remove the pan standee. Remove the burner caps and flame caps from the burners. Use a size 7 socket wrench to unscrew and remove the nozzles, replacing them with those corresponding to the type of gas to be used (see the table ). - Page 18 Installing your Bringing it all toget Building into fitted kitchen units These hobs are designed for installation in fitted kitchen units up to 600mm deep with suitable characteristics. Any cabinet side panels taller than the height of the hob itself must be at least 150mm away from the opening into which the hob is inserted.
-
Page 19: Using Your
Using your... - Page 20 Using your Getting the most from your appliance Lighting the burners To obtain a flame more easily, light the burner before placing a cooking utensil on the pan stand To light a burner, proceed as follow: for Version with lighting integrated in the control knob push the knob of the burner fully down and turn it anticlockwise to the “maximum flow”...
-
Page 21: Care And Maintenance
Care and maintenance... -
Page 22: Cleaning
Care and maintenance Looking after your appliance Before each operation, disconnect the appliance from the electrical mains and allow it to cool down. General cleaning Wash enameled parts with lukewarm water and detergent: do not use abrasive products which might damage them. Wash the flame caps and burner caps often with boiling water and detergent, taking care to remove all deposits The hob pan stands can also be washed in a dishwasher... - Page 23 Care and maintenance Looking after your appliance Routine maintenance Have the condition and efficiency of the gas pipe and the pressure regulator (if installed) checked periodically. If anomalies are found, do not repair components but have the faulty component replaced. To ensure good performance and safety, the gas regulator taps must be greased periodically.
- Page 24 Care and maintenance Looking after your appliance Technical Specification Injector Table G30 29mbar 7.5 kW 545 g/h II2H3+ GB Clase: 3 G30 29mbar G20 20 mbar RAPID BURNER DIA. of INJECTOR (1/100mm) NOMINAL RATING (KW) CONSUMPTION 286 l/h 218g/h SEMI-RAPID BURNER DIA.
-
Page 25: Product Support
Product support... -
Page 26: Troubleshooting
Product support Help is always at hand Troubleshooting 1. If no electrical functions appear to work, check 3. DO NOT ATTEMPT TO REPAIR THIS the hob isolation switch has not been turned off HOB YOURSELF. CALL PRODUCT SUPPORT ON 01759 487838 OR CONSULT also check the fuse in the switch and the circuit A GAS SAFE REGISTERED INSTALLER breaker in you consumer unit... -
Page 27: Help And Assistance
Product support Help is always at hand Help and assistance If you require any technical guidance or find that your Built In Hob is not operating as intended, a simple solution can often be found in the Troubleshooting section of these instructions or online at www. -
Page 28: Declaration Of Conformance To Product Standards
Product support Help is always at hand Declaration of conformance to Disposal product standards This appliance conforms to all relavant standards applicable to domestic appliances sold in the UK crossed out wheelie bin or online at www. - support.com If you still require further assistance, call one of our experts on 01759 487838 Product support... - Page 29 • Specifications are subject to change without notice. • The product must be correctly installed and • Bush disclaim any liability for loss or damage arising operated in accordance with the instructions from the breakdown of the product.
- Page 30 Contact: www. -support.com Helpline: 01759 487838...
Need help?
Do you have a question about the LSBGHP and is the answer not in the manual?
Questions and answers