
Subscribe to Our Youtube Channel
Related Manuals for OTS AQUACOM MK-III

Summary of Contents for OTS AQUACOM MK-III
- Page 1 ® Aquacom mk-III 3-diver intercom Full-Duplex Surface Station for Underwater Communications “Technology In Depth” ®...
- Page 2 - NOTICE - This manual and the information contained herein are provided for use as a main- tenance and operation guide. No license or rights to manufacture, produce, and/ or sell either the manual or articles described herein are given. Undersea Systems International, Inc., dba Ocean Technology Systems, reserves the right to change specifications without notice.
-
Page 3: Table Of Contents
Table of Contents: Section 1: Introduction ................4 Section 2: Description of Equipment ............5 Specifications ...................5 Included With MK-III ..............6 Additional Components ..............6 2.3.1 Communications Cables ............6 2.3.1.1 CommRopes ............6 2.3.1.2 Floating Commcable .........6 2.3.2 Earphone-Microphone (EM) Assemblies ......6 2.3.3 Umbilical Adapters ............6 2.3.4 THB-MK-III Headset ............7 2.36... -
Page 4: Section 1: Introduction
MK-III. If you have any questions, contact your local OTS dealer, or feel free to contact OTS directly (See page 20 for OTS contact informa- tion.) -
Page 5: Section 2: Description Of Equipment
SECTION 2 EQUIPMENT DESCRIPTION SPECIFICATIONS Input Voltage: 12VDC (Minimum 3 amps) or 90–240 V AC, 50–60 Hz Idle Current: 300 mA Audio Frequency: 300-4000 Hz Battery Type: Nonspillable Lead Acid, 12v, 7.2Ah Battery Life: 20 hours idle, 12 hours Working Operating Temperature: -40°C to 50°C (-40°F to 122°F) Storage Temperature:... -
Page 6: Included With Mk-Iii
RCS-20US battery charger • RB-12 rechargeable battery ADDITIONAL COMPONENTS, SOLD SEPARATED All additional components can be sourced from OTS or your local OTS dealer. 2.3.1 COMMUNICATIONS CABLES Each diver requires an intercom cable to connect to the MK-III. Be sure to obtain cables that mate with the Diver Earphone-Microphone Assem- bly and the corresponding MK-III mating connectors. -
Page 7: Thb-Mk-Iii Headset
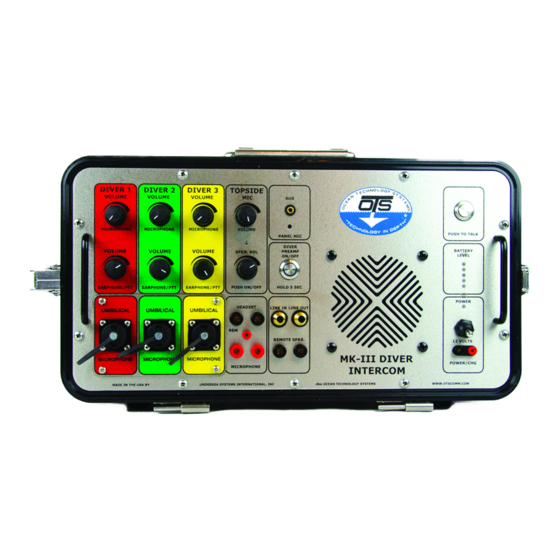
2.3.4 THB-MK-III HEADSET (900465-000) OTS offers an optional tender headset designed to support all MK-III fea- tures, including a headset mounted Push-to-talk button. 2.3.5 HHM-2 MICROPHONE (910193-000) OTS offers an optional hand-held microphone designed to support all MK-III features. MK-III PANEL MAP Figure 1 depicts the MK-III panel. -
Page 8: Mk-Iii Case Map
6. Panel Microphone: The panel mounted Microphone. 7. Diver Pre-amp: Powered Mic on/off switch with LED. 8. Panel Mounted Speaker: The panel mounted speaker. 9. Push to Talk: The push to talk button toggles the panel mounted mi- crophone. 10. REM: Remote Tender Headset PTT connection. 11. -
Page 9: Section 3: Supplying Electrical Power
When the latches are closed and the unit is sealed, the MK-III is pro- tected from ocean spray. While the MK-III has been tested against an overboard scenario, it is not guaranteed to be protected against full submersion. 2. Bumper Feet: The MK-III has an additional set of Bumper Feet, al- lowing the unit to be used from either a face up (vertical) or face out/ horizontal orientation. -
Page 10: Battery Charging
DANGER WHILE RECHARGING THE BATTERY AND THE SAFETY VENTS ARE OPEN, THE UNIT MUST BE KEPT AWAY FROM WATER AND OCEAN SPRAY. FAILURE TO KEEP THE UNIT FREE FROM WATER MAY CAUSE INJURY OR DEATH LED BATTERY CONDITION INDICATOR Charge Remaining Audio Tone 100% 3 Green... -
Page 11: Battery Replacement
Replacement batteries (part no. 392016-000) are available from OTS or your local dealer. Follow these instructions to replace the battery: 1. Ensure the power switch (Fig. 1, #17) is toggled to the off position. If the unit is connected to an external power source, unplug the power cable from it. -
Page 12: Ac Power
U.S.A. However, if you need a plug for a different region of the world, appropriate power cords are available from OTS or your OTS dealer. EXTERNAL DC POWER To operate the MK-III using an external 12-volt DC power source (such as a lead-acid battery of 5.0 Ah or other DC power supply of at least 3A),... -
Page 13: Section 4: Operation
AVOID SHOCKING, DO NOT PLACE MOUTH/LIPS ON THE SCREWS OF THE MICROPHONE AND/OR INSULATE THE SCREWS WITH A RUBBER BOOT. PLEASE CONTACT OTS IF YOU REQUIRE A RUBBER BOOT FOR YOUR APPLICATION Two-Wire or Four-Wire selection: Only for banana connector versions. -
Page 14: Topside Controls
Fig. 5 Fig. 6 Four-Wire Operation Instructions: While in the Four-Wire configuration, the Tender and Divers can communicate freely without the need to press any buttons. Diver Pre-Amp: Do not connect non-powered earphone / microphone assemblies when the pre-amp is activated. Doing so will damage the earphone / microphone assembly. -
Page 15: Diver Controls
Pressing the PTT button will mute the panel speaker and activates the panel microphone for as long as the button is depressed. Pressing the PTT button also mutes all the diver microphones. Panel Mic: The Panel Mic is normally deactivated. Pressing the PTT button will activate the Microphone. -
Page 16: Daisy Chaining
Diver Earphone Volume: WARNING: pressing the push-to-talk button could shock the divers in the event that the diver microphone mounting screws are in direct contact with the diver’s mouth. Ensure that the microphone is placed away from the Diver’s mouth or the screws are insulated with a rubber boot. -
Page 17: Helpful Hints
HELPFUL HINTS These guidelines are provided to help you understand how best to use the MK-III 3-Diver Intercom. 1. Before diving operations begin, check to ensure the microphone, earphone, and wiring connections are secure and operating properly. Ninety percent of all problems in underwater communications are due to a connection problem. -
Page 18: Section 5: Maintenance And Sub-Panel Replacement
SECTION 5 MAINTENANCE AND SUB-PANEL REPLACEMENT PREVENTIVE MAINTENANCE Although the Aquacom MK-III 3-Diver Intercom has a rugged design, ® it should be treated with care, as with any quality electronic equipment. The following should be done regularly or before every dive to prevent malfunction of the MK-III: 1. - Page 19 1. Ensure that the unit is powered down. 2. Remove the 10 panel screws and washers. Fig. 7 3. Gently lift the panel away from the case and disconnect the panel from the battery. 4. Turn the panel over so that you can get easy access to the electronics side of the panel.
-
Page 20: Troubleshooting
MK-III that is not mentioned below, or if you have attempted the suggested solutions and the failure persists, contact OTS or your local OTS dealer for consultation or repair. If you need to replace any components or parts, refer to the Spare parts... -
Page 21: Spare Parts
SPARE PARTS Name of Part OTS part number 200051-000 Accessory Net 244042-000 Panel Screw 245047-000 Panel Washers 243002-000 Panel Handles 110065-000 Panel Speaker 242026-000 Control knobs 242026-001 Control knob cap J020 Power/charge panel connector 910193-000 HMM-2 Handheld Microphone 900465-000 THB-MK-III Headset... - Page 22 NOTES: 506279-000 REV. A...
- Page 23 NOTES: 506279-000 REV. A...
-
Page 24: Limited Warranty
Ocean Technology Systems factory-trained service center or properly trained personnel. In no event shall Ocean Technology Systems be liable for consequential damages. You can now register your product online at the OTS Web site. Just visit http://www.otscomm.com/register1.html. Ocean Technology Systems 3133 W.
Need help?
Do you have a question about the AQUACOM MK-III and is the answer not in the manual?
Questions and answers