Advertisement
Overview
HolyBro Kakute F7 HDV is designed to work with the DJI FPV VTx module. The GH port available on the
board makes it much more convenient for you to connect HolyBro Kakute F7 HDV to the DJI FPV VTx, for
both signal and power supply.
Features
•
Supports Betaflight.
•
High-performance / low-noise IMU. MPU6000 with 6-axis gyro and accelerometer.
•
Ready for autonomous flight: Integrated BMP280 barometer and SCL/SDA for use with external
GPS/magnetometer units.
•
Dedicated bootloader button for easy firmware flashing.
•
Low-profile design fits into even very compact frames.
•
Input voltage 7v to 42v. Power the board directly from the flight pack, up to 6S (on "B+" pad
only).
•
Automatic voltage monitoring. No need to run a separate vBat wire for voltage monitoring; the
KAKUTE F7 HDV monitors voltage directly from the power supply.
•
Filtered voltage output for clean, noise-free video. 2 On-board regulators output 5V and 8V. 5V
output up to 1.5A to power peripherals such as receiver, FPV camera, or LED strip. 8V output up
to 2A to DJI FPV VTx.
•
Supports BLHeli pass-through for easy ESC upgrade and configuration.
#11042
KAKUTE F7 HDV
Advertisement
Table of Contents

Related Manuals for Holybro KAKUTE F7 HDV


Summary of Contents for Holybro KAKUTE F7 HDV
- Page 1 Overview HolyBro Kakute F7 HDV is designed to work with the DJI FPV VTx module. The GH port available on the board makes it much more convenient for you to connect HolyBro Kakute F7 HDV to the DJI FPV VTx, for both signal and power supply.
-
Page 2: Specifications
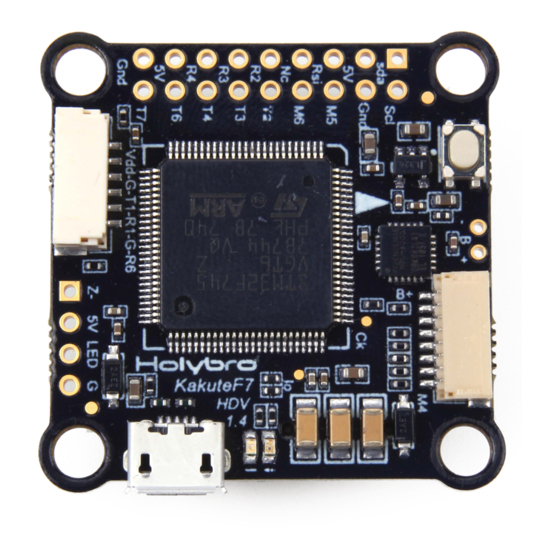
Specifications • MCU: STM32F745 32-bit processor • IMU:MPU6000 • Barometer: BMP280 • USB VCP Driver (all UARTs usable simultaneously; USB does not take up a UART) • 6 hardware UARTS (UART1,2,3,4,6,7) • All UARTS support hardware inversion. SBUS, SmartPort, and other inverted protocols work on any UART without “uninvert hack”. - Page 3 Pin out Function Battery positive voltage (2S-6S) UART7 RX Ground CURRENT CURRENT Motor signal outputs (located in plug) Pin out Function 8V/2A Ground UART1 TX UART1 RX Ground UART6 RX...
- Page 4 Installing Betaflight Configurator Betaflight is managed using the Betaflight Configurator application, also known for short as the Betaflight GUI, or just, “The GUI”. (GUI is pronounced “gooey” in case you wondered. Only weirdos say, “Gee You Eye”.) Download the Betaflight Configurator application here: https://github.com/betaflight/betaflight-configurator/releases This is a standard application package for Windows, MacOS, or Linux.
- Page 5 If you don’t see DFU in the pulldown menu, then either the board didn’t detect that you had the bootloader button pressed or your drivers are not installed correctly. If you don’t see DFU in the pulldown menu, you cannot flash new firmware to the board. It won’t work. For the advanced users, a simpler way of getting into bootloader mode is to go to the CLI and type “bl”.
-
Page 6: Initial Configuration
flashed the board. Or it may indicate that your Virtual COM Port (VCP) drivers were not installed correctly. You are ready to configure your board. Initial Configuration The full configuration of Betaflight could take hours to document. In this section, we’ll describe a few things that are specific to this board. - Page 7 have to follow these recommendations if for some reason they don’t work for you. If you followed the instructions in this guide, the screen shot above shows how to configure the Ports tab. When you configure the Ports, keep the following guideline in mind: each UART can be used for one function only.
- Page 8 Configuration Click on the “Configuration” tab on the right side of the window. Scroll down to the “Other Features” section. • If you are using any kind of telemetry (SmartPort, Crossfire, etc.), enable TELEMETRY. • If you are using a programmable LED strip, enable LED_STRIP.
-
Page 9: Saving Your Configuration
Blackbox If you have enabled the Blackbox feature, go to the Blackbox tab on the left-hand side of the configurator window. In the Blackbox tab, at the top, set the Blackbox logging device to “SD Card” (it should be set like this by default). Set the Blackbox Logging Rate to 2 kHz. To use Blackbox logging, insert a FAT-formatted SD card of 32 GB or smaller into the SD card slot on the Kakute F7. -
Page 10: Additional Reference
7. Click the mouse once in the text box at the bottom of the CLI tab to place the cursor there. 8. Instead of typing any commands, right-click in the text box and choose “Paste”. 9. Press the Enter key on your keyboard. The pasted-in text will rapidly scroll past. 10.
Need help?
Do you have a question about the KAKUTE F7 HDV and is the answer not in the manual?
Questions and answers