
Subscribe to Our Youtube Channel
Related Manuals for Aviosys IP Power 9255


Summary of Contents for Aviosys IP Power 9255
- Page 1 IP Power 9255 User Manual Release Date: 11/30/2019 Manual Version: 1.12 Firmware: Ver. 4.03 - 1- Ref#92550216001...
- Page 2 Warning: Any changes made to this equipment without permission may cause damages to the device! IMPORTANT NOTICE 1. IP Power 9255 was designed to be used with a protective covering, the user is responsible for any damages caused from misuse, or use under inappropriate conditions.
-
Page 3: Table Of Contents
Table of Contents 1.) WELCOME ......................... 5 .......................... 5 NTRODUCTION ....................6 INIMUM YSTEM EQUIREMENTS 2.) PRODUCT OVERVIEW ......................7 ..........................7 EATURES ........................... 7 PECIFICATION ........................8 ACKAGE ONTENTS 3.) INTERFACE DESCRIPTION ....................9 ........................ 9 ARDWARE NTERFACE 4.) SETTING UP YOUR DEVICE ....................10 ........................ - Page 4 .) S ........................27 OWER OMMAND .) P ..........................28 OWER ELAY .) R ....................... 28 OWER OMMAND ......................... 29 ELNET OMMANDS 7.) FREQUENTLY ASKED QUESTIONS (F.A.Q) ................30 - 4- Ref#92550216001...
-
Page 5: Welcome
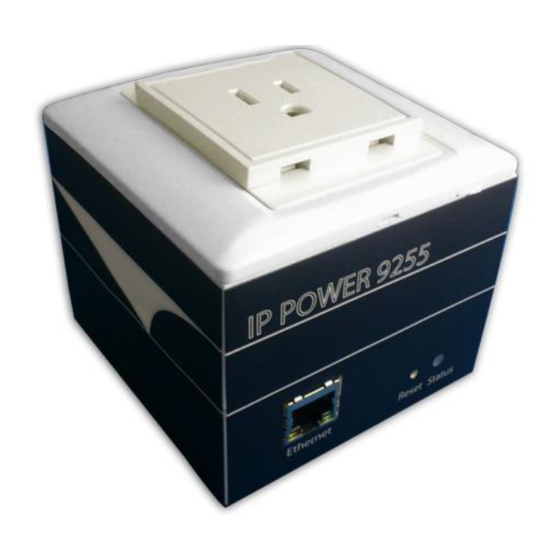
1.) Welcome Introduction The 9255 is an industrial grade single port relay perfect to power management through an Ethernet connection. This device can easily integrate with other devices and allow power control with your integrated system. With the 9255 robust design and high quality components it provides an added incentive to other devices or can be used independently. -
Page 6: Minimum System Requirements
Minimum System Requirements CPU Minimum Requirements • Intel(R), Pentium(R), DUAL Core (D),CPU 3.0GHz or equivalent Operating Systems: • Windows Operating Systems (IE5.0+SPI & Firefox) • 512 MB system memory or above • 10/100 Ethernet switch/hub • Sound Card: DirectX 9.0c compatible sound card •... -
Page 7: Product Overview
2.) Product Overview Features Inrush Current relay design for extra protection. Designed to control T5 fluorescent lighting. Industrial single port Relay design network controller. Accessible with popular web browsers - IE, Google Chrome, Netscape & Firefox. Supports up to maximum current: 8 Amp. Power surge protection design to protect against high voltage power surge. -
Page 8: Package Contents
Package Contents 1.) 9255 Unit x 1 2.) 9255 Installation CD CD will provide manual, software, and documentation on the 9255 Specification: 10AMP 18AWG 0.75 x 3C 3.) Standard PC Power Cable (Optional) - 8- Ref#92550216001... -
Page 9: Interface Description
3.) Interface Description Hardware Interface Power Cable Input: The Power Input is found on the back of the device. Power Output The Power output is on the top of the device. Simply plug in the device that you would like to power control. (Comes in different plug standards) RJ45 Ethernet: Plug in the RJ45 Ethernet cable to the... -
Page 10: Setting Up Your Device
4.) Setting up your Device Before we Start *Before setting up the device make sure of the following: All the package contents are all included if anything is missing please contact the dealer where the device was purchased from. Check that the power input cable is working correctly. Check the cables to make sure there are no problems with the cable. -
Page 11: 9255 Quick Installation
9255 Quick Installation 1.) Connect the Ethernet cable (RJ45) to the 9255 to your local area network. 2.) Then connect the power cable into the power cable input of the 9255. 3.) Connect the device that you would like to control to the output plug on the top of the 9255. -
Page 12: Using Ip Edit
Using IP Edit IP Edit is a search tool designed to search, configure, or access the IP Power 9255 from a local networked computer. IP Power 9255 Default Login / Password Default IP: 192.168.1.100 (When no DHCP is apparent) Default Login: admin Default Password: 12345678 1.) Insert the CD provided with the product... - Page 13 For example: If you have the following information regarding the 9255 and your network Gateway: 192.168.1.1 Computer IP Address: 192.168.1.122 9255 IP Address: 192.155.2.26 Sub Netmask: 255.255.255.0 Port: 8080 Since the IP Address of the 9255 is the following: 192.155.2.26 You will need to make sure that the first 3 segments of your 9255 IP Address must match the first 3 segments of your gateway IP.
-
Page 14: Using Ip Service
In the IP 9255 under the system configuration page, you can select the IP server that you would like the 9255 to go to. You can select from the Aviosys server or the Cloud Server. This function must be turned on to work. - Page 15 4.) Find your device and double click on the screen and a IE window will pop up connecting to your device. *Your device must be Port forwarded for the login screen to appear. 5.) After you have connected to your device, type in the login and password for your device - 15- Ref#92550216001...
-
Page 16: Web Interface
5.) Web Interface The web interface on the IP Power 9255 consists of 4 main sections. Power Controls, Scheduler, Ping Settings, and Setup Power Controls: Turn off, Turn on, the socket to provide power to the device. Scheduler: Schedule specific dates or time to call an action to the IP Power 9255. -
Page 17: Power Controls
Power Controls The Power Controls page is the panel where the user can directly turn off / on power to the attached device, set timers and name the outlet. Name In the name section the device name can be set. Simply type in a name you would like for the deice and hit the apply button. -
Page 18: Scheduler
Scheduler The power schedule offers flexibility so the user can easily schedule events to control the power of the device. Date: Enter the date in which the action will occur needs to be set. Time: Enter the time of the action will occur. Repeat: Select the frequency of this action. -
Page 19: Ping Settings
Ping Settings The Auto-ping functionality allows the 9255 to check if the device have malfunctioned or needs to be restarted. If the device is no working correctly the 9255 Ping will activate the action that you have selected to reinstate the state of the device Relay: A description of which on let to use Ping function Enable: Disable or Enable ping settings... - Page 20 Ping Type: Ping type sets a condition in the case where either all or 1 of the conditions are met the action will be activated. For instance, if you set Ping Type to " AND", all the Ping IP's must fail for the action to be activated.
-
Page 21: Setup
Then the process starts all over. 10.) Since the Ping Type is set to or if any of the Ping IP constitute a failure then the action will be committed. If the Ping Type was set to "AND" all conditions must be met for the action to be activated. Setup The setup page allows the user to configure the system settings of the 9255. -
Page 22: System
System The system section allows you to make changes to the network information of the 9255. This includes changes to the IP Address, Gateway, Subnet Mast, and DNS. In additional under the system section you will also find other features including SNMP, Telnet, DHCP, Beeper configuration and more. - Page 23 Note: We recommend using free services like www.dyndns.com for this portion. The device may react differently to other ddns services. DDNS Server IP: The DDNS server IP Domain: Type in the dyndns domain name Username: Enter the DDNS username here Password: Enter the DDNS password.
-
Page 24: E-M
E-mail This section is where email settings are inputted. After the information is populated the 9255 will send notifications regarding the device when activated. To send out mail successfully , please do set the DNS correctly . You can check with your ISP for correct DNS information. -
Page 25: Change Password
Change Password The change password function, will allow the user to change the current password of the device. Changing the password of the device: 1.) Type in the old password for the device 2.) Then type in the new password maximum of 8 characters 3.) Repeat the new password again 4.) Then hit the submit button. -
Page 26: Ip Server Configuration
IP Server Configuration The IP Server Configuration page is where the 9255 can be configured to connect to IP service. IP service allows you to easily find your device off the web or off the google cloud server without the need to remember long IP Addresses. Instead you can find your device easily just by searching with the name of your device. -
Page 27: Logout
Logout Click on the Logout link after you finish each session of using the IP Power 9255. This will ensure that any other person that uses the device next will not be able to control the devices without logging in. - Page 28 b.) Power Delay The Power delay command allows you to delay the set power command. Command format: http://ip:port/set.cmd?cmd= setpower+p6x=?+p6xn=?+t6x=aa x means output number : 1 or 2 or 3 or 4 ? means on or off : 1 = on , 0 = off p6xn means 2nd action of output x t6x=aa...
- Page 29 Telnet Commands The 9255 supports telnet protocol and can be controlled in a telnet enabled environment. To Login to the 9258 in telnet 1.) Make sure to go to command prompt and type in Telnet and the IP Address of your 9258 device.
- Page 30 setpower p61=0: Port Off Get power: The get power command gives you the current status of the device. To get power on the device type: When get power is typed all 4 ports will show whether the ports on on/off using 1's and 0's.
- Page 31 Please visit our FAQ section on our website for the latest and most updated information on this product. You can visit our site at: www.Aviosys.com Q1: I forgot the password and can not enter the administration page now, what can I do? A1: Use username "super user"...
- Page 32 Please refer the picture of the NTP page buttons functions : 1. Save : Save the setting & Disable NTP function . 2. NTP : Enable NTP function. 3. Local time : Use the local time of the controlled PC & Disable NTP function . ⚫...
Need help?
Do you have a question about the IP Power 9255 and is the answer not in the manual?
Questions and answers