
Related Manuals for Gorilla Playsets Krazy Clubhouse


Summary of Contents for Gorilla Playsets Krazy Clubhouse
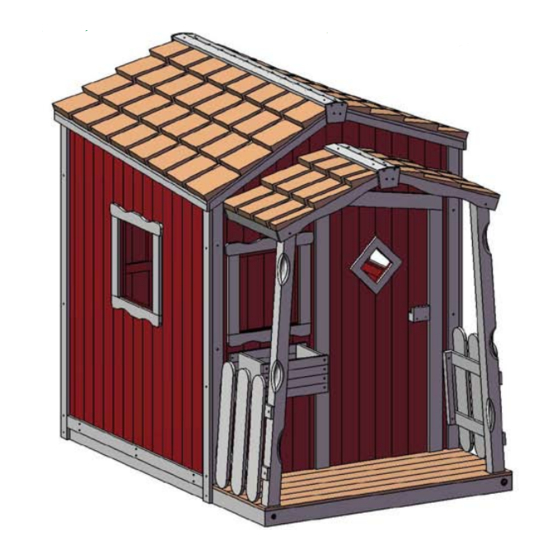
- Page 1 ™ ™ playsets playsets Krazy Clubhouse Model: 2000 BOXES: 2000 Playhouse Box 1 of 2 2000 Playhouse Box 2 of 2 Copyright © 2013 Gorilla Playsets All Rights Reserved 190 Etowah Industrial Court Canton, GA 30114 www.gorillaplaysets.com...
- Page 2 Please inspect and inventory all parts immediately upon accepting delivery. Use the inventory pages in the manual to make sure you have received all necessary parts. The quickest method to get any parts that are missing or damaged is to use our “Quick Response Center”...
- Page 3 GORILLA PLAYSETS WARRANTY - 2013 Gorilla Playsets® (“Gorilla”) warrants its play sets to be free from defects in workmanship and materials, under normal use and conditions, for 10 years for above ground structural wood components and for one year for all other components (e.g., swings, hardware, plastics, tarps, rope ladder, etc.).
-
Page 4: Important Safety Guidelines
IMPORTANT SAFETY GUIDELINES This product is recommended for use by children ages 3-11. This product is intended for residential use only and not intended for use in any public setting. A safety surface such as mulch or recycled tire should be used around the play set to prevent injury from falls. -
Page 5: Warranty Registration
WARRANTY REGISTRATION - KRAZY CLUBHOUSE - Gorilla Playsets manufactures 3 EASY WAYS TO REGISTER Gorilla Playsets (678) 880-3329 Where did you buy this product?: Date of Place of Purchase Purchase Name: Email: Street City State Please select 18-30 41-50 Excellent... -
Page 6: Important - Please Read
IMPORTANT – PLEASE READ As fresh lumber acclimates to its new environment, the natural tendencies of the tree can show itself in the form of checks, or “cracks” in the lumber. In almost all cases this is normal and it will not affect the structural integrity of your play set. - Page 7 Model: 2000 BOXES: 2000 Playhouse Box 1 of 2, 2000 Playhouse Box 2 of 2 REV: 8.5.2013...
- Page 8 TABLE OF CONTENTS Safety and Maintenance Tips……………………………………..…….....Pages 3-5 General Information and Site Plan..............Pages 6-7 Kit Contents and Tool List…………..………………………………………....Page 8 Hardware and Lumber Checklist...……………………………………………..Pages 9-15 Attaching Porch Floor to Main Floor…………………………..………...…....Step 1 Attaching Walls………………………..…………………………..……....Steps 2-4 Attaching Corner Boards………………..……………….…………...…....Steps 5-8 Attaching Porch Posts, Porch Roof and Porch Roof Peak…...….…….....
- Page 9 Safety and Maintenance Tips for Your New Play Set: NOTE: Your children’s safety is our #1 concern. Observing the following statements and warnings reduces the likelihood of serious or fatal injury. Please review these safety rules regularly with your children. •...
- Page 10 Safety and Maintenance Tips for Your New Play Set: (continued) Playgrounds should be inspected on a regular basis. If any of the following conditions are noted, they should be removed, corrected, or repaired immediately to prevent injuries. • Hardware that is loose, worn or that has protrusions or projections. •...
- Page 11 Play Set Surfacing Recommendations: Below are some of the recommendations that the U.S. Consumer Product Safety Commission (CPSC) offers from its Handbook for Public Playground Safety. The guide can be downloaded in full at www.cpsc.gov/cpscpub/pubs/325.pdf 1. Protective Surfacing - Since almost 60% of all injuries are caused by falls to the ground, protective surfacing under and around all playground equipment is the most critical safety factor on playgrounds.
- Page 12 General Info to Review Before Installation • Identify all of the parts for your play set. Empty each box and lay out boards so you can see each part. Your instruction book will have detailed drawings that will make it easy for you to recognize individual parts.
- Page 13 Please familiarize yourself with the manual, parts/components and general construction process of your new playset before getting started. SITE PLAN: Approximate assembly time: 2-4 hours Roof Dimensions (6) foot unobstructed safety perimeter around clubhouse recommended. 51-1/4" Inside Playhouse Dimensions: 43-3/4"W X 43-3/4"D Inside Porch Dimensions: 46-3/16"W X 17-1/8"D 66-1/2"...
-
Page 14: Required Tool List
REQUIRED TOOL LIST: ___ Standard or Cordless Drill w/ Phillips Bits ___ Phillips Screwdriver(s) ___ 10mm wrench or adjustable wrench or 10mm socket with socket wrench ___ Level ___ Tape Measure ___ Extension Cord (if using standard drill) ___ Hammer ___ Pencil ___ Shovel KIT CONTENTS:... - Page 15 NOTE: FASTENERS INCLUDED ARE METRIC. DIMENSIONS IN INCHES ARE APPROXIMATE. 3mm x 30 3mm x 25mm #5 X 1-1/4" #5 X 1" 1.19 WOOD SCREW WOOD SCREW QTY: 16 QTY: 30 (FOR FLOWER BOX) 3.5mm x 30mm 3.5mm x 35mm #6 X 1-1/4"...
-
Page 16: Description Qty
PICTURE DESCRIPTION QTY. FLOOR PORCH FLOOR BACK WALL... - Page 17 PICTURE DESCRIPTION QTY. SIDE WALL FRONT WALL ROOF PANEL...
- Page 18 PICTURE DESCRIPTION QTY. PORCH ROOF LEFT PORCH ROOF RIGHT PORCH POST LEFT PORCH POST RIGHT PORCH PEAK...
- Page 19 PICTURE DESCRIPTION QTY. FENCE ROOF PEAK ROOF PEAK 50" BACK CORNER RIGHT ANGLED END 48.5" BACK SIDE CORNER RIGHT 54" BACK CORNER LEFT ANGLED END...
- Page 20 PICTURE DESCRIPTION QTY. 52" BACK SIDE CORNER LEFT 47" FRONT CORNER LEFT ANGLED END 48.5" FRONT SIDE CORNER LEFT 51" FRONT CORNER RIGHT ANGLED END 52" FRONT SIDE CORNER RIGHT SIDE BASE BOARD BACK BASE BOARD...
- Page 21 PICTURE DESCRIPTION QTY. FLOWER BOX BACK FLOWER BOX FRONT FLOWER BOX SIDE FLOWER BOX BOTTOM FLOWER BOX BACK (TOP AND BOTTOM) HANDLE BRACKET...
- Page 22 STEP 1: ATTACHING THE PORCH FLOOR 1: ATTACH THE PORCH FLOOR TO THE FLOOR. USE M6 X 50 PAN HEAD SCREW, M6 WASHER AND M6 HEX NUT. PORCH FLOOR FLOOR M6 HEX NUT M6 WASHER M6 X 50 PAN HEAD SCREW DETAIL C SCALE 1 : 4...
- Page 23 STEP 2: ATTACHING SIDE WALL LEFT 1: ATTACH SIDE WALL LEFT AND BACK WALL AS SHOWN BELOW MAKE SURE THE SIDE WALL LEFT AND BACK WALL ARE FLUSH AND PERPENDICULAR. USE 2" WOOD SCREWS IN THE PREDRILLED HOLES. BACK WALL SIDE WALL LEFT FLOOR...
- Page 24 STEP 3: ATTACHING SIDE WALL RIGHT 1: ATTACH SIDE WALL RIGHT AND BACK WALL AS SHOWN BELOW MAKE SURE THE SIDE WALL LEFT AND BACK WALL ARE FLUSH AND PERPENDICULAR. USE 2" WOOD SCREWS IN THE PREDRILLED HOLES. BACK WALL SIDE WALL RIGHT FLOOR...
- Page 25 STEP 4: ATTACHING FRONT WALL 1: ATTACH FRONT WALL WITH SIDE WALL LEFT AND SIDE WALL RIGHT AS SHOWN BELOW. MAKE SURE FRONT WALL AND SIDE WALLS ARE FLUSH AND PERPENDICULAR. USE 2" WOOD SCREWS IN THE PREDRILLED HOLES. PORCH FLOOR FRONT WALL...
- Page 26 STEP 5: ATTACHING THE RIGHT BACK CORNER 1: LOCATE A 50" BACK CORNER RIGHT ANGLED END AND A 48.5" BACK SIDE CORNER RIGHT. 2: PLACE THE 50" BACK SIDE CORNER RIGHT ANGLED ON BACK WALL . USE 1-3/8" WOOD SCREWS IN THE PREDRILLED HOLES.
- Page 27 STEP 6: ATTACHING THE LEFT BACK CORNER 1: LOCATED A 54" BACK CORNER LEFT ANGLED END AND A 52" BACK SIDE CORNER LEFT. 2: PLACE THE 54" BACK CORNER LEFT ANGLED END ON THE BACK WALL . USE 1-3/8" WOOD SCREWS IN THE PREDRILLED HOLES.
- Page 28 STEP 7: ATTACHING THE LEFT FRONT CORNER 1: LOCATE A 47" FRONT CORNER LEFT ANGLED END AND A 48.5" FRONT SIDE CORNER LEFT. 2: PLACE THE 47" FRONT SIDE CORNER LEFT ANGLED END ON FRONT WALL . USE 1-3/8" WOOD SCREWS IN THE PREDRILLED HOLES.
- Page 29 STEP 8: ATTACHING THE RIGHT FRONT CORNER 1: LOCATE A 51" FRONT CORNER RIGHT ANGLED END AND A 52" FRONT SIDE CORNER RIGHT. 2: PLACE THE 51" FRONT CORNER RIGHT ANGLED END ON THE FRONT WALL . USE 1-3/8" WOOD SCREWS IN THE PREDRILLED HOLES.
- Page 30 STEP 9: ATTACHING THE PORCH POSTS 1: LOCATE TWO PORCH POSTS (LEFT AND RIGHT). 2: ATTACH THE PORCH POSTS TO THE PORCH FLOOR. FLUSH THE BOTTOM OF THE PORCH POSTS TO THE BOTTOM OF THE PORCH FLOOR . USE AN M6 X 1-3/4" PAN HEAD SCREW WITH AN M6 WASHER TO FASTEN THE PORCH FLOOR TO THE THREADED INSERT IN THE PORCH POST.
- Page 31 STEP 10: ATTACHING PORCH ROOF 1: ATTACH THE PORCH ROOF TO THE FRONT WALL ON TOP OF THE PORCH ROOF SUPPORTS. USE 1" WOOD SCREWS IN THE PREDRILLED HOLES. 2: PUSH THE TWO PORCH POSTS INSIDE THE PORCH ROOF . USE 1-5/8" WOOD SCREWS IN THE PREDRILLED HOLES.
- Page 32 STEP 11: ATTACHING PORCH PEAK 1: ASSEMBLE THE ROOF PEAK CAP AND THE ROOF PEAK. USE 1"WOOD SCREWS IN THE PREDRILLED HOLES. 2: ATTACH THE PORCH PEAK YOU JUST ASSEMBLED TO THE PORCH ROOF. USE SIX 1" WOOD SCREWS IN THE PREDRILLED HOLES. 1"...
- Page 33 STEP 12: ATTACHING THE FENCES 1: ATTACH THE FENCE TO THE PORCH POST FLUSH TO THE OUTSIDE OF THE PORCH POST. USE 1-3/8" WOOD SCREWS IN THE PREDRILLED HOLES. 2: ATTACH THE FENCE TO THE FRONT WALL ON THE INSIDE. USE 1-3/8" WOOD SCREWS IN THE PREDRILLED HOLES.
- Page 34 STEP 13A: ATTACHING ROOF 1: THIS PAGE JUST SHOWS THE ROOF PEAK VIEWS. 2: STEP 13B EXPLAINS HOW TO ATTACH THE ROOF. BOTTOM VIEW OF THE ROOF SUPPORT 1 DETAIL T SUPPORT 2 SCALE 1 : 3 SUPPORT 1 SUPPORT 2 DETAIL B SCALE 1 : 3...
- Page 35 STEP 13B: ATTACHING ROOF PANELS 1: ATTACH THE FRONT SIDE OF THE ROOF AS SHOWN BELOW (SECTION B-B) MAKE SURE THE WALL GOES BETWEEN SUPPORT 1 & 2 AS SHOWN DETAIL A. USE 1-5/8" WOOD SCREWS IN THE PREDRILLED HOLES INSIDE THE ROOF. DO NOT OVER TIGHTEN THE SCREWS. 2: ATTACH THE BACK SIDE OF THE ROOF BY PUSHING OR PULLING DOWN ON THE ROOF TO MAKE IT TWISTED AS SHOWN IN SECTION B-B.
- Page 36 STEP 14: ATTACHING ROOF PEAK AND CAPS 1: ATTACH THE ROOF PEAK TO THE ROOF PANEL. USE #8 X 1-1/4" WOOD SCREWS IN THE PREDRILLED HOLES. 2: ATTACH A ROOF PEAK CAP TO THE END OF ROOF PEAKS. USE #8 X 1" WOOD SCREWS IN THE PREDRILLED HOLES.
- Page 37 STEP 15: ASSEMBLE THE FLOWER BOX 1: LOCATE FOUR FLOWER BOX FRONT BOARDS, FOUR FLOWER BOX BACK BOARDS, TWO FLOWER BOX SIDES AND A FLOWER BOX BOTTOM. 2: ATTACH FOUR FLOWER BOX FRONT BOARDS TO THE FLOWER BOX SIDES. USE 1-1/4" WOOD SCREWS AS SHOWN IN STEP1.
- Page 38 STEP 16: ATTACH THE FLOWER BOX 2: ATTACH THE FLOWER BOX WITH ON THE FRONT WALL UNDER THE WINDOW. USE TWO 1-3/8" WOOD SCREWS ON THE TOP BOARD AND USE TWO 1" WOOD SCREWS ON THE BOTTOM BOARD. 1-3/8" WOOD SCREW 1"...
- Page 39 STEP 17: ATTACHING FRONT WALL TO THE FLOOR 1: ATTACH TWO BRACKETS ON THE INSIDE OF THE FRONT WALL NEXT TO THE DOOR . USE 1-5/8" WOOD SCREWS. 2: IF THE DOOR DOES NOT CLOSE PROPERLY PUSH THE SIDE WALL OVER AND THEN INSTALL THE 2 BRACKET.
- Page 40 STEP 18: ATTACHING THE BASE BOARDS 1: LOCATE TWO SIDE BASE BOARDS AND A BACK BASE BOARD. 2: ATTACH THE SIDE BASE BOARD BETWEEN THE FLOOR AND THE SIDE WALL. USE SIX 1-3/8" WOOD SCREWS IN THE PREDRILLED HOLES TO COVER THE GAP BETWEEN THE FLOOR AND WALLS. REPEAT ON THE OTHER SIDE.
-
Page 41: Step 19: Attaching Handle
STEP 19: ATTACHING HANDLE 1: ATTACH THE HANDLE TO THE DOOR . USE TWO 2-1/2" WOOD SCREWS IN THE PREDRILLED HOLES. HANDLE HANDLE WITH COUNTER BORED HOLES #8 X 2-1/2" WOOD SCREW DETAIL A SCALE 2 : 15...
Need help?
Do you have a question about the Krazy Clubhouse and is the answer not in the manual?
Questions and answers