Table of Contents
Advertisement
Amplifier Harness
©2019 Stillwater Designs
19417166-20190620
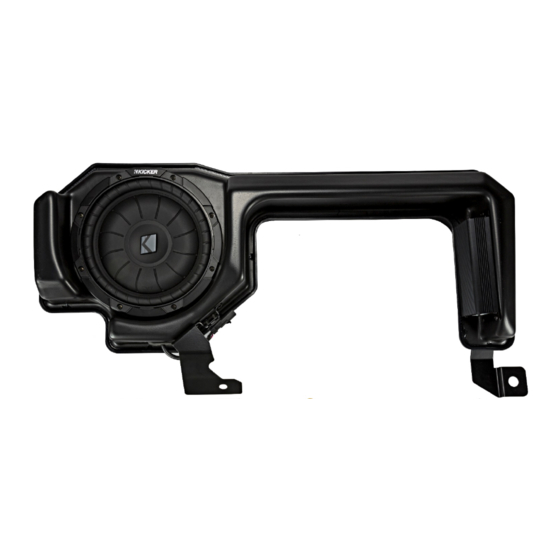
Amplifier Assembly
Subwoofer Assembly
Subwoofer Harness
Subwoofer Power Harness
Amplifier Power Harness
M6 Nuts x 3
Wire Ties x 6
Fuse x 2
Adaptor Harness
Self-Drilling Screws x 2
19417166
Designed for 2019 and newer
Chevrolet® Silverado 1500
and GMC® Sierra 1500 Crew
Cab or Double Cab trucks with
HD radio.
1
Advertisement
Table of Contents

Related Manuals for Kicker 19417166


Summary of Contents for Kicker 19417166
- Page 1 19417166 Designed for 2019 and newer Chevrolet® Silverado 1500 and GMC® Sierra 1500 Crew Cab or Double Cab trucks with HD radio. Subwoofer Assembly Subwoofer Harness Amplifier Harness Amplifier Assembly Subwoofer Power Harness Amplifier Power Harness M6 Nuts x 3...
- Page 2 1. Disconnect negative battery cable. 2. Remove the cover of the battery junction box. Fig. 1 3. Make sure supplied fuse is not installed in fuse holder and connect the subwoofer and amplifier power wires to the studs pictured in figure 2. Either wire can go to either stud Torque to 4.7Nm (42in-lb) Connect one power Fig.
- Page 3 8. If equipped with power seats, adjust the passenger seat as high as possible. Remove the panel next to the seat. Fig. 6 9. Remove the front kick/sill trim panel as well as the rear sill panel. Fig. 7 Fig. 7 Fig.
- Page 4 12. Connect the gray amplifier harness connector to the ACM. 13. Disconnect the 28-pin black connector from the ACM. Carefully cut away approximately 3 inches of the black cloth wrapping the harness. Find the green with black strip wire and cut. Strip back about ¼...
- Page 5 NOTE: If equipped with the optional carpeted storage tray as pictured in Fig. 17, remove at this time. The storage tray cannot be used in conjunction with the subwoofer. The subwoofer by design provides an optional storage area once it is installed. 19.
- Page 6 23. Route the black four pin subwoofer connector out of the hole that was cut near the stud where the jack tools attach. Route the white amplifier connector behind seat bolts and out of the hole Fig. 20 that was cut near outer seat bolt. Fig. 21 24.
- Page 7 30. Reinstall all previously removed parts in reverse order. NOTE: MAKE SURE WIRE HARNESS IS NOT BEING CRUSHED WHEN REINSTALLING JACK BRACKET! 31. Install supplied fuses into fuse holders. 32. Reconnect negative battery cable. Tighten to 7.5Nm (66in-lb) Splicing Technique 1.
- Page 8 Seatback Removal Removing O/B Head Restraints and CTR Head Rest. Remove O/B head restraints by pushing in on two release buttons on head rest guide caps and lifting up on head restraint (qty 2) Fig. 1 & 2 Remove CTR head rest by pushing in on two release buttons on head rest guide caps and lifting up on head rest (qty 1) Fig.
- Page 9 Insert awl into groove in head rest guide, then rotate 90 degrees and pull up on tool to pull Fig. 4 guide from BIW Fold 60/40 cushions to upright position Fig. 5 Fig. 5...
- Page 10 Locate and remove 4 M6 lower attachment bolts securing the seat back to the BIW cab wall. Fig. 6 Using angled awl with point facing passenger side of vehicle – find latch release lever located to passenger side of each child seat re-router loop below the seat back trim. Insert awl into release lever on latch and pull vertically up 10-20 mm while pulling seat back forward to disengage striker from latch (Qty 3 latches –...
- Page 11 Fig. 8 Fig. 10 Fig. 9...
- Page 12 Troubleshooting the Kicker Integrated Systems If you experience a problem once the subwoofer or amplifier are installed use this guide to locate the trouble. The radio is working, but the Subwoofer is not working: Check the battery voltage to make sure it is not discharged below 11 volts.
- Page 13 If you continue to experience problems after troubleshooting, please contact KICKER Technical Support at (800) 256-0808 ext. 6009, or support@kicker.com. P.O. Box 459 • Stillwater, Oklahoma 74076 • USA • (405) 624–8510...
Need help?
Do you have a question about the 19417166 and is the answer not in the manual?
Questions and answers