Table of Contents
Advertisement
Quick Links
Advertisement
Table of Contents

Related Manuals for V-ZUG V6000 Supreme


Summary of Contents for V-ZUG V6000 Supreme
- Page 1 Operating instructions Freezer V6000 Supreme Freezer...
- Page 2 The model number corresponds to the first alphanumerics on the identification plate. These operating instructions apply to: Model designation Type Size system Freezer V6000 Supreme FR6T-51099 Variations depending on the model are noted in the text. © V-ZUG Ltd, CH-6302 Zug, 2020...
-
Page 3: Table Of Contents
Table of contents Safety precautions 4 Technical data 31 Symbols used............ 4 Disposal 31 General safety precautions........ 4 Index 32 Appliance-specific safety precautions .... 4 Service & Support 35 Appliance installation .......... 5 Instructions for use.......... 6 Using for the first time 8 Appliance description 8... -
Page 4: Safety Precautions
Safety precautions Symbols used and have understood the haz- ards involved. Children shall Denotes important safety precau- tions. not play with the appliance. Failure to observe said precautions Cleaning and user mainten- can result in injury or in damage to ance shall not be undertaken the appliance or fittings! by children without supervi-... -
Page 5: Appliance Installation
1 Safety precautions ▪ The ice-maker (depending on model) Appliance installation needs to be connected to the domestic water supply. Use the water inlet hose with 3/4 inch thread supplied for this. The water pressure must be between ▪ The appliance must be installed by 0.05 MPa and 0.5 MPa (between 0.5 qualified personnel only. -
Page 6: Instructions For Use
1 Safety precautions Correct use Instructions for use ▪ The appliance is designed for use in Before using for the first time the home for cooling and storing food. ▪ The appliance must be installed and The appliance must only be used as de- connected to the electricity supply in scribed in the operating instructions. - Page 7 1 Safety precautions ▪ To protect your eyesight, do not look Note on use directly into the LED illumination system ▪ Do not operate any electrical devices when the light is switched on. inside the freezer compartment. ▪ Do not store explosive materials or aer- Caution: Risk to life! osol cans in close proximity to or inside ▪...
-
Page 8: Using For The First Time
Using for the first time Before operating the newly installed appliance for the first time, the following steps should be taken: ▸ Remove packaging and transport materials as well as any protective film from the in- terior. ▸ Clean the interior and accessories with lukewarm water or a mild soapy solution (wa- ter and washing-up liquid) and dry thoroughly. -
Page 9: Operating And Display Elements
3 Appliance description Operating and display elements Navigation buttons ON/OFF (hold for 3 seconds) Home / Start screen Acknowledge alarm BACK: Cancel/Discard entry Navigation touch display Functions User setting Fast freezing Date Timer Time Ice cube mode Language Holiday function Temperature unit °C / °F Sabbath mode Other settings... -
Page 10: Operating The Appliance
An arrow pointing down indicates a cooling pro- cess; an arrow pointing up indicates a rise in temperature. Overview of start screen Start screen for the Freezer V6000 Supreme (51099) Set temperature in the freezer compartment Navigate to the functions Navigate to the settings –... -
Page 11: Switching The Appliance On
3 seconds. – The appliance is switched on. – The V-ZUG logo (display symbol) appears. – The initial test runs (takes about 3 minutes). A newly installed appliance takes at least 12 hours (empty state) – keeping the door closed –... -
Page 12: Switching The Appliance Off
5 Using the appliance functions and settings The effective temperature may at times be different from the selected set value if the door is open for an extended period of time or if warm food has been placed inside. symbol (value change locked) indicates that changes cannot be applied in this particular instance. -
Page 13: Using The Functions And Settings
5 Using the appliance functions and settings ▸ Confirm the info question that follows with Yes. Select the desired duration (max. 72 hours) by scrolling up or down. ▸ Confirm with OK. hour – The function is activated and displayed in orange in the functions. - Page 14 5 Using the appliance functions and settings Function Description Timer Acoustic alarm emitted after the selected duration (max. 45 minutes) is up. Activating ▸ Touch the button and select ▸ «Activate timer?» appears. Confirm with Yes. ▸ Select the desired duration (max. 45 minutes) by scrolling up or down.
- Page 15 5 Using the appliance functions and settings Function Description Sabbath mode The illumination is not affected by opening or closing the door. The ice-maker and various functions are temporarily deactivated. Activating ▸ Preparing for the Sabbath: Touch the button and select ▸...
- Page 16 5 Using the appliance functions and settings Function Description Ice cube mode For regularly making ice cubes. Note: PartyIce and ice cube size are inactive unless the ice cube mode is activated. Activating ▸ Touch the button and select ▸ «Activate ice cube mode?» appears. Confirm with Yes.
- Page 17 5 Using the appliance functions and settings Setting Description Accessing the user settings and other settings Date Set the date. Adjusting ▸ Touch the button and select ▸ Select the «Year, month and day» by scrolling up or down and confirm each time with OK. –...
- Page 18 5 Using the appliance functions and settings Setting Description Water filter Reminder to regularly replace the water filter. reminder Activating ▸ Touch the button and select ▸ «Activate reminder» appears. Confirm with Yes. – «Next reminder in 360 days» appears in the display.
- Page 19 5 Using the appliance functions and settings Setting Description Cleaning Cleaning of the water system. water system Selecting ▸ Touch the button and select ▸ «Manual clean» appears. Confirm with Yes. – The message «Please wait» appears. ▸ «Start cleaning» appears. Confirm with Enter. –...
- Page 20 5 Using the appliance functions and settings Setting Description Condenser Reminder to regularly clean the condenser. reminder Activating ▸ Touch the button and select ▸ «Activate reminder» appears. Confirm with Yes. – «Next reminder in 180 days» appears in the display.
- Page 21 5 Using the appliance functions and settings Setting Description Demo mode This setting enables specialist retailers to put the appliance into the showroom mode for demonstration purposes. The demo mode enables functions to be demonstrated without the appli- ance being switched on. Note: This setting is not recommended for private use.
-
Page 22: Brief Description Of The Appliance Functions
5 Using the appliance functions and settings Brief description of the appliance functions Fast freezing The fast freezing function allows larger quantities of food, e.g. after a shopping trip or freezing pre-cooked meals, to be cooled more quickly. The temperature is lowered to the coldest value for a maximum of 72 hours. -
Page 23: Switching On And Using The Ice-Maker
6 Switching on and using the ice-maker Deactivate the ice cube mode before cleaning the water system. Condenser reminder If the setting is activated, a reminder to manually clean the condenser appears every 180 days. For how to do this, see: Care and maintenance (see page 26). Switching on and using the ice-maker Check that there is a water filter cartridge installed and that the water circuit has been flushed before switching the ice-maker on for the first time. -
Page 24: Interior And Accessories
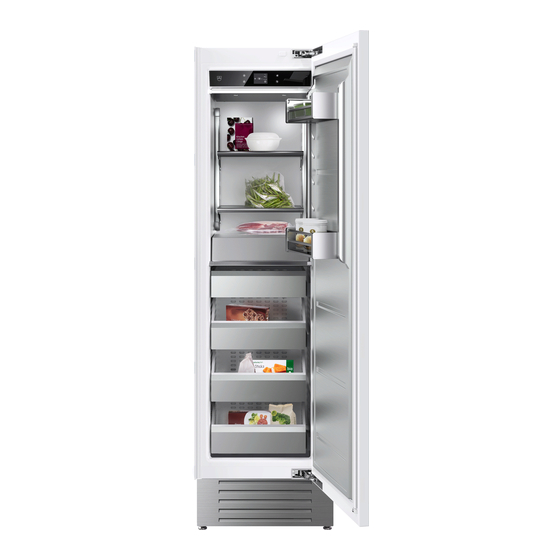
7 Interior and accessories Interior and accessories The freezer drawers and ice cube bin can be removed. The height of the shelves and the door trays on the inside of the freezer compartment door can also be adjusted. Freezer drawer The drawer is on guide rails. -
Page 25: Tips And Tricks
8 Tips and tricks Door trays To adjust or remove the door trays located on the inside of the appliance door: ▸ Hold the door tray at both ends and push upwards until it comes out of its fixture. ▸ Pull it outwards. Reverse the steps to put the tray back in place. -
Page 26: Notes On Saving Energy
9 Care and maintenance ▪ Depending on the product, the following packaging materials are suitable: freezer bags, aluminium foil or plastic boxes. Freezer burn can be avoided by making the food packaging as airtight as possible. ▪ Do not refreeze food once defrosted! Only after being prepared (through cooking or frying) can food be refrozen. -
Page 27: Cleaning The Interior
9 Care and maintenance Cleaning the interior For the hygienic storage of food, the interior should always be kept clean. Avoid bringing cold parts made of glass such as the shelves into direct contact with boiling water! Wash all removable accessories by hand, not in the dish- washer. -
Page 28: Noises
10 Noises The fins on the condenser are sharp! Use suitable protective equipment for hands and arms in order to be able to clean the condenser safely. Noises The appliance can make various noises during operation. Although the appliance is noise-optimized, some noise cannot be eliminated completely. - Page 29 11 Trouble-shooting Display message / Fault Solution / Measures Display: Freezer compartment too warm ▪ The appliance displays the warmest re- corded temperatures in the correspond- ing zone. ▸ Press the button to acknowledge the acoustic alarm message. ▸ Do not place warm foods right next to the temperature sensor.
- Page 30 11 Trouble-shooting Display message / Fault Solution / Measures The ice-maker is not working. ▸ Make sure that the appliance is connec- ted to the water supply. ▸ Make sure that the ice-maker is switched on. Further info: Using the functions and settings (see page 13).
- Page 31 12 Technical data Technical data Product data ▸ See the identification plate, energy label and www.vzug.com. External dimensions ▸ See installation instructions Electrical connection ▸ See identification plate Disposal 13.1 Packaging Never allow children to play with packaging material due to the danger of injury or suffocation.
- Page 32 Index Appliance disposal .......... 31 Restoring factory settings....... 17 Appliance functions ......... 12 Appliance information ........21 Appliance installation ......... 5 Sabbath mode..........15 Safety warnings Appliance installation ........ 5 Care and maintenance ........26 Appliance-specific .......... 4 Cleaning the condenser ......20, 27 Correct use ............ 6 Cleaning the ice-maker........
- Page 33 Notes...
- Page 35 V‑ZUG service centre. Technical questions, accessories, warranty extensions V-ZUG is happy to help you with any general administrative or technical queries, to take your orders for accessories and spare parts and to inform you about our progressive service agreements.
- Page 36 Ice cube mode Language Holiday function Temperature unit °C / °F Sabbath mode Other settings Restore factory setting Water filter reminder Cleaning water system Condenser reminder Demo mode Information about the appliance Service 1098943-R01 V-ZUG Ltd, Industriestrasse 66, CH-6302 Zug info@vzug.com, www.vzug.com...
Need help?
Do you have a question about the V6000 Supreme and is the answer not in the manual?
Questions and answers