Table of Contents
Advertisement
Quick Links
Advertisement
Table of Contents
Troubleshooting

Related Manuals for Flash Technology VANGUARD FTS 270


Summary of Contents for Flash Technology VANGUARD FTS 270
- Page 1 VANGUARD HIGH FTS 270, FTS 372 FTS 270 – LED High Intensity Obstruction Lighting FTS 372 – LED Medium Intensity Obstruction Lighting (AOL) Reference Manual Part Number F7912700 Flash Technology, 332 Nichol Mill Lane, Franklin, TN 37067 flashtechnology.com (615) 261-2000...
- Page 2 Flash Technology Revision A - 2/13/2020...
-
Page 3: Installation Checklists
All equipment has been inspected for damage All received equipment has been verified against the packing list to ensure completeness Contact Flash Technology technical support if items found to be missing Site installation drawings have been consulted for placement, mounting and wiring details... - Page 4 If external alarm detection circuit responds to open contacts, ensure they are wired to the proper contacts that open on alarm. Verify alarm wiring has been protected by using shielded wires. Also verify proper grounding of the shield wire, and that the wires are run through conduit. Flash Technology Revision A - 2/13/2020...
-
Page 5: Front Matter
While every effort has been made to ensure that the information in this manual is complete, accurate and up-to- date, Flash Technology assumes no liability for damages resulting from any errors or omissions in this manual, or from the use of the information contained herein. Flash Technology reserves the right to revise this manual without obligation to notify any person or organization of the revision. -
Page 6: Parts Replacement
PARTS REPLACEMENT The use of parts or components, in this equipment, not manufactured or supplied by Flash Technology voids the warranty and invalidates the third party testing laboratory certification which ensures compliance with FAA Advisory Circulars 150/5345-53D. The certification is valid as long as the system is maintained in accordance with FAA guidelines (FR doc. -
Page 7: Table Of Contents
..............................30 FTC 270 Controller Installation ..........................31 FH 372 Installation ..............................33 FH 372 Mounting ..............................33 FH 372 Wiring and grounding ..........................34 PC 270 power converter Installation ........................35 Flash Technology Revision A - 2/13/2020... - Page 8 Web Interface ............................56 Home Page ................................57 Section 5: Maintenance and Troubleshooting ....................... 58 Safety Warning! ............................... 58 Preventative Maintenance ............................58 Storage ..................................58 RFI Problems ................................58 Diagnostic Test ................................ 58 Flash Technology Revision A - 2/13/2020 viii...
- Page 9 Customer Service & Contact Information ......................66 FTC 270 Parts ..............................67 PC 270 and FH 270 Parts ............................. 69 PC 372 and FH 372 Parts ............................. 71 MKR 372 MARKER INTERFACE ..........................72 RMA Policy ................................73 Flash Technology Revision A - 2/13/2020...
- Page 10 Table 6-1: FTC 270 Replacement Parts ........................67 Table 6-2: PC 270 and FH 270 Replacement Parts ....................... 69 Table 6-3: PC 372 and FH 372 Replacement Parts ....................... 71 Table 6-4: MKR 372 MARKER INTERFACE Replacement Parts ..................72 Flash Technology Revision A - 2/13/2020...
-
Page 11: Introduction & Operation
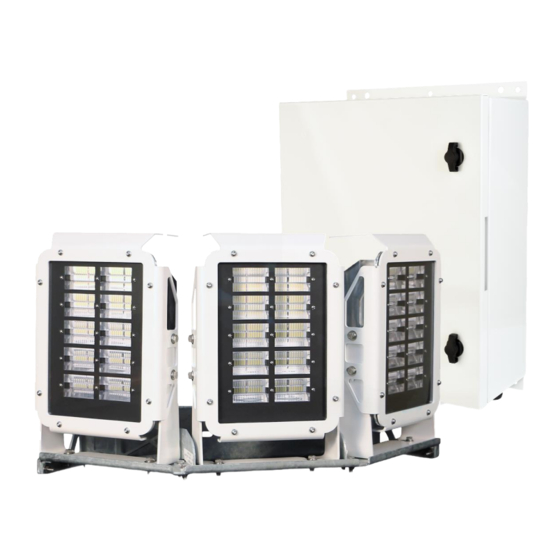
(0-9 Tiers, 0-4 Per Tier) ICAO: LI Type B Flash Technology engineered the FTS 270 LED Lighting System for maximum LED life, reducing the need for service. Simple wiring, setup, and diagnostics increase the ease of installation and service. Each high-intensity obstruction light consists of a flashhead (FH 270) and a connected power converter (PC 270). A maximum of forty-eight high intensity lights may be connected in a single lighting system. -
Page 12: System Specifications
-55 deg to 55 deg Celsius (C) Temperature Operating -40 to 130 F -40 to 55 C Humidity 95% relative humidity Wind Wind speeds up to 150 miles per hour (mph) Flash Technology Revision A - 2/13/2020... -
Page 13: Table 1-2: Ftc 270 Specifications
605 mm x 445 mm x 318 mm Dimensions H x W x D (inches) 20.65" x 37.08" x 12.35" 23.82” x 17.5” x 12.51” 2.89 Aerodynamic Wind Area (ft²) 5.01 3.6 (with bracket) Protection Rating IP66 Flash Technology Revision A - 2/13/2020... -
Page 14: Table 1-4: Fh 270 & Pc 270 Performance Characteristics
>246 mW/sr 42 W 100,000 ECD 157 W (White) (+/- 25%) 20,000 ECD Twilight ICAO: HI Type B 38 W (White) (+/- 25%) Night 2,000 40 W (White) (+/- 25%) Peak VA is 1066 Flash Technology Revision A - 2/13/2020... -
Page 15: Table 1-5: Fh 372 & Pc 372 Physical Specifications
(+/- 25%) FAA: L-864 (L) 25 W TC: CL-864 21 W ICAO: MI Type B 2,000 ECD Night 23 W (+/- 25%) 25 W (Red & IR) 29 W * Peak VA is 114 Flash Technology Revision A - 2/13/2020... -
Page 16: Table 1-7: Mkr 372 Marker Interface & Mkr 371 Physical Specifications
Nominal Intensity (Watts + 5%) MKR 372 MARKER Steady 19.6 W INTERFACE Flashing 4.2 W (with 4 IR markers) MKR 371 IR Steady 32.5 ECD 3.9 W Flashing 0.8 W (single IR marker) (+/- 25%) Flash Technology Revision A - 2/13/2020... - Page 17 FH and MKR). The RS-485 link allows the controller to update the operating firmware of the boards (PCBs) on the tower, via the PCB2 Tower Controller Board. Flag Indicator on the 2-pole circuit breakers is clearly marked with green OFF and red ON. Flash Technology Revision A - 2/13/2020...
- Page 18 Modbus or Eagle protocols may be used. The PCB3 also provides the ability to read a USB drive for the purposes of updating firmware versions. The PCB3 also allows an optional Wi-Fi interface to the lighting system, using a long- range external antenna, or a short-range internal USB Wi-Fi dongle. Flash Technology Revision A - 2/13/2020...
- Page 19 If either of these options are included in the FTC 270, then a 5-port gigabit Ethernet switch will also be included to provide the needed networking hardware to allow PCB3 to communicate with multiple devices. Flash Technology Revision A - 2/13/2020...
-
Page 20: Figure 1-2: View Of Fh 270 Dual Led
Each FH 270 panel connects to the PC 270 with a factory supplied flashhead cable (shown below). This cable is pre- terminated from the factory and can be purchased in 10ft or 25ft lengths. White and blue stickers have been placed on both terminal ends of the cable to assist with installation. Flash Technology Revision A - 2/13/2020... - Page 21 LED FH panel. TB1 is used for AC voltage input and RS-485 communication. Details of the PCB1 controller board can be found below in Figure 1-3. The bottom of the enclosure houses the 3 quick connect plugs for the FH cable that leads to each FH 270 panel. Flash Technology Revision A - 2/13/2020...
-
Page 22: Figure 1-3: Pc 270: Pcb 1: Controller Board: F2161000
6 tiers. The BEACON dial allows up to 8 FH 270s per tier. More details about the MODE dial can be found on the next page. NOTE: The lowest level of lights is considered as Tier 1 (T1). Flash Technology Revision A - 2/13/2020... - Page 23 J1 of PCB1). PCB 4 POWER SUPPLY The three power supplies (PCB 4) are located behind the bracket for PCB1. They accept 100-277 VAC 50/60Hz input power and supply 58VDC to PCB3 at J2. Flash Technology Revision A - 2/13/2020...
-
Page 24: Medium Intensity Led Lighting System (Fts 372 Aol)
The PC 372 will have two RS-485 connections on TB1 (input and output). The RS-485 connections only to serve as a pass-through for the RS-485 connection to the FH 372. Nothing inside the PC 372 communicates on the RS-485 lines. Flash Technology Revision A - 2/13/2020... - Page 25 NOTE: Ensure the termination jumper, located on the circuit board in the upper portion of the FH 372, is closed. If more than 1 AOL/FH 372 is present onsite, ensure the termination jumper is closed on the last FH372 in the RS-485 communication link. Flash Technology Revision A - 2/13/2020...
-
Page 26: Low Intensity Led Lighting System (Mkr 372 Marker Interface And Mkr 371)
NOTE: The RS-485 termination jumper should be open on the MKR 372 INTERFACE PCB. In certain custom installations, when only low intensity led MKR fixtures (MKR 371) are used, the term jumper should be closed on the last MKR PCB with all other jumpers in the open position. Flash Technology Revision A - 2/13/2020... - Page 27 Rotary Dial Position Tier Position* Tier 1 Tier 2 Tier 3 Tier 4 Tier 5 Tier 6 Tier 7 Tier 8 Tier 9 Do not use *Tier 1 being the lowest level of marker lights. Flash Technology Revision A - 2/13/2020...
- Page 28 RS-485 link should have the jumper in the closed position (covering both pins), with all other jumpers in the open position. Lighting Unit Jumper Position* PC 270 FH 372 MKR 372 Marker Interface *Jumpers shown in the closed position. Flash Technology Revision A - 2/13/2020...
-
Page 29: Mounting And Installation Instructions
Ensure that all conduit and flex fittings are correct type and size, and properly installed so that they make a tight metal to metal connection at each enclosure entry. Consider grounding the conduit at the base of the tower directly to the ground ring using #2 solid. Flash Technology Revision A - 2/13/2020... -
Page 30: Other Installation Tips
INSTALLATION NOTE If installation drawings prepared specifically for your site disagree with information provided in this manual, the site installation drawings should take precedence. Consult any site-specific installation wiring diagram supplied with your equipment. Flash Technology Revision A - 2/13/2020... -
Page 31: Ftc 270 Controller Installation
The provided RS-485 communication cable will terminate on the right side of TB1. Ensure you match the color-coding appropriately to avoid communication issues and improper system operation. Flash Technology Revision A - 2/13/2020... - Page 32 Connect the wires to matching labels on the PCB for proper operation (Clear to WHT, Black to BLK, drain wire to SHLD). Flash Technology Revision A - 2/13/2020...
-
Page 33: Fh 372 Installation
With the light engine secured by the two outer latches, place a level on the beacon’s top plate and verify that it is level in two directions. Note: Flash Technology’s “T”- Level (Optional Part # 11000013455) has two vials to simplify installation. -
Page 34: Fh 372 Wiring And Grounding
Ensure the use of an anti-corrosive agent is used on all terminal ends. NOTE!! Avoid sharp bends in the ground wire and ensure the wire is routed down and away from the flashhead. Flash Technology Revision A - 2/13/2020... -
Page 35: Pc 270 Power Converter Installation
VAC, 50/60 Hz with no modification necessary to the input power module. The provided RS-485 communication cable will terminate on the right side of TB1. Ensure you match the color-coding appropriately to avoid communication issues and improper system operation. Flash Technology Revision A - 2/13/2020... -
Page 36: Fh 270 Flashhead Installation
Each panel has a leveling indicator on the sides of the panels. Tier Level-Above Ground Level (AGL) Elevation Angle 0 to 300 feet (91 meters) 3° 301 to 400 feet (122 meters) 2° 401 to 500 feet (152 meters) 1° 500 feet and higher 0° Flash Technology Revision A - 2/13/2020... -
Page 37: Mkr 372 Marker Interface
Mount the interface enclosure to the supplied brackets (ITEM “S1”) using the provided hardware Ground the interface enclosure to the tower using 2 AWG insulated wire (preferred) Ensure that the enclosure is oriented so that it can be opened fully for service Flash Technology Revision A - 2/13/2020... -
Page 38: Mkr 371 Led Marker (Low Intensity Side Light) Wiring
372 INTERFACE wires into a junction box is powered by a single phase of a 3-phase 208VAC powered system. Always follow specific installation-wiring diagrams that come with the system. NOTE: At the MKR 371 LED MARKER, cut off the bare drain wire, as this will not be used in the marker base. Flash Technology Revision A - 2/13/2020... -
Page 39: Lightning Protection
LIGHTNING PROTECTION All Flash Technology equipment is designed to withstand severe transient over-voltages. While not provided from Flash Technology, a lightning arresting system should be installed to prevent eventual damage by lightning. Transient suppressors from line-to-line and line-to neutral are recommended at the primary power load center. -
Page 40: Check-Out Procedure
1. From the main menu, scroll DOWN to “Lighting Inspections” and press ENTER. 2. Scroll to “Automatic LI” and press ENTER 3. Scroll to “Begin Test” and press ENTER 4. The display screen will indicate when the test is complete. Flash Technology Revision A - 2/13/2020... - Page 41 3. Scroll to the desired alarm and press ENTER 4. Scroll to “Test Alarm” and press ENTER 5. Scroll to “Alarm” and press ENTER 6. Scroll to “Normal” and press ENTER to restore/clear the alarm Flash Technology Revision A - 2/13/2020...
-
Page 42: Information Display
SYSTEM SETTINGS power or to restore configuration settings to factory default values. Also allows setting the real time clock’s date/time + timezone 1. Menu options and features are based on firmware version 10/25/2019 (V ?.0.1). Flash Technology Revision A - 2/13/2020... -
Page 43: Site Tower Config
HI BCN TIER[1-6] (# of beacons) Configuration # OF AOL BCNS (Number of AOL Beacons) NUM OF MKR TIERS (Number of Marker Tiers) MARKERS PER TIER MARKER TIER[1-9] (# of markers) MKRTIER NOT PRESENT (0), 1-4 REGULATORY SPEC Flash Technology Revision A - 2/13/2020... - Page 44 DAY TO TWI (Day to Twilight) TWI TO NIGHT (Twilight to Night) TWR MODE CTRL PHOTODIODE/GPS/SCHEDULE (Tower Mode Control) Help A Secondary System Can Use The Auxiliary Input To Command Lights On/Off. Auxiliary Input Command On /Off Status Flash Technology Revision A - 2/13/2020...
- Page 45 FLASHING Help To enable infrared beacon, the beacon must support IR. IR Enable Yes/No IR IS NIGHT ALM When selected an IR alarm will also cause a night alarm. (IR is night alarm) Yes/No Flash Technology Revision A - 2/13/2020...
-
Page 46: Monitoring Config
When the FTC 270 utilizes a cellular modem the settings should be as follows: IP Address Mode: Static IP Address: 192.168.1.11 Subnet Mask: 255.255.255.0 Default Gateway: 192.168.1.10 The MAC Address is not editable. Flash Technology Revision A - 2/13/2020... -
Page 47: Primary Data Monitoring
Modbus devices. (Not currently available) Ethernet Eagle - selected when the system will be connected to the Flash Technology NOC ALTERNATE DATA MONITORING Alternate Data Monitoring allows for a secondary monitoring method. All options available in the Primary Data Monitoring menu are available in the Alternate Data Monitoring menu. -
Page 48: Table 3-4: Monitoring Configuration Menu Options
Station Address: Default is 2 (Enter Value Ranging From 0 – 255) Hours (Enter Value Ranging From 0 - 24) Monitoring Autoupdate: XX Hours - XX Method: Minutes (Enter Value Ranging From 0 - Minutes Ethernet SNMP Primary Server IP Address (Enter IP Address) Flash Technology Revision A - 2/13/2020... - Page 49 2. Ethernet SNMP, if used, must be selected as the Primary Data Monitoring method. 3. Monitoring Options are mutually exclusive. Example: If RS 485 Modbus RTU is selected in either menu, it is removed from the available options in the other menu. Flash Technology Revision A - 2/13/2020...
-
Page 50: Monitoring Status
Note: The FTC 270 maintains event times and up to 30 are displayed. Mode Override Mode Override 0D 0h 15M Site Event History Local Diagnostics Mode Override Mode Override 0d 0H 20M Display Board Runtime Days i.e. 400d Flash Technology Revision A - 2/13/2020... - Page 51 Hours Min Sec Firmware Revision HI Beacon Firmware [Version X.X] RS 485 Communications Quality Percentage between 0 and 100 White A2D – Panel 1 String 0-4, Panel 2 String 0-4, Panel 3 String 0-4 Flash Technology Revision A - 2/13/2020...
- Page 52 Hours Min Sec Firmware Revision Firmware [Version X.X] RS 485 Communications Quality (Percentage between 0 and 100) Markers Sensed Marker Marker A2D – MARKER 1-4 Currents, Marker Driver Voltage Temperature Pressure Altitude Misc A2D Humidity Flash Technology Revision A - 2/13/2020...
-
Page 53: Lighting Inspection (Li)
Parallel With No User Interaction.) Yes Confirm? Lighting Beacon Day Alarm Alarm/Normal Inspection (LI) Beacon White Night Alarm Alarm/Normal Beacon Red Night Alarm Alarm/Normal Manual LI Beacon Twilight. Alarm Alarm/Normal Marker Alarm Alarm/Normal Photodiode Dry Contact Test Alarm/Normal Flash Technology Revision A - 2/13/2020... -
Page 54: Mode Override
Override Left: (Displays The Amount Of Time Remaining In The Current Override Mode) System will not flash when Override Mode “White Day” is selected for systems programmed as “Tower Type Red” Option will not be displayed for systems programmed as “Tower Type White”. Flash Technology Revision A - 2/13/2020... -
Page 55: System Settings
Waiting for password Configuration ***** Real Time Clock Date Time Daylight Savings Time (Enable/Disable) Requires a valid password to set the customized configuration. Upon success unit will set the customized configuration based on the password entered. Flash Technology Revision A - 2/13/2020... -
Page 56: Web Interface
The FTC 270 provides an intuitive web interface that is accessible via Wi-Fi or Ethernet connection. From this interface, all the information that is included on the Display PCB1 is also available to view and change. Flash Technology Revision A - 2/13/2020... -
Page 57: Home Page
If the controller (FTC 270) has lost communications with any tower device, it will show as a non-flashing icon and will appear in a maroon color. Marker alarms will appear in an orange color. Flash Technology Revision A - 2/13/2020... -
Page 58: Maintenance And Troubleshooting
RFI entering the equipment. DIAGNOSTIC TEST The FTC 270 has built in diagnostic capabilities to assist in troubleshooting the system. Flash Technology recommends that a full system diagnostic test is run before troubleshooting individual system components. -
Page 59: Component Testing
When a single white LED fails in a shorted state, the string voltage will drop by 1/24 or 4.1% When single red or IR LEDs fails in a shorted state, the string voltage will drop by 1/15 or 6.7% String current will remain the same. Flash Technology Revision A - 2/13/2020... -
Page 60: Target A2D Values
3. Scroll down to HI Beacon Tier (or BCN depending on the FW version) and press ENTER. 4. Scroll down to Tier BCN press Enter 5. Select proper A2D (White, Red, IR) press Enter. 6. Select panel 1-3 press Enter 7. Select string View Voltage and Current Values Flash Technology Revision A - 2/13/2020... -
Page 61: A2D Tables
Nominal White Twi String Voltage A2D 1 LED shorted drops Nominal White Night String Voltage A2D 1 LED shorted drops Nominal Red Night String Voltage A2D 1 LED shorted drops Nominal IR String Voltage A2D 1 LED shorted drops Flash Technology Revision A - 2/13/2020... -
Page 62: Failure Scenarios And Remote Troubleshooting
NOTE! If string voltage is below normal but string current is normal – There are shorted LEDs on that string. This in itself does not warrant flashhead panel or board replacement. This is not an indication that more LEDs will fail in the string. Repair procedures are provided in Component Removal and Replacement. Flash Technology Revision A - 2/13/2020... -
Page 63: Component Removal And Replacement
PCB1, then loosening the 4 screws retaining PCB1 and sliding the bracket down to remove the bracket. 3) Disconnect the input power lead to the power supply by removing GRN, BLU, BRN wires from the top half of TB2. Flash Technology Revision A - 2/13/2020... -
Page 64: Fh 270 High Intensity Flashhead
Note the wiring connections, wire colors, rotary dial positions and RS485 jumper positions when replacing boards. These must be replaced exactly as they were. If in doubt, refer to the INFO CARD on the cabinet door or the appropriate wiring diagram provided in this manual. Flash Technology Revision A - 2/13/2020... -
Page 65: Firmware Upgrades
USB drive matches the file that was last used to upgrade it and will not commence the firmware upgrade process. Remote firmware upgrades are also possible. Remote upgrade requires network access (cellular or Ethernet) to the display board. Contact Flash Technology for more information about this process. Flash Technology Revision A - 2/13/2020... -
Page 66: Recommended Spare & Replacement Parts
Telephone: (615) 261-2000 Facsimile: (615) 261-2600 Internet Address: flashtechnology.com Shipping Address: Flash Technology 332 Nichol Mill Lane Franklin, TN 37067 ORDERING PARTS To order spare or replacement parts, contact Parts Department at 1-800-821-5825. The following tables and figures provide the details on the major replaceable parts and their component locations for the FTC 270, PC 270, FH 270, PC 372, FH 372 and MKR 372 MARKER INTERFACE. -
Page 67: Ftc 270 Parts
PHD 516 PHOTODIODE W/50' PIGTAIL SHLD 1855517 FTC 270 PHOTODIODE PHD 516 PHOTODIODE W/75' PIGTAIL SHLD 1855518 FTC 270 GPS BOARD PCB FTS 371 GPS OPTION 2433000 FTC 270 GPS KIT FTS 371 GPS SYNC KIT 1370285 Flash Technology Revision A - 2/13/2020... -
Page 68: Figure 6-1: Ftc 270 Internal Wiring & Component Locations
Figure 6-1: FTC 270 Internal Wiring & Component Locations Flash Technology Revision A - 2/13/2020... -
Page 69: Pc 270 And Fh 270 Parts
HARNESS PC 270 LED PANEL RED IR OUTPUT 4373004 FH 270 CABLE CABLE FH 270, 10FT 4270000010 FH 270 CABLE CABLE FH 270, 25FT 4270000025 FH 270 LED PANEL FH 270 DUAL LED – SINGLE PANEL 1270110 Flash Technology Revision A - 2/13/2020... -
Page 70: Figure 6-2: Pc 270 Internal Wiring & Component Locations
Figure 6-2: PC 270 Internal Wiring & Component Locations Flash Technology Revision A - 2/13/2020... -
Page 71: Pc 372 And Fh 372 Parts
TERM BLOCK INPUT AC POWER RS-485 OVP 1363011 PC 372 TERM BLOCK ASSY FH/SC CABLE 1362030 FH 372 LIGHT ENGINE FH 372 LIGHT ENGINE REPLACEMENT 1372102 Figure 6-3: PC 372 Internal Wiring and Component Locations Flash Technology Revision A - 2/13/2020... -
Page 72: Mkr 372 Marker Interface
Reference Item Description Part Number MKR 372 INT PCB MARKER JBOX FTS 270 2422100 MKR 372 INT TERM BLOCK INPUT POWER RS-485 1363010 Figure 6-4: MKR 372 Interface Internal Wiring Diagram & Component Locations Flash Technology Revision A - 2/13/2020... -
Page 73: Rma Policy
RMA POLICY If any system or part(s) purchased from Flash Technology need to be returned for any reason (subject to the warranty policy), please see the current RMA policy available online at: flashtechnology.com/rma. To initiate an RMA, call the Flash Technology NOC to receive technical assistance (800-821-5825 Option 9, M-F, 7 a.m.
Need help?
Do you have a question about the VANGUARD FTS 270 and is the answer not in the manual?
Questions and answers