Advertisement
Quick Links
TORQUÍMETRO ELECTRÓNICO COMPUTORQUE
ELECTRONIC TORQUE WRENCH
MANUAL DE USUARIO
USER'S MANUAL
CÓDIGOS / CODES:
6200
6201
6203
6204
PRECAUCIÓN:
seguridad e instrucciones de operación.
CAUTION:
Before using this product, read this manual and follow all safety rules and
operational instructions.
Antes de usar este producto, lea este manual y siga todas las reglas de
Advertisement
Chapters

Related Manuals for Urrea 6200


Summary of Contents for Urrea 6200
- Page 1 TORQUÍMETRO ELECTRÓNICO COMPUTORQUE ELECTRONIC TORQUE WRENCH MANUAL DE USUARIO USER’S MANUAL CÓDIGOS / CODES: 6200 6201 6203 6204 PRECAUCIÓN: Antes de usar este producto, lea este manual y siga todas las reglas de seguridad e instrucciones de operación. CAUTION: Before using this product, read this manual and follow all safety rules and...
-
Page 3: Table Of Contents
E S P A Ñ O L CONTENIDO: Felicidades, ha comprado usted el más sofisticado y fácil de usar torquímetro electrónico, con un mínimo mantenimiento su llave de torque le brindará años de trabajo sin problemas de servicio. 1. CARACTERÍSTICAS ...................4 2. -
Page 4: Características
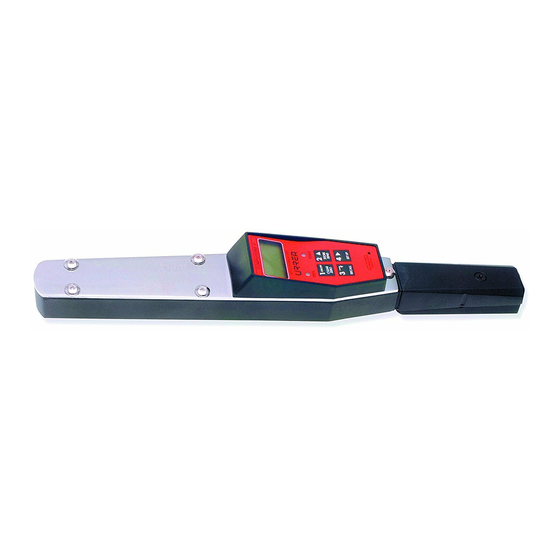
E S P A Ñ O L CARACTERÍSTICAS FUNCIONES • Presición de +/- 1% de incremento. • Memoria de amplio almacenamiento de datos de torque. • El torquímetro electrónico más nuevo disponible en el mercado. • Alta repetibilidad y precisión. •... - Page 5 E S P A Ñ O L B O T Ó N N. Encendido (ON/OFF). O. BORRA la pantalla de cristal líquido. F. Gráfica de barras análoga. P. Puesta a CERO. G. 7 unidades de toque ft-lb, In-lb, In-oz, Nm, dNm, mkg, cmkg B O T Ó...
-
Page 6: Instrucciones De Operación
E S P A Ñ O L Nota: Se cuenta con un botón de encendido (on/off) localizado en la parte lateral derecha del torquímetro. El torquímetro es embarcado desde fábrica con el botón en posición "off". antes de usarse, deslice el botón a "on". Posicione el botón en la posición "off" sólo si el torquímetro será... - Page 7 E S P A Ñ O L PARA CAMBIAR UNIDADES DE MEDICIÓN DE TORQUE: in-lb, in-oz, Nm, dNm, mkg, cmkg, ft-lb 1. Presione el botón #4 dos veces, la unidad de medición parpadeará en pantalla. 2. Para cambiar la unidad de medida, presione el botón #2 hasta que la unidad de medida deseada parpadee en pantalla.
- Page 8 E S P A Ñ O L A J U S T E D E P O R C E N TA J E S D E T O L E R A N C I A 1. Presione el botón #4, hasta que el primer dígito de los dos que están en la esquina superior derecha parpadeen.
- Page 9 E S P A Ñ O L 2. Presione el botón #4 dos veces y verifique si las unidades de torque activas estén en In-lbs. 3. Presione el botón #4 una vez más para activar el primer cero parpadeante. 4. Presione el botón #2 hasta que el número 1 sea mostrado.
- Page 10 E S P A Ñ O L F U N C I O N E S E L E C T R Ó N I C A S D E L T O R Q U Í M E T R O PA R A U S A R E N M O D O D E O P E R A C I Ó...
-
Page 11: To Recall Data Stored In Memory To The Lcd
E S P A Ñ O L TO RECALL DATA STORED IN MEMORY TO THE LCD 1. Press button #3 (recall). The torque values placed in memory will appear on the digital display in the reserve order that they were placed in memory. - Page 12 E S P A Ñ O L A tone indicates completion of this function. If this torque value also needs to be placed into memory, press button #2 (store/ send) once. PLEASE NOTE: When downloading recalled memory to a printer or computer, the data will be sent and printed in the order torque values were taken.
-
Page 13: To Turn Wrench Off
E S P A Ñ O L T O T U R N W R E N C H O F F Press and hold button #1 (clear/zero) for approximately two seconds. An audible tone will signal and the display will turn blank. - Page 14 E S P A Ñ O L ELECTRONIC TORQUE WRENCH / TORQUÍMETRO ELECTRÓNICO COMPUTORQUE...
- Page 15 E S P A Ñ O L ELECTRONIC TORQUE WRENCH / TORQUÍMETRO ELECTRÓNICO COMPUTORQUE...
-
Page 16: Computorq
• Make sure the wrench is in the propper be done in both directions (CW torque engineering units prior to and CCW). calibrating. SPECIFICATIONS PART RANGE INCREMENT LENGTH WEIGHT NUMBER LBS. 6200 1/4" 5-50 In-lbs .01 In-lbs 13.5" 6201 3/8" 25-250 In-lbs .1 In-lbs 14.9" 6203 3/8"... - Page 17 E S P A Ñ O L FIRST: Excercise the wrench to full scale 3 times in the CW direction before calibration sequence begins: LCD DISPLAY Hold key for 3 seconds (buzzer on) first digit will blink Enter "calibrate CW" code 5251 by: A - Press key scroll up to (5) press key...
- Page 18 E S P A Ñ O L FIRST: Excercise the wrench to full scale 3 times in the CCW direction before calibration sequence begins: LCD DISPLAY Hold key for 3 seconds (buzzer on) first digit will blink Enter "calibrate CCW" code 5252 by: A - Press key scroll up to (5) press key...
- Page 19 E S P A Ñ O L COMPUTORQ shown being calibrated on a mechanical loader. COMPUTORQ shown being calibrated on a electronic loader. COMPUTORQ features a battery conservation switch to extend the battery life when the wrench is not in use. ELECTRONIC TORQUE WRENCH / TORQUÍMETRO ELECTRÓNICO COMPUTORQUE...
-
Page 20: Batteries - Replacement, Location And Use
E S P A Ñ O L BATTERIES - REPLACEMENT, LOCATION AND USE A 9-volt alkaline battery is standard and provides for approx. 60 hours of operation. A "LoBat" indication on the display signals for replacement. There are 10-20 hours of wrench operation remaining, even after "LoBat"... - Page 21 E N G L I S H TABLE OF CONTENT: Congratulations on the purchase of the most sophisticated, yet user friendly electronic torque wrench manufactured today. With minimum maintenance, your wrench should provide years of trouble free service. Please read the entire operating manual to obtain the maximum performance from your new wrench.
-
Page 22: Features
E N G L I S H FEATURES FUNCTIONS • Accuracy to +/- 1% increments. • Large storage of torque data memory. • Newest electronic available today. • Extremely accurate repeatable. • Microprocessor and strain gauge based technology. • Selectable modes of operation. •... - Page 23 E N G L I S H B U T T O N N. ON/OFF Power O. CLEAR LCD display. P. ZERO TARE. Analog bar graph. G. 7 torque units B U T T O N ft-lb, In-lb, In-oz, Nm, dNm, mkg, cmkg Scroll up (increase value H.
-
Page 24: Operating Instructions
E N G L I S H Please Note: There is an "off-on" slide switch located on the right side of the wrench. The wrench is shipped from the factory with the switch in the "off" position. Before use, slide the switch up or "on". -
Page 25: To Change Unit Of Torque Measure
E N G L I S H TO CHANGE UNIT OF TORQUE MEASURE: in-lb, in-oz, Nm, dNm, mkg, cmkg, ft-lb 1. Press button #4 (set-up) two times. The unit of measure will flash on the display. 2. To change the unit of measure, press button #2 (store/send). Continue pressing button #2 (store/ send) until the unit of measure desired is blinking on the LCD. -
Page 26: To Set Percentages Of Tolerances
E N G L I S H T O S E T P E R C E N TA G E S O F T O L E R A N C E S 1. Press button #4 )set-up), until the first digit of two in the upper right corner is blinking. - Page 27 E N G L I S H 2. Press button #4 twice and verify if the active torque units are in in-lbs 3. Press button #4 one more time to activate the first blinking "0". 4. Press button #2 until the number "1" is displayed.
-
Page 28: Electronic Wrench Functions To Use In "Track" Mode Of Operation
E N G L I S H E L E C T R O N I C W R E N C H F U N C T I O N S T O U S E I N " T R A C K " M O D E O F O P E R AT I O N 1. -
Page 29: To Recall Data Stored In Memory To The Lcd
E N G L I S H TO RECALL DATA STORED IN MEMORY TO THE LCD 1. Press button #3 (recall). The torque values placed in memory will appear on the digital display in the reserve order that they were placed in memory. - Page 30 E N G L I S H A tone indicates completion of this function. If this torque value also needs to be placed into memory, press button #2 (store/ send) once. PLEASE NOTE: When downloading recalled memory to a printer or computer, the data will be sent and printed in the order torque values were taken.
-
Page 31: To Turn Wrench Off
E N G L I S H T O T U R N W R E N C H O F F Press and hold button #1 (clear/zero) for approximately two seconds. An audible tone will signal and the display will turn blank. - Page 32 E N G L I S H ELECTRONIC TORQUE WRENCH / TORQUÍMETRO ELECTRÓNICO COMPUTORQUE...
- Page 33 E N G L I S H ELECTRONIC TORQUE WRENCH / TORQUÍMETRO ELECTRÓNICO COMPUTORQUE...
-
Page 34: Specifications
• Make sure the wrench is in the propper be done in both directions (CW torque engineering units prior to and CCW). calibrating. SPECIFICATIONS PART RANGE INCREMENT LENGTH WEIGHT NUMBER LBS. 6200 1/4" 5-50 In-lbs .01 In-lbs 13.5" 6201 3/8" 25-250 In-lbs .1 In-lbs 14.9" 6203 3/8"... - Page 35 E N G L I S H FIRST: Excercise the wrench to full scale 3 times in the CW direction before calibration sequence begins: LCD DISPLAY Hold key for 3 seconds (buzzer on) first digit will blink Enter "calibrate CW" code 5251 by: A - Press key scroll up to (5) press key...
- Page 36 E N G L I S H FIRST: Excercise the wrench to full scale 3 times in the CCW direction before calibration sequence begins: LCD DISPLAY Hold key for 3 seconds (buzzer on) first digit will blink Enter "calibrate CCW" code 5252 by: A - Press key scroll up to (5) press key...
- Page 37 E N G L I S H COMPUTORQ shown being calibrated on a mechanical loader. COMPUTORQ shown being calibrated on a electronic loader. COMPUTORQ features a battery conservation switch to extend the battery life when the wrench is not in use. ELECTRONIC TORQUE WRENCH / TORQUÍMETRO ELECTRÓNICO COMPUTORQUE...
-
Page 38: Batteries - Replacement, Location And Use
E N G L I S H BATTERIES - REPLACEMENT, LOCATION AND USE A 9-volt alkaline battery is standard and provides for approx. 60 hours of operation. A "LoBat" indication on the display signals for replacement. There are 10-20 hours of wrench operation remaining, even after "LoBat"... - Page 40 The warranty is not applicable if the product does not show the URREA brand, if the product is worn out by its daily use, shows signs of abuse, damage, its original composition has been altered, or specifies a different warranty.
Need help?
Do you have a question about the 6200 and is the answer not in the manual?
Questions and answers