
Related Manuals for KegLand Cannular


Summary of Contents for KegLand Cannular
- Page 1 Cannular Semi-Auto Instruction Manual Cannular Compact Semi-Auto Canning Machine Instruction Manual KegLand Distribution PTY LTD www.KegLand.com.au www.KegLand.com.au Last Updated 24/04/2020 5:59 PM Page 1 of 23...
- Page 2 WARNING DO NOT OPERATE THE CANNULAR WITHOUT FIRST GETTING THE CANNULAR IN SPECIFICATION ACCORDING TO THE SPECIFIC CHUCK USED. IF THE CANNULAR IS NOT IN SPECIFICATION IT CAN RESULT IN THE ROLLERS DAMAGING THE CHUCK. WARNING ENSURE THE CANNULAR IS UNPLUGGED BEFORE PLACING ANY BODY PART NEAR ANY MOVING PARTS OR WHEN MANUALLY ROTATING THE MOTOR OR THE CHUCK.
- Page 3 A 24V Power supply rated to a minimum of 20amps with a standard Anderson Plug is required to run the Cannular. If you do not have a power supply they are stocked on our website. Only the un-wired 20A power supply should be used with the Semi-Auto Cannular.
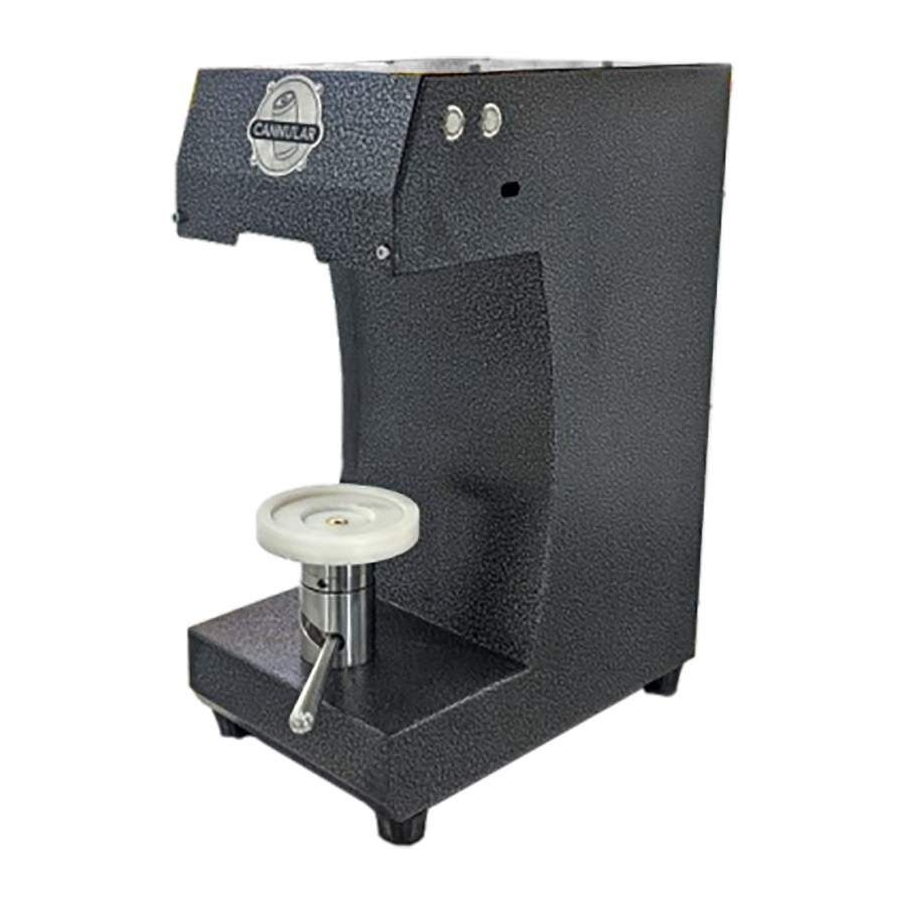
- Page 4 Cannular Semi-Auto Instruction Manual Table Turn table support Coupling Lever Power button Operation button www.KegLand.com.au Last Updated 24/04/2020 5:59 PM Page 4 of 23...
- Page 5 Changing and Adjusting the Chuck The Cannular is setup out of the box with a chuck that is suitable for a B64 can end. This chuck is compatible with cans available from KegLand. If you wanted to use a non-KegLand can and can end then you will need to adjust the rollers and change the chuck to suit the specific can end you are using.
- Page 6 Cannular Semi-Auto Instruction Manual To change the chuck, unscrew the two grub nuts shown to the right using a 3mm allen key. and pull downwards to remove the chuck from the drive shaft. This may require a bit of force.
- Page 7 Ensure that the correct chuck for your particular can end is installed and tightened onto the drive shaft. Start by unplugging the Cannular machine from the power supply. The rollers can be adjusted with the top cover on; however, it may make it easier to access the adjustment...
- Page 8 Cannular Semi-Auto Instruction Manual should not buckle under the pressure. Once you are happy with the position of the table, tighten the coupling nut firmly using an allen key. Table Position Adjustment It is possible that at some stage your table may have come out of alignment. In this case you will need to use a 5mm allen key to re-position the turn table.
- Page 9 Cannular Semi-Auto Instruction Manual If you get the buckle happening on the second operation then please check your can is being raised straight up and completely concentric with the chuck. Small adjustments to the turn table position To make small adjustments to the turn table position.
- Page 10 Cannular Semi-Auto Instruction Manual 3. Adjust the position of the turn table so that the can is completely concentric with the chuck when it is raised. 4. Once you are satisfied with the position of the turn table do up the three bolts with the allen key www.KegLand.com.au...
- Page 11 Cannular Semi-Auto Instruction Manual Adjusting the Rollers Both rollers on the Semi-Auto Cannular have detented rollers, such that they can be rotated around the drive shaft 360 degrees to give a greater degree of fine adjustment in the x-axis. The correct detention setting differs according to the size of the can used.
- Page 12 Cannular Semi-Auto Instruction Manual Note: The rollers have been removed from the machine in the above diagram for explanatory purposes only. Generally once this has been set and tightened it will not need to be adjusted. Op Roll Height and Gap Adjustment...
- Page 13 Cannular Semi-Auto Instruction Manual 2. Adjust the position of the roller so the gap “X” between the chuck and the 1 Op roller is 0.3 – 0.7 mm. 3. Tighten the x-axis adjustment nut firmly once at the correct gap “X” size.
- Page 14 Op Roll should be 0.3 – 0.4 mm Check Your Roll’s Spin In order for the Cannular canning machine to work efficiently the rolls must be able to spin. Ensure the Allen key bolts on the underside of the rolls are done up tightly but once you have done this, rotate the rolls with your finger to ensure they can still turn without much resistance.
- Page 15 Cannular Semi-Auto Instruction Manual IMPORTANT: After you have adjusted the rollers manually turn the chuck clockwise such that the two rollers run through a full rotation and make sure that the rollers never come into contact with the chuck at any point in time.
- Page 16 Cannular Semi-Auto Instruction Manual The forming of the 1st operation seam is the most important operation as this operation takes the end curl and can flange and begins the forming process. It’s the formation/dimension of this 1st seam that controls the effectiveness of the 2nd operation seaming roll profile in achieving a hermetic seal.
- Page 17 Cannular Semi-Auto Instruction Manual IMAGE 1 – 1 Operation IMAGE 2 – 2 Operation www.KegLand.com.au Last Updated 24/04/2020 5:59 PM Page 17 of 23...
- Page 18 STEP 1 Using the Cannular can seamer, prepare two test cans. Seam the first can using just the first operation seam. With the second can, use both the first and second operation to finish the seam. You should have two individual cans that look like this below:...
- Page 19 Cannular Semi-Auto Instruction Manual STEP 2 Cut a wedge out of the top of the can using an angle grinder. We recommend the use of a 1mm cutting disk for your angle grinder or if you do not have an angle grinder then a hack saw will do the job adequately.
- Page 20 Cannular Semi-Auto Instruction Manual STEP 3 Using a knife scrap the cut clean. This can also be done with some fine sand paper. CAN A STEP 4 Look closely at the Can A to examine the overlap. It’s extremely important that you can visually see overlap in this section.
- Page 21 Cannular Semi-Auto Instruction Manual STEP 5 Similar to step 4 examine the overlap. This can be more difficult to see as the seam has already been finished. It can make it easier to see this overlap if you gently pry open the can seam slightly...
- Page 22 Cannular Semi-Auto Instruction Manual The second op seam thickness is quite easy to measure using calipers. Using Can B, take the average of 4 measurements around the circumference of the can. The average of these 4 measurements should be between 1.2-1.3mm.
- Page 23 3.3mm as long as you still have sufficient actual overlap. As this particular Cannular machine is driven using a manual leaver, it is possible for the operator to pull too hard on the lever which can also make a longer seam yet still gives an acceptable finished seam.
Need help?
Do you have a question about the Cannular and is the answer not in the manual?
Questions and answers