Table of Contents
Advertisement
Quick Links
830-629-2900 / 800-729-3839 / Fax 800-653-3839 / Text photos only: 830-481-6433 / INTERNET: www.detex.com
INSTALLATION INSTRUCTIONS FOR THE EAX-300 DOOR PROP / DOOR CHIME (EAX-300 / 300W / 300SK)
Dwg #: 105830
Table of Contents
Parts breakdown view & part numbers.........................................................
Hardware List, Device preparation.................................................................
Switch Selector Positions, Door Mounting Procedure....................................
Wall mounting procedure, Multi-door & SK procedure..................................
Device installation (finish)..............................................................................
Key Stop Installation, Optional Accessories..................................................
Special notes & definitions, Magnet handing & re-handing, operations........
Change door prop timiing..............................................................................
Operations continued, Troubleshooting.........................................................
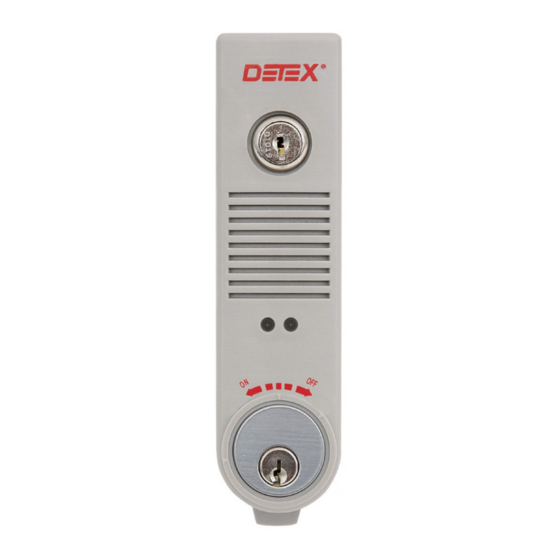
The Detex EAX-300 is designed for applications that require a door prop alarm device on secured doors. The alarm,
with approximately 100dB, will sound when someone attempts to keep the door open beyond the selected time.
The EAX-300, with it's smaller size makes it the choice for quick and easy installations on emergency exit and restricted doors.
Should you have any Question/Problem with your Detex device please call Detex Technical Support from the
job site at 1-800-729-3839 and choose option 2 on our menu. Please do not return the product to the distributor.
For WARRANTY information,
scan code below or
go to www.detex.com/warranty
Detex Corporation, 302 Detex Drive, New Braunfels, Texas 78130-3045
104889 Page 1
104889 March 18, 2020
For device installation videos,
scan code below or
go to www.detex.com/videos
C
Page
2
3
4
4-5
5
6
6-7
7-8
8
Advertisement
Table of Contents

Related Manuals for Detex EAX-300 Series


Summary of Contents for Detex EAX-300 Series
- Page 1 Change door prop timiing................Operations continued, Troubleshooting............The Detex EAX-300 is designed for applications that require a door prop alarm device on secured doors. The alarm, with approximately 100dB, will sound when someone attempts to keep the door open beyond the selected time.
- Page 2 #4 x 3 /4" Screw, PPH Backplate 102715 Magnet Kit 102665 Magnet Locator 102607 Hardware Kit (includes keystop parts)(not shown) 102633 Your particular part or configuration may not be shown: Contact Detex technical support at 800-729-3839 (option 2) 104889 Page 2...
- Page 3 Collar required if distance is greater than 5/16" Optional collar can be ordered Cam orientation as shown from Detex (p/n: ECL-1595) with key removed 6: Connect 9-volt battery and 4: Re-install cam assembly 5: Set slide selector switch functions (See Table A on page 4)
- Page 4 Table A: Selector Switch Functions ( *Default settings; **Will shorten battery life) STATUS OFF* No indication that device is armed or disarmed. INDICATOR ARMED - red LED blinks approximately every 6 seconds.** (SWITCH B) DISARMED - green LED blinks approximately every 6 seconds.** Door prop mode OFF* (SWITCH A)
- Page 5 STEP 8: NOT FOR USE ON EAX-300W Multi-door & SK function wiring connection (if required). 8b: Drill hole 8c: Reassembly 8a: Remove board Fitting or nut NOT included Recommended hole size: Remove (1/2" connector P/N PP-5107) Drill 7/8 dia, (1) place (2) screws 1"...
- Page 6 OPTIONAL KEY STOP INSTALLATION (Not required for normal operation) (If required, key stop included in hardware kit) Front View (KEY STOP POSITIONS) Install key stop "OFF" position "ON" position (Key cannot (Key can KS used with be removed) be removed) standard Yale KS shown style cam...
- Page 7 DOOR PROP OPERATIONS: The door prop function is selected by setting SWITCH A to the 'OFF' position. To arm the system, close the door and turn the key CCW to the 'ON' position. The red LED will flash twice indicating that the device is now armed. If the door is opened, the device will begin a timing countdown according to the selected amount of time (15 seconds default).
- Page 8 3) Cylinder had wrong cam installed. 3) Requires standard Yale cam. 4) Cylinder microswitch lever broken. 4) Microswitch needs to be replaced. Remove PCB and return to Detex Repair. 5) Cylinder installed incorrectly. 5) Check cylinder installation. Make sure key is turned counter-clockwise all the way to ON.
Need help?
Do you have a question about the EAX-300 Series and is the answer not in the manual?
Questions and answers