Table of Contents
Advertisement
Quick Links
IMPORTANT! Keep these instructions for future reference.
Read these instructions before assembly and use of
this product.
• Adult assembly is required. Tools needed for assembly:
Allen Wrench (included) and Phillips screwdriver
(not included).
• Requires four D (LR20) alkaline batteries (not included)
or an AC adaptor (input 120 - 240 VAC, 50 - 60Hz, with
an output of 6 VDC) for operation (included).
Some features of this product only work with the Fisher-Price
Download the Fisher-Price
(not included). This app is available from the App Store
Algunas características de este producto solo funcionan con la aplicación Smart Connect de
Fisher-Price. Bajar la aplicación Smart Connect de Fisher-Price para controlar el columpio
con un dispositivo celular (no incluido). Esta aplicación está disponible en el App Store
o Google Play.
fisher-price.com
®
Smart Connect™ app to control the swing from your smart device
¡IMPORTANTE! Guardar estas instrucciones para futura
referencia. Leer estas instrucciones antes de ensamblar
y usar este producto.
• Requiere montaje por un adulto. Herramienta necesaria
para el montaje: llave hexagonal (incluida) y desatornillador
de cruz (no incluido).
• Funciona con cuatro pilas alcalinas D (LR20) x 1,5V
(no incluidas) o un adaptador de corriente alterna (entrada de
120 - 240 V~, 50 - 60Hz, salida de 6 Vcc), incluido.
1
®
Smart Connect™ app.
or Google Play™.
SM
DKD85
SM
Advertisement
Table of Contents

Related Manuals for Mattel Fisher-Price DKD85


Summary of Contents for Mattel Fisher-Price DKD85
- Page 1 DKD85 Some features of this product only work with the Fisher-Price ® Smart Connect™ app. Download the Fisher-Price ® Smart Connect™ app to control the swing from your smart device (not included). This app is available from the App Store or Google Play™.
- Page 2 WARNING: Prevent serious injury or death: • Never leave child unattended. • This product is not intended for unsupervised or prolonged periods of sleep. • Always use the restraint system. When used as an infant rocker: • Fall Hazard: Never use on any elevated surface, since child’s movement may cause the product to slide or tip over.
- Page 3 Consumer Information Información al consumidor IMPORTANT! Maximum Weight Limit: 25 lb (11,3 kg). If your child weighs less than 25 lb (11,3 kg), but is really active and appears to be able to climb out of the swing, immediately discontinue its use. •...
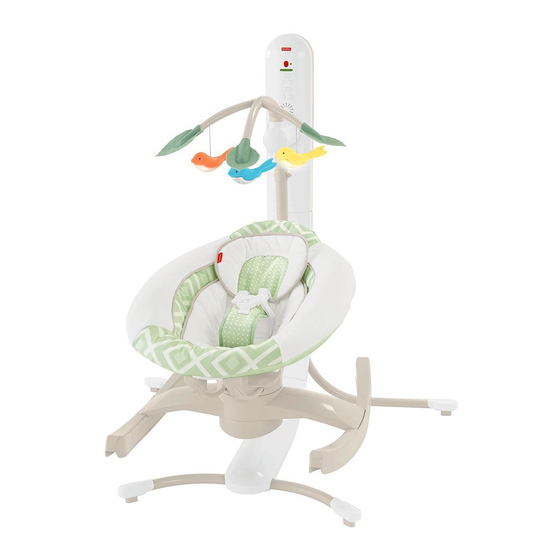
- Page 4 Parts Piezas 2 Seat Side Rails Seat Pad Seat Back 2 barandillas Almohadilla Respaldo laterales de la silla Seat Base Base de la silla Swing Base Body Support Swing Mobile Base del columpio Soporte corporal Móvil del columpio Swing Arm Brazo del columpio Allen Wrench Llave hexagonal...
- Page 5 Assembly Montaje IMPORTANT! Before assembly and each use, inspect this product for damaged hardware, loose joints, missing parts or sharp edges. Do not use the product if any parts are missing, damaged or broken. Do not use accessories or replacement parts other than those approved by the manufacturer.
- Page 6 Assembly Montaje • Insert two M5 x 38 mm screws into the lower swing frame and tighten with a Phillips screwdriver. • Insertar dos tornillos M5 x 38 mm en el armazón inferior del columpio y apretarlos con un desatornillador de cruz. Swing Base Cover Cubierta de la base del columpio •...
- Page 7 Assembly Montaje Motorized Swing Frame Tube Tubo del armazón motorizado del columpio Lower Swing Tube Tubo inferior del columpio FRONT VIEW VISTA DEL FRENTE • Turn the swing assembly upright. • Fit the motorized swing frame to the lower swing frame. From the back of the swing assembly, make sure the button on the lower swing frame tube “snaps”...
- Page 8 Assembly Montaje Swing Power Cord Cover Cubierta del cable eléctrico del columpio • Fit the tab on the swing power cord cover into the slot in the swing frame assembly. Push to “snap” in place. • Conectar la lengüeta de la cubierta del cable eléctrico del columpio en la ranura de la unidad del armazón. Presionar para ajustarla en su lugar.
- Page 9 Assembly Montaje Remove this screw Remove this scr Quitar este tornillo Quitar este torni IMPORTANT! The screw used to assemble the swing arm to the swing frame tube is located in the swing arm retainer. Loosen the M5 x 45 mm screw in the swing arm retainer with the Allen wrench and remove it. This screw will be used in assembly step 10.
- Page 10 Assembly Montaje Swing Mobile Móvil del columpio • Fit the mobile into the socket in the swing frame. • Push down on the mobile base to be sure it is secure. • Ajustar el móvil en la conexión del armazón del columpio. •...
- Page 11 Assembly Montaje Seat Bottom Asiento • Fit the seat bottom onto the seat base. Hint: The seat bottom is designed to fit onto the seat base one way. If it does not seem to fit, turn it around and try again. •...
- Page 12 Assembly Montaje Rocker Rails Barandillas de la mecedora BOTTOM VIEW VISTA DE ABAJO • Turn the seat assembly over. • Fit the rocker rails onto the bottom of the seat assembly • Insert four M4,5 x 19 mm screws into the rocker rails and tighten with a Phillips screwdriver •...
- Page 13 Assembly Montaje Upper Slots Lower Slots Ranuras inferiores Ranuras superiores Smaller Baby • Insert the seat shoulder belts through the lower slots in the seat pad back. Larger Baby • Insert the seat shoulder belts through the upper slots in the seat pad back. Bebé...
- Page 14 Assembly Montaje Buckles Hebillas FRONT VIEW VISTA DEL FRENTE • Fasten the buckles on the bottom of the seat pad. Make sure you hear a “click”. • Abrochar las hebillas de la parte de abajo de la almohadilla. Asegurarse de oír un clic. Shoulder Belts Cinturones de hombro Waist Belts...
- Page 15 Battery Installation Colocación de las pilas Hint: Install batteries if you need to use this swing away from an outlet. We recommend using alkaline batteries for longer battery life. Atención: instalar las pilas para usar este columpio donde no haya tomacorrientes eléctricos. Se recomienda usar pilas alcalinas para una mayor duración.
- Page 16 Battery Safety Information Información de seguridad acerca de las pilas In exceptional circumstances, batteries may leak fluids that can cause a chemical burn injury or ruin your product. To avoid battery leakage: • Do not mix old and new batteries or batteries of different types: alkaline, standard (carbon-zinc) or rechargeable (nickel-cadmium).
- Page 17 WARNING: Prevent serious injury or death: • Never leave child unattended. • This product is not intended for unsupervised or prolonged periods of sleep. • Always use the restraint system. When used as an infant rocker: • Fall Hazard: Never use on any elevated surface, since child’s movement may cause the product to slide or tip over.
- Page 18 Securing Your Child Sistema de sujeción Shoulder Belt Shoulder Belt Cinturón de hombro Cinturón de hombro Waist Belt Cinturón de la cintura Waist Belt Cinturón de la cintura Restraint Pad Almohadilla de sujeción • Place your child in the seat. Position the restraint pad between your child’s legs. •...
- Page 19 Securing Your Child Sistema de sujeción TIGHTEN LOOSEN APRETAR AFLOJAR • To tighten the waist belts: Feed the anchored end of the belt up through the buckle to form a loop . Pull the free end of the belt . Repeat this procedure to tighten the other belt. •...
- Page 20 Adjusting Seat Recline Ajustar el respaldo LIFT OR LOWER SUBIR O BAJAR PRESS PRESS PRESIONAR PRESIONAR • While pressing the button on the back of the seat, lift or lower the seat for upright or recline use. • Mientras presiona el botón en la parte trasera de la silla, subir o bajar el respaldo a la posición vertical o reclinada. Rocker Seat Silla mecedora •...
- Page 21 Cradle Swing Columpio mecedor • Place the seat onto the swing arm to use as a swing. • Rotate the seat to change the swinging motion: swing side-to-side or head-to-toe. You should hear a “click” when the seat is in the correct position. •...
- Page 22 Cradle Swing AC Power Uso del columpio con corriente alterna • Place the swing near a standard wall outlet. • Plug the AC adaptor into the power cord extending from the back of a leg. • Plug the AC adaptor into the wall outlet. •...
- Page 23 Cradle Swing Columpio mecedor Power Switch Power LED Interruptor de encendido Luz LED de encendido Swing Speed Buttons Swing Speed LEDs Botones de velocidad Luces LED de velocidad del columpio del columpio Music Buttons Botones de música Volume Buttons Botones de volumen Light Button Botón de luz Sound Button...
- Page 24 Smart Connect ™ App Download Information Información para bajar la aplicación Smart Connect™ • Some features of this product only work with the Fisher-Price ® Smart Connect™ app. • Download the Fisher-Price ® Smart Connect™ app to control the swing from your smart device (not included). This app is available from the App Store or Google Play™.
- Page 25 Pairing Your Device Sincronizar el dispositivo Before using the Smart Connect™ app for the first time, you will need to pair your device with the swing. Antes de usar la aplicación Smart Connect por primera vez, será necesario sincronizar el dispositivo con el columpio. Pairing Button Botón de sincronización •...
- Page 26 Smart Connect ™ App Aplicación Smart Connect Press the swing icon to open the swing controls. Presionar el icono del columpio para abrir los controles del columpio. Press the Music on the Go icon to play swing songs from your device. Press the switch icon to turn the Smart Messages ON or OFF.
- Page 27 Smart Connect ™ App Aplicación Smart Connect View your device status here: You’re Connecting, You’re Connected, You’re Not Connected or Your swing is out of range, turned off or asleep. Press to connect or disconnect Ver aquí el estado del dispositivo: Se está your device from the swing.
- Page 28 Smart Connect ™ App Compatibility Compatibilidad con la aplicación Smart Connect The Fisher-Price ® Smart Connect™ app is compatible with the devices listed in the table. ® APPLE ANDROID™ • iPhone ® 4s or newer • Google Nexus 4, Nexus 5, Nexus 6 •...
- Page 29 Care and Storage Mantenimiento y almacenamiento Care • Unbuckle the restraint system. • Remove the clips on the top of the seat pad back. Unfasten the buckle on the bottom of the seat pad. • Remove the pad from the restraint system. •...
- Page 30 Adults Note: If you use this product with the AC adaptor, periodically examine the AC adaptor for damage to the cord, housing or other parts that may result in the risk of fire, electric shock or injury. If the AC adaptor is damaged, do not use the product with the AC adaptor.
- Page 31 Consumer Information Información al consumidor FCC STATEMENT (UNITED STATES ONLY) This equipment has been tested and found to comply with the limits for a Class B digital device, pursuant to Part 15 of the FCC rules. These limits are designed to provide reasonable protection against harmful interference in a residential installation.
- Page 32 Apple & the Apple logo are trademarks of Apple Inc., registered in the U.S. and other countries. App Store is a service mark of Apple Inc. Google Play is a trademark of Google Inc. ©2016 Mattel. All Rights Reserved. ® and ™ designate U.S. trademarks of Mattel, except as noted. DKD85-2C70-G1 PRINTED IN MEXICO 1101167347-2LC...
Need help?
Do you have a question about the Fisher-Price DKD85 and is the answer not in the manual?
Questions and answers