Table of Contents
Advertisement
Quick Links
Advertisement
Table of Contents

Related Manuals for Perfect Prime TM0300


Summary of Contents for Perfect Prime TM0300
- Page 1 Infrared Thermometer TM0300 Instruction Manual...
-
Page 2: Table Of Contents
CONTENTS 1. SAFETY REGULATIONS ............2 2. FUNCTIONS/APPLICATIONS ..........3 3. TECHNICAL SPECIFICATIONS ..........4-5 4. PRODUCT DESCRIPTION ............6 ................7 4.1 Display ................ 8 4.2 Keyboard ..........8 4.3 INSTALL/REPLACE BATTERIES 4.4 SWITCH ON/OFF .............. 8 5. SETTINGS ................ -
Page 3: Safety Regulations
1. SAFETY REGULATIONS Aenon! This user manual is an essenal part of this product. The user manual should be read carefully before you use the product for the rst me. If the product is given to someone for temporary use, be sure to enclose user manual to it. -
Page 4: Functions/Applications
2. FUNCTIONS/APPLICATIONS IR-thermometer TMO300 is designed for non-contact measurement of surface temperature of various objects. Ergonomic, shockproof housing, small size and weight, intuive interface, laser spot marking, connuous measurement mode provide simple and convenient measurement of temperature of dangerous, moving, hard-to-reach distant objects at less than 1 second at just one touch of the trigger. -
Page 5: Technical Specifications
3. TECHNICAL SPECIFICATIONS Display 30*30mm LCD with backlight Measuring range -50 °C …600 °C -58 °F …1112 °F Accuracy -50 °C…-20 °C ±3 °C (±6 °F) (-58 °F…-4 °F) -20 °C…0 °C ±2 °C (±4 °F) (-4 °F…32 °F) 0 °C…600 °C ±1,5 °C (±3 °F) (32 °F…1112 °F or ±1,5%... - Page 6 3. TECHNICAL SPECIFICATIONS Relave humidity for operaon <95% and storage Power supply 1,5V LR6 alkaline Battery life ~6 hours Automatic Shutdown 30 sec. Laser Class II, 635-670nm, <1mW Dimensions 165*47*59mm Weight 135 g...
-
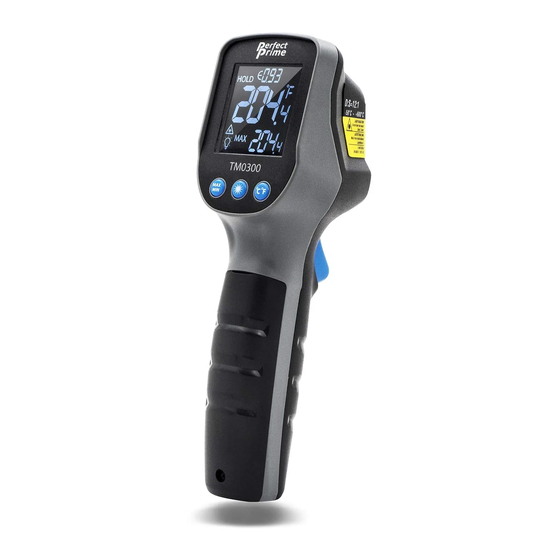
Page 7: Product Description
4. PRODUCT DESCRIPTION Display Keybord Trigger Laser spot marking exit window Infrared sensor Battery cover... -
Page 8: Display
4. PRODUCT DESCRIPTION Display Indication of continuous measurement Emissivity value Indication of battery charge level Measuring units (° or °F) Maximal/minimal measurement value Indication of maximal/minimal value Indication of display backlight Indication of activated laser spot marking Measurement result Indication of data hold on the display... -
Page 9: Keyboard
4. PRODUCT DESCRIPTION Keyboard • Check max/min values/adjust emissivity degree. • Switch on/o display backlight and laser spot marking. • Select measuring unit (° or °F)/adjust emissivity degree. INSTALL/REPLACE BATTERIES Remove the battery cover. Install the battery observing correct polarity. Put the battery cover back and push it until a click is heard. -
Page 10: Settings
5. SETTINGS 1) Measuring units Short press button to select the measuring unit: °C – degrees Celsius; °F – degree Fahrenheit. Short press button to select the measuring unit. 2) Laser spot marking Short press button to activate laser spot marking*. Symbol will appear on the display. -
Page 11: Measurement
6. MEASUREMENT Short press the trigger to switch on the device. Press corresponding buttons to set the measuring unit, activate laser sport marking, display backlight if needed. Aim the device against the object of measurement and press the trigger. Measurement result will appear on the display. Long press the trigger to activate continuous measurement. -
Page 12: Emissivity
7. EMISSIVITY All objects emit thermal energy. Emitted energy quantity depends on the surface temperature and object emissivity. The product can measure emission on the surface of object and calculate object temperature. Objects with di erent surfaces but with the same temperature can emit di erent quantity of thermal energy. -
Page 13: Switch On The Device
8. SWITCH ON THE DEVICE / 9. OPTICAL RESOLUTION / 10. CARE AND MAINTENANCE Switch on the device. Press and hold the trigger, then long press button .Symbol will start ashing on the display. Release the trigger. Value 0.95 is set by default. -
Page 14: Utilization
10. UTILIZATION Expired tools, accessories and package should be passed for waste recycle. Please send the product to the following address for proper recycle: Do not throw the product in municipal waste!According to European directive 2002/96/ C expired measuring tools and their components must be collected separately and submitted to environmentally friendly recycle of wastes. -
Page 15: Warranty
11. WARRANTY PerfectPrime products go through post-production control and are governed by the following warranty terms. The buyer’s right to claim about defects and general provisions of the current legislation do not expire. • PerfectPrime agrees to eliminate all defects in the product, discovered while warranty period, that represent the defect in material or workman- ship in full volume and at its own expense. - Page 16 CUSTOMER SERVICE INQUIRIES Your emails are important to us so we strive to reply all hours. In exceptional cases, inquiries and emails within we may require more time to respond. Thank you for your understanding. For more information about our products and services, please send us an email: cs@perfectprime.com For B2B or project-based application, please send an email:...
- Page 17 HORMES LIMITED Retailer cs@perfectprime.com Email G/F UNIT 3, 61 GLENTHORNE ROAD, Address LONDON W6 0LJ UNITED KINGDOM +44 203 7695377 Telephone...
Need help?
Do you have a question about the TM0300 and is the answer not in the manual?
Questions and answers