Table of Contents
Advertisement
http://www.sauservice.com/manuals/Gunblade%20Folder/GB00.html
GUNBLADE DELUXE
SAFETY AND REGULATORY
INFORMATION
GAME REGISTRATION (not included)
ASSEMBLING THE MACHINE
BOOKEEPING
SERVICE INFORMATION
TABLE OF CONTENTS
1
2
3
3
4
5
6
7
13
14
17
18
19
20
21
22
23
24
25
26
27
28
29
30
32
33
34
35
36
37
38
39
40
41
7/12/2005
Advertisement
Table of Contents

Related Manuals for SEGA ENTERPRISES GUNBLADE NY DELUXE


Summary of Contents for SEGA ENTERPRISES GUNBLADE NY DELUXE
-
Page 1: Table Of Contents
Gunblade NY Service Manual Page 1 of 2 GUNBLADE DELUXE TABLE OF CONTENTS INTRODUCTION OF THE OWNER'S MANUAL GENERAL PRECAUTIONS INSTALLATION LOCATION PRECAUTIONS SAFETY AND REGULATORY INFORMATION GAME REGISTRATION (not included) SPECIFICATIONS INSTALLATION ITEMS ASSEMBLING THE MACHINE LEG ADJUSTERS ASSEMBLY CHECKS OPERATION HOW TO PLAY EXPLANATION OF TEST AND DATA... -
Page 2: Gunblade Ny Service Manual
Gunblade NY Service Manual Page 2 of 2 PROJECTOR CARE AND ADJUSTMENT STATIC CONVERGENCE ADJUSTMENT FLUORESCENT LAMP PERIODIC INSPECTION TROUBLESHOOTING GAME BOARD GAME BOARD SERVICE RECORD (not included) DESIGN RELATED PARTS PARTS IDENTIFICATION PARTS REPLACEMENT RECORD (not included) MANUAL COMMENTS WIRING DIAGRAM http://www.sauservice.com/manuals/Gunblade%20Folder/GB00.html 7/12/2005... -
Page 3: Introduction Of The Owner'smanual
[Next Page] INTRODUCTION OF THE OWNERS MANUAL SEGA ENTERPRISES, LTD., has for more than 30 years been supplying various innovative and popular amusement products to the world market. This Owners Manual is intended to provide detailed descriptions together with all the necessary installation, game settings and parts ordering information related to GUN BLADE NY, a new SEGA product. -
Page 4: General Precautions
General Precautions Page 1 of 2 [Table of Contents] [Previous Page] [Next Page] General Precautions Follow Instructions: All operating and use instructions should be followed. Attachments: Do not use attachments not recommended by the product manufacturer as they may cause hazards. Accessories: Do not place this product on an unstable cart, stand, tripod, bracket, or table. - Page 5 General Precautions Page 2 of 2 qualified service personnel under the following conditions: a) If the power cord or plug is damaged; b) If liquid has been spilled, or objects have fallen into the product; c) If the product has been exposed to rain or water; d) If the product does not operate normally when following the operating instructions.
-
Page 6: Installation Location Precautions
General Precautions (cont.) Page 1 of 1 [Table of Contents] [Previous Page] [Next Page] Safety Check: Upon completion of any service or repairs to this product, ask the service technician to perform safety checks to determine that the product is in proper operating condition. Heat: The product should be situated away from heat sources such as radiators, heat registers, stoves, or other products (including amplifiers) that produce heat. -
Page 7: Specifications
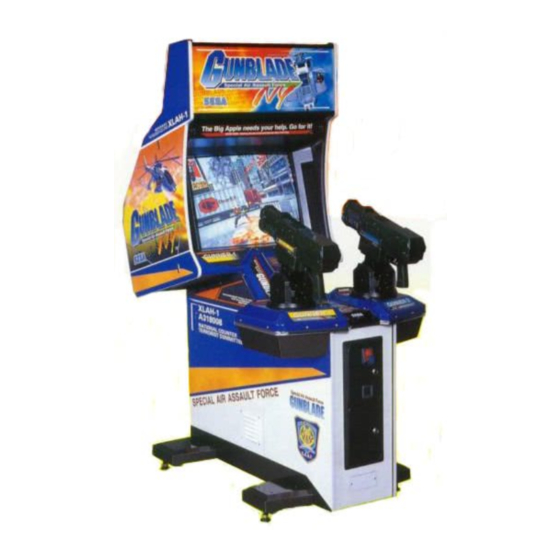
Specifications Page 1 of 1 [Table of Contents] [Previous Page] [Next Page] SPECIFICATIONS WIDTH LENGTH HEIGHT WEIGHT ASSEMBLED GAME 48 IN 73 IN 89 IN 662 LBS 45 IN 27 IN 82 IN 298 LBS PTV BASE 48 IN 24 IN 11 IN 45 LBS CABINET DX... -
Page 8: Installation Items
Installation Items Page 1 of 1 [Table of Contents] [Previous Page] [Next Page] INSTALLATION ITEMS The following items are supplied with the machine. Be sure that these items remain with the game if it is transported or sold. 1 Service Manual, Gun Blade NY 1 Tamperproof wrench, M4 1 Tamperproof wrench, MS 1 Remote Controller, Mitsubishi Projection TV... - Page 9 Assembly and Precautions Page 1 of 1 [Table of Contents] [Previous Page] [Next Page] ASSEMBLY AND PRECAUTIONS Perform the assembly work by following the procedure stated herein. Failing to comply with the instructions can cause an injury or electrical shock. Assembly should be performed as per the instructions in this manual.
-
Page 10: Leg Adjusters
Leg Adjusters Page 1 of 1 [Table of Contents] [Previous Page] [Next Page] WARNING! Make sure that all the leg adjusters are in contact with the floor. If they are not, the cabinet can move, causing an accident. This machine has 8 casters and 6 leg adjusters. When the installation position has been determined, cause the leg adjusters to come into contact with the floor, and make adjustments so that the casters are raised approximately 5mm from the floor. -
Page 11: Assembly Checks
Assembly Checks Page 1 of 1 [Table of Contents] [Previous Page] [Next Page] Assembly Checks In the test mode, perform the following tests: http://www.sauservice.com/manuals/Gunblade%20Folder/GB14.html 7/12/2005... -
Page 12: Operation
Operation Page 1 of 1 [Table of Contents] [Previous Page] [Next Page] OPERATION To ensure safe operation of the product, be sure to comply with all the following precautions. WARNING! Be sure that all the leg adjusters are in contact with the floor surface. If they are not, the cabinet can move and cause an accident. -
Page 13: How To Play
How to Play Page 1 of 1 [Table of Contents] [Previous Page] [Next Page] HOW TO PLAY Insert coin(s). When the number of credits needed for game play are available, "PRESS START" is displayed. Press the start button to have the mission select screen appear. Choose from one of the three missions, REGAIN THE UN HQ, BIG APPLE LIBERATION, and SCORE ATTACK REMIX, by sighting the desired one and pulling the trigger. -
Page 14: Explanation Of Test And Data Displays
Explanation of Test and Data Display Page 1 of 2 [Table of Contents] [Previous Page] [Next Page] EXPLANATION OF TEST AND DATA DISPLAY By operating the switch unit, periodically perform the tests and data check. When installing the machine initially, or collecting cash, or when the machine does not function properly, perform checks in accordance with this section. - Page 15 Explanation of Test and Data Display Page 2 of 2 see if the MONITOR adjustment is correct. 1. MEMORY TEST IC Board 2. In the SOUND test mode, check the sound related ROMs. Check such data as game play Data Check time and histogram to adjust the difficulty level, etc.
-
Page 16: Switch Unit
Switch Unit Page 1 of 1 [Table of Contents] [Previous Page] [Next Page] WARNING! Do not touch places other than those specified. Touching places not specified can cause an electric shock or short circuit. Open the coin chute door and the switch unit shown will appear. The functioning of each SW is as follows: TEST BUTTON For the handling of the test button, refer to the following pages. -
Page 17: Test Mode
Test Mode Page 1 of 1 [Table of Contents] [Previous Page] [Next Page] Test Mode The Test Menu allows the functioning of each part of the Cabinet to be checked, the monitor to be adjusted, and the coins and game related various settings to be performed. Press the Test Button to cause the following Test Menu to be displayed on the monitor. -
Page 18: Memory Test
Memory Test Page 1 of 1 [Table of Contents] [Previous Page] [Next Page] Memory Test The Memory Test mode is for checking the on-board memory IC functioning. GOOD is displayed for normal ICs and BAD is displayed for abnormal ICs. When the test is completed, if the results are shown as below, it is satisfactory. -
Page 19: Input Test
Page 1 of 1 [Table of Contents] [Previous Page] [Next Page] Input Test When Input Test is selected, the monitor will show the following, allowing you to watch the status of each switch. On this screen, periodically check the status of each switch. By pressing each switch, if the display on the right-hand side of the name of each switch changes to ON from OFF, the switch and the wiring connections are satisfactory. -
Page 20: Output Test
Output Test Page 1 of 1 [Table of Contents] [Previous Page] [Next Page] Output Test Selecting Output Test allows the status of each lamp to be viewed. Periodically check the status of each lamp on this screen. <--- Repeatedly displays sequentially in order of Winner Lamp, 7-SEG. At this time lamp and 7-SEG L- ED tests are performed in the manner corresponding to the item displayed. -
Page 21: Sound Test
Sound Test Page 1 of 1 [Table of Contents] [Previous Page] [Next Page] Sound Test Selecting Sound Test allows sounds (sound effects, announcement, background music, etc.) to be chosen and heard. In this mode, check the sound-related IC Board and each speaker. Press the Service button to bring the arrow --->... -
Page 22: Crt Test
CRT Test Page 1 of 1 [Table of Contents] [Previous Page] [Next Page] CRT Test Choose CRT Test to display the screen on which the Monitor adjustment is checked. By watching the screen, periodically check if adjustments are needed or not. For adjustment, refer to the Section of Monitor Adjustment stated herein. -
Page 23: Game Assignments
Game Assignments Page 1 of 1 [Table of Contents] [Previous Page] [Next Page] Game Assignments Selecting Game Assignments will have the following screen appear, allowing play time, game difficulty, etc. to be set. Refer to the following for the contents of each item. Before exiting the setting will not be changed. -
Page 24: Coin Assignment
Coin Assignment Page 1 of 1 [Table of Contents] [Previous Page] [Next Page] Coin Assignments This mode permits you to set the start number of credits, as well as the basic numbers of coins and credits. This mode expresses "how many coins correspond to how many credits". Setting change is not effective until Exiting. -
Page 25: Coin Credits
Coin Credits Page 1 of 2 [Table of Contents] [Previous Page] [Next Page] COIN/CREDIT SETTING (COIN CHUTE COMMON TYPE) NAME OF FUNCTIONING OF COIN FUNCTIONING OF COIN SETTING CHUTE #1 CHUTE #2 SETTING #1 1 COIN, 1 CREDIT 1 COIN, 1 CREDIT SETTING #2 1 COIN, 2 CREDITS 1 COIN, 1 CREDIT... - Page 26 Coin Credits Page 2 of 2 3 COINS, 3 CREDITS SETTING #26 1 COIN, 6 CREDITS 4 COINS, 4 CREDITS 5 COINS, 6 CREDITS SETTING #27 FREE PLAY FREE PLAY http://www.sauservice.com/manuals/Gunblade%20Folder/GB29.html 7/12/2005...
-
Page 27: Manual Settings
Manual Settings Page 1 of 1 [Table of Contents] [Previous Page] [Next Page] MANUAL SETTINGS 8 - Determines conversion of coin/credit. 9 - This sets how many conversion coins should be inserted to obtain one service coin. 10 - This sets how many conversion coins are represented by a coin inserted in coin chute one. 11 - This sets how many conversion coins are represented by a coin inserted in coin chute two. -
Page 28: Aim Set
Aim Set Page 1 of 1 [Table of Contents] [Previous Page] [Next Page] AIM SET By adjusting the guns' VR value from the aspect of the software, the sighting position can be set correctly. After VR adjustment and replacement, or game board replacement, but sure to perform Aim Set on this screen. - Page 29 Bookkeeping Page 1 of 1 [Table of Contents] [Previous Page] [Next Page] BOOKKEEPING Selecting the bookkeeping in the menu mode displays the bookkeeping data up to the present on the following two screens. Press the test button again to proceed to the next screen. When screen 2/2 is displayed, pressing the test button returns to the menu mode.
-
Page 30: Back Up Data Clear
Backup Data Clear Page 1 of 1 [Table of Contents] [Previous Page] [Next Page] COIN CHUTE~ : Number of coins put in. As seen from the front of the cabinet, the right-hand side is #1 and the left-hand side is #2. Note that depending on the destinations, only one Coin Chute is available. -
Page 31: Controller
Controller Page 1 of 1 [Table of Contents] [Previous Page] [Next Page] CONTROLLER WARNING! In order to prevent an electric shock and short circuit, be sure to turn off power before performing work that requires you to touch the interior of the product. Be careful so as not to damage any wiring. -
Page 32: Vr Adjustment
VR Adjustment Page 1 of 2 [Table of Contents] [Previous Page] [Next Page] VR ADJUSTMENT WARNING! Do not touch places other than those specified. Touching places not specified can cause an electric shock or short circuit. Loosen the 2 screws which secure the VR bracket in order to move the bracket. Move the VR bracket to disengage the adjust gear mesh and move the VR shaft in a manner so that the VR shaft cut portion faces the opposite side of the adjust gear as shown. - Page 33 VR Adjustment Page 2 of 2 By removing the cord clamp, first remove the VR blue 3P for up/down and VR red 3P for left/right. Take off the two screws which secure the VR bracket to remove the bracket. Remove volume gear from the VR to replace the VR. After replacing the VR, perform work by following the procedure as per VR adjustment.
-
Page 34: Trigger Switch
Trigger Switch Page 1 of 1 [Table of Contents] [Previous Page] [Next Page] REPLACEMENT OF TRIGGER SW WARNING! In order to prevent an electric shock and short circuit be sure to turn off power before performing work which involves touching the interior of the product. Be careful so as not to damage wiring. -
Page 35: Micro Switch
Micro Switch Page 1 of 1 [Table of Contents] [Previous Page] [Next Page] REPLACING THE MICRO SWITCH Take off two tamperproof screws A and 3 tamperproof screws B to remove the Grip Right. In this status, the micro switch can be replaced. http://www.sauservice.com/manuals/Gunblade%20Folder/GB38.html 7/12/2005... -
Page 36: Motor Brush
Motor Brush Page 1 of 1 [Table of Contents] [Previous Page] [Next Page] REPLACEMENT OF MOTOR BRUSH On the output test screen in the test mode, when 1P gun or 2P gun display indicates ON, if the gun does not vibrate, first check the switch unit's circuit protector. If the circuit protector is satisfactory, check the motor brush. -
Page 37: Greasing
Greasing Page 1 of 1 [Table of Contents] [Previous Page] [Next Page] GREASING CAUTION! Be sure to apply grease to specified parts as indicated in the periodic maintenance schedule. Failure to apply the proper grease can result in damage to parts. Once every three months, apply grease to the game mechanisms specified below. -
Page 38: Coin Selector
Coin Selector Page 1 of 2 [Table of Contents] [Previous Page] [Next Page] HANDLING THE COIN JAM If the coin is not rejected even when the REJECT button is pressed, open the coin chute door and open the selector gate. After removing the jammed coin, put a normal coin in and check to see that the selector correctly functions. - Page 39 Coin Selector Page 2 of 2 Once every month when performing the Coin SW Test, simultaneously check the following: Does the Coin Meter count satisfactorily? Does the coin drop into the Cash box correctly? Is the coin rejected when inserted while keeping the Reject Button pressed down? http://www.sauservice.com/manuals/Gunblade%20Folder/GB41.html 7/12/2005...
- Page 40 Projector Adjustment Page 1 of 1 [Table of Contents] [Previous Page] [Next Page] PROJECTOR ADJUSTMENTS CAUTION! Since the projector has been adjusted at the time of shipment, do not make any further adjustments without good reason. Fine adjustments are stored in the projector. Pressing the fine adjustment switch (Convergence adjustment) results in entering the fine adjustments mode, and this may cause the stored fine adjustment to be changed.
-
Page 41: Static Convergence
Static Convergence Adjustment Page 1 of 1 [Table of Contents] [Previous Page] [Next Page] MITSUBISHI PROJECTOR MITSUBISHI PROJECTOR CONTROL PANEL For the Convergence adjustment mode, press the test mode on/off key (12). Ensure that "R" is displayed on the screen. Make adjustment so as to cause the red cross pattern to match with the green cross pattern by using Left shift key (14), Right shift key (15), Lower shift key (16), and Upper shift key (17). -
Page 42: Fluorescent Lamp
Fluorescent Lamp Page 1 of 1 [Table of Contents] [Previous Page] [Next Page] REPLACEMENT OF THE FLUORESCENT LAMP WARNING! When performing work, be sure to turn power off. Working on the machine with power on can cause an electric shock or short circuit accident. The fluorescent lamp, which gets very hot, can cause burns. -
Page 43: Periodic Inspection
Periodic Inspection Page 1 of 1 [Table of Contents] [Previous Page] [Next Page] PERIODIC INSPECTION TABLE The items below require periodic check and maintenance to retain the performance of this machine and ensure safe business operation. Be sure to clean the interior of the cabinet and inspect and clean the power supply plug once per year. -
Page 44: Troubleshooting
Troubleshooting Page 1 of 1 [Table of Contents] [Previous Page] [Next Page] TROUBLESHOOTING WARNING! In order to prevent an electric shock, be sure to turn power off before performing work and touching the interior of the machine. Be careful so as not to damage wiring. Damaged wiring can cause an electric shock or short circuit accident. -
Page 45: Game Board
Game Board Page 1 of 2 [Table of Contents] [Previous Page] [Next Page] WARNING! In order to prevent an electric shock, be sure to turn power off before performing work and touching interior parts of the machine. Be careful so as not to damage wiring and cause an electric shock or short circuit. CAUTION! Do not expose the game board without good reason. - Page 46 Game Board Page 2 of 2 http://www.sauservice.com/manuals/Gunblade%20Folder/GB49.html 7/12/2005...
-
Page 47: 16. Design Related Parts
Design Related Parts Page 1 of 1 [Table of Contents] [Previous Page] [Next Page] 16. DESIGN RELATED PARTS No. PART No. DESCRIPTION GBN0-0551 BILLBOARD 4210-9083 SIDE STICKER L 4210-9084 SIDE STICKER R GBN0-1003-D STICKER GUNBLADE L GBN0-1003-E STICKER GUNBLADE R GBN0-1003-F STICKER A GBN0-1003-G... -
Page 48: Parts Identification
Parts Identification Index Page 1 of 1 [HomePage] [GunBlade TOC] Parts Identification Index ASSEMBLY PART NUMBER PAGE TOP ASSY GUNBLADE NY DX 53-54 ASSY MAIN BD GBN-0100 ASSY PTV GBN1-0500 ASSY BILLBOARD GBN1-0550 ASSY FRONT PANEL GBN0-0600 ASSY PTV BASE GBN1-0650 ASSY MASK MGL-1150... - Page 49 Top Assy Gunblade NY DX Page 1 of 1 [Table of Contents] [Previous Page] [Next Page] 17. PARTS LIST (1) TOP ASSY GUNBLADE NY DX http://www.sauservice.com/manuals/Gunblade%20Folder/GB53.html 7/12/2005...
- Page 50 Assy Main BD (GBN-0100) Page 1 of 1 [Table of Contents] [Previous Page] [Next Page] (2) ASSY MAIN BD (GBN-0100) ITEM NO. PART NO. DESCRIPTION GBN0-0101 WOODEN BASE MAIN BD 1051-5218 SHIELD CASE 1051-5219-91 SHIELD CASE LID 833-12562 GAME BD GUNBLADE NY 839-0778 FLT BD B-CRX RCT http://www.sauservice.com/manuals/Gunblade%20Folder/GB55.html...
- Page 51 Assy PTV (GBN1-0500) Page 1 of 1 [Table of Contents] [Previous Page] [Next Page] (3) ASSY PTV (GBN1-0500) ITEM PART NO. DESCRIPTION NOTE GBN1-0550 ASSY BILLBOARD GBN1-0600 ASSY FRONT PANEL GBN1-0650 ASSY PTV BASE MGL1-1150 ASSY MASK RAL0-0501 MASK HOLDER DYN0-0501 PANEL MOUNT BRKT L DYN0-0502...
- Page 52 Assy Billboard (GBN-0550) Page 1 of 1 [Table of Contents] [Previous Page] [Next Page] (4) ASSY BILLBOARD (GBN1-0550) ITEM NO. PART NO. DESCRIPTION NOTE GBN0-0551 BILLBOARD GBN1-0552 BILLBOARD BOX GBN0-0553 BILLBOARD HOLDER 105-5239-01 AIR VENT 3901-5538-32EX ASSY FL32W EX W/CONN HIGH 000-T00408-OB M SCR TH BLK M4X8 http://www.sauservice.com/manuals/Gunblade%20Folder/GB57.html 7/12/2005...
- Page 53 Assy Front Panel (GBN0-0600) Page 1 of 1 [Table of Contents] [Previous Page] [Next Page] (5) ASSY FRONT PANEL (GBN0-0600) ITEM NO. PART NO. DESCRIPTION GBN0-0601 FRONT PANEL GBN0-0602 SERVICE DOOR OUT0-0023 SIDE BRKT OUT0-0024 BRKT UPPER OUT0-4025 BRKT LOWER 000-T00430-OC M SCR TH CRM M4 X 30 050-F00500...
- Page 54 Assy PTV Base Page 1 of 1 [Table of Contents] [Previous Page] [Next Page] (6) ASSY PTV BASE (GBN1-0650) ITEM NO. PART NO. DESCRIPTION GBN1-0651 PTV BASE GBN1-0652 JOINT BRKT ARC1-1006 LEG BRACKET BLACK 6011-5699X LEG ADJUSTER BOLT 5/8 X 4 SCR1-1008 NUT PLATE FOR CASTER 6011-6224...
- Page 55 Assy Mask (MGL-1150) Page 1 of 1 [Table of Contents] [Previous Page] [Next Page] (7) ASSY MASK (MGL-1150) ITEM NO. PART NO. DESCRIPTION MGL1-1102 TV MASK MGL1-1151 SLIT PLATE MGL1-1152 MASK SIDE HOLDER 0121-F00408-OB TAP SCR FH BLK M4X8 000-F00410 M SCR FH M4X10 http://www.sauservice.com/manuals/Gunblade%20Folder/GB60.html 7/12/2005...
- Page 56 Assy Cabinet DX (GBN1-1000) Page 1 of 1 [Table of Contents] [Previous Page] [Next Page] (8) ASSY CABINET DX (GBN1-1000) http://www.sauservice.com/manuals/Gunblade%20Folder/GB61.html 7/12/2005...
- Page 57 Assy Side Door L (GBN-1006) Page 1 of 1 [Table of Contents] [Previous Page] [Next Page] (10) ASSY SIDE DOOR L (GBN-1006) ITEM NO. PART NO. DESCRIPTION GBN1-1007 N SIDE DOOR L 1050-5238 FAN BRKT AIR 1050-5239-01 VENT FAN 6011-8543 GUARD AXIAL FLOW FAN AC120V 60 2601-0011-02...
- Page 58 Assy Speaker (GBN0-1026) Page 1 of 1 [Table of Contents] [Previous Page] [Next Page] (11) ASSY SPEAKER (GBN0-1026) ITEM NO. PART NO. DESCRIPTION GBN0-1027 SPEAKER BRKT SPEAKER BOX MINI DOME 130-5152 000-P00412-W M SCR PH W/FS M4X12 http://www.sauservice.com/manuals/Gunblade%20Folder/GB64.html 7/12/2005...
- Page 59 Assy Tweeter (GBN0-1028) Page 1 of 1 [Table of Contents] [Previous Page] [Next Page] (12) ASSY TWEETER (GBN0-1028) ITEM NO. PART NO. DESCRIPTION GBN0-1029 TWEETER BRKT 130-5112 TWEETER 8 OHM 2W 0 35 000-P00308-W M SCR PH W/FS M3X8 http://www.sauservice.com/manuals/Gunblade%20Folder/GB65.html 7/12/2005...
- Page 60 Assy Woofer (GBN0-1030) Page 1 of 1 [Table of Contents] [Previous Page] [Next Page] (13) ASSY WOOFER (GBN0-1030) ITEM NO. PART NO. DESCRIPTION DYN0-2208 SPEAKER BRKT 130-5097 SPEAKER BOX SUPER WOOFER 0111-T03512 TAP SCR TH 3.5X12 http://www.sauservice.com/manuals/Gunblade%20Folder/GB66.html 7/12/2005...
- Page 61 Center Cover (GBN1-1003) Page 1 of 1 [Table of Contents] [Previous Page] [Next Page] (15) CENTER COVER (GBN1-1003) ITEM NO. PART NO. DESCRIPTION GBN0-1003-A CENTER COVER BLANK GBN0-1003-B ENGINE COVER GBN1-1003-C TWEETER NET GBN0-1003-D STICKER GUNBLADE L GBN0-1003-E STICKER GUNBLADE R GBN0-1003-F STICKER A GBN0-1003-G STICKER MARK GBN0-1003-H COVER BLACK SHEET...
- Page 62 SW Unit (GBN-1040) Page 1 of 1 [Table of Contents] [Previous Page] [Next Page] (17) SW UNIT (GBN-1040) ITEM NO. PART NO. DESCRIPTION GBN1-1041 SW BRKT STICKER SW UNIT 4211-9074 STICKER SW UNIT 220-5179 VOL CONT B-5K OHM 5091-5028 SW PB 1M 6011-0042 KNOB 22MM http://www.sauservice.com/manuals/Gunblade%20Folder/GB68.html...
- Page 63 Assy Controller (GBN1-2000) Page 1 of 1 [Table of Contents] [Previous Page] [Next Page] (18) ASSY CONTROLLER (GBN1-2000) http://www.sauservice.com/manuals/Gunblade%20Folder/GB69.html 7/12/2005...
- Page 64 Assy Slide Mecha (GBN1-2050) Page 1 of 1 [Table of Contents] [Previous Page] [Next Page] (19) ASSY SLIDE MECHA (GBN1-2050) http://www.sauservice.com/manuals/Gunblade%20Folder/GB71.html 7/12/2005...
- Page 65 Assy Motor (GBN1-2070) Page 1 of 1 [Table of Contents] [Previous Page] [Next Page] (20) ASSY MOTOR (GBN1-2070) ITEM NO. PART NO. DESCRIPTION GBN1-2071 MOTOR BRKT 350-5292 MOTOR DC 24V 600RPM 2091-0023 CONN CLOSED END 610-0402 ASSY WIRE GUN MOTOR 000-P00408-S M SCR PH W/S M4X8 010-P00306 S-TITE SCR PH M3X6...
- Page 66 Assy Swing Base (GBN-2100) Page 1 of 1 [Table of Contents] [Previous Page] [Next Page] (21) ASSY SWING BASE (GBN-2100) http://www.sauservice.com/manuals/Gunblade%20Folder/GB74.html 7/12/2005...
- Page 67 Assy Base (GBN-2150) Page 1 of 1 [Table of Contents] [Previous Page] [Next Page] (22) ASSY BASE (GBN-2150) http://www.sauservice.com/manuals/Gunblade%20Folder/GB76.html 7/12/2005...
- Page 68 Assy Volume U/D (GBN-2200) Page 1 of 1 [Table of Contents] [Previous Page] [Next Page] (23) ASSY VOLUME U/D (GBN-2200) ITEM NO. PART NO. DESCRIPTION GBN0-2201 VR BRKT U/D 601-7945 GEAR 20 220-5373 VOL CONT B-5K OHM 220-5484 VOL CONT B-5K OHM 028-C00308-P SCR CH CUP M3X8 http://www.sauservice.com/manuals/Gunblade%20Folder/GB78.html 7/12/2005...
- Page 69 Assy Volume U/D (GBN-2200) Page 1 of 1 [Table of Contents] [Previous Page] [Next Page] (24) ASSY VOLUME L/R (GBN-2250) ITEM NO. PART NO. DESCRIPTION NOTE GBN0-2251 VR BRKT L/R 601-6555 GEAR Z=30 M=0.75 220-5373 VOL CONT B-5K OHM 220-5484 VOL CONT B-5K OHM HEX SKT CAP SCR 020-000410-HZ...
- Page 70 Assy Grip (GBN-2400) Page 1 of 1 [Table of Contents] [Previous Page] [Next Page] (25) ASSY GRIP (GBN-2400) ITEM NO. PART NO. DESCRIPTION AIN-2401 GRIP BASE GBN-2402 GRIP LEFT GBN-2403 GRIP RIGHT GBN-2404 LEVER AIN-2405 TORSION SPRING 509-5080 SW MICRO TYPE 008-T00512-OB TMP PRF SCR TH BLK M5X12 FAS-080008...
- Page 71 Assy AC Pwr Sply (GBN-4000) Page 1 of 1 [Table of Contents] [Previous Page] [Next Page] (26) ASSY AC PWR SPLY (GBN-4000) http://www.sauservice.com/manuals/Gunblade%20Folder/GB81.html 7/12/2005...
- Page 72 Assy Elec Base (GBN-4100) Page 1 of 1 [Table of Contents] [Previous Page] [Next Page] (27) ASSY ELEC BASE (GBN-4100) http://www.sauservice.com/manuals/Gunblade%20Folder/GB83.html 7/12/2005...
-
Page 73: Manual Comments
SEGA has made every effort to ensure that this manual is accurate. If you find any errors or omissions, or have other comments on the GUN BLADE NY manual, please write them and deliver by FAX or mail to: SEGA ENTERPRISES INC. (USA) ATTN: Han Rockhill Graphics Coordinator...
Need help?
Do you have a question about the GUNBLADE NY DELUXE and is the answer not in the manual?
Questions and answers