Table of Contents
Advertisement
Quick Links
Advertisement
Table of Contents

Subscribe to Our Youtube Channel
Related Manuals for Fona Aquamarine


Summary of Contents for Fona Aquamarine
- Page 1 Operating Instructions ^èì~ã~êáåÉ léÉê~íáåÖ=fåëíêìÅíáçåë båÖäáëÜ...
-
Page 3: Table Of Contents
Operating Instructions Table of contents General information Dear Customer ..................... Contact data ....................General information on the Operating Instructions........Intended use....................Formats and symbols used ................Safety information Identification of danger levels............... Standards and regulations ................Operating personnel..................Physical working principle ................Laser radiation hazards................ - Page 4 Aquamarine 4.4.1 Install power supply................4.4.2 Handpiece and assembly of single-use fiber tips and light guide ..4.4.2.1 Handpiece ................. 4.4.2.2 Connecting the handpiece to the operation unit....4.4.2.3 Assembly of sterile single-use optical fiber tips....4.4.2.4 Assembly of the ActiveTip light guide........
- Page 5 Operating Instructions Troubleshooting of simple defects..............Technical support, repair and testing ............Replacing the rechargeable battery of the control unit......... Replacement of parts subject to wear and tear..........Electromagnetic compatibility Electromagnetic emission ................Interference immunity................... Working clearances..................Disposal 10.1 Batteries ....................... 10.2 Accessories ....................
-
Page 6: General Information
It is important to observe all safety information to prevent personal injury and material damage. Please perform maintenance and cleaning based on the corresponding instructions. We wish you much success and pleasure with the Aquamarine. Your Aquamarine Team Contact data Customer service In the event of technical queries, please use our online contact form at www.fonadental.com. -
Page 7: General Information On The Operating Instructions
Aquamarine. For indications for use refer to chapter "Indications, contraindications and medical precautions". The use of the Aquamarine is not appropriate in an operating theater. -
Page 8: Formats And Symbols Used
Prompts you to do something. Prerequisite 1. First action step 2. Second action step Alternative action ➢ Result, reaction of Aquamarine References See "General information" Identifies a reference to another text passage. [ → 8] Indicates the page being referred Lists ●... -
Page 9: Safety Information
Information to make work easier For application information and other useful information. Standards and regulations For the installation and operation of the Aquamarine, the manufacturer requires: ● compliance with IEC 60825-1 and its amendments, ● observance of any supplemental national laws and regulations. -
Page 10: Operating Personnel
Unauthorized access In order to prevent false or improper use, the Aquamarine must not be used by unauthorized persons. Therefore the Aquamarine equipment must be protected against unauthorized access when not in use. This can... -
Page 11: Nominal Ocular Hazard Distance
Label removers and flammable solutions used for cleaning and disinfecting the Aquamarine should be allowed to evaporate before using the device. Observe fire hazards caused by flammable gases. Reducing the risk of burns Unintentional exposure to the laser radiation may lead to burns. -
Page 12: Laser Protective Goggles
Laser protective goggles All persons present in the room e.g. patient, dentist, assistant must always wear the appropriate laser protective goggles which are delivered along with the Aquamarine. Check before use Before using the laser protective goggles, please read and observe the instructions for use provided by the manufacturer and attached to the goggles in the case. -
Page 13: Unitip, Endotip And Activetip
When disconnecting the disposable fiber tips (UniTip 320µm, EndoTip 200µm) or the glass rod (ActiveTip 8mm) from the Aquamarine, always cover the connection socket at the handpiece with the special protection cap supplied. Make sure that the optical system is clean before connecting the disposable fiber tip or glass rod. -
Page 14: Installation
If there is any doubt about the correct function of the switching power supply or the correct electric power supply (wall outlet) the unit may only be used with internal electric power supply (battery). Do not use the Aquamarine if a visual inspection shows that it has been damaged in any way. -
Page 15: Modifications
Always perform the data transfer according to the instructions of the manual. Never disconnect the USB-stick during data transfer while you perform a software update. The connection of the Aquamarine to other USB devices could result in previously unidentified risks for your patients, yourself or others. -
Page 16: System Description
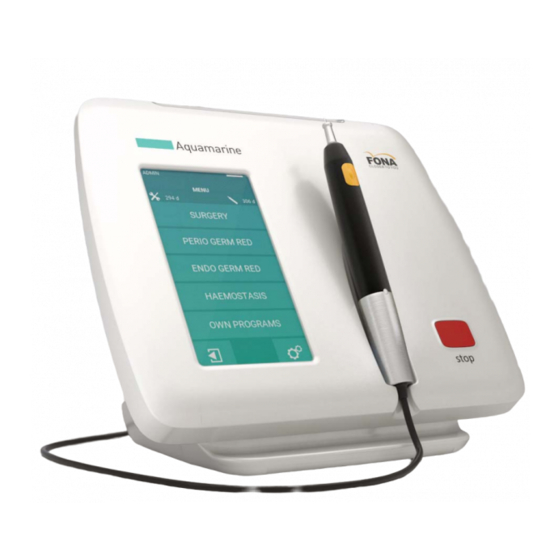
Aquamarine 3 System description System overview Aquamarine (Control unit & handpiece with laser source) LED lights Touch screen Laser Stop key Carry handle Handpiece including laser diode Single-use fiber tips (UniTip 320µm, EndoTip 200µm) Finger switch with exchangeable keypad Removable handpiece sleeve... -
Page 17: Laser Operation Modes
Operating Instructions ON/OFF switch Power supply socket (grey) Interlock connector including interlock connector bridge (red) Socket for handpiece cable (black) USB port The sockets and plugs are color-coded. Laser operation modes Continuous wave mode (CW) CW implies a continuous, uninterrupted laser beam as long as the laser is activated (and determined by a time set). -
Page 18: Handpiece With Integrated Laser Source
Aquamarine Handpiece with integrated laser source The laser source (diode) of the Aquamarine is integrated into the handpiece of the unit, which makes optical lines inside the handpiece cable obsolete. The handpiece is magnetically held inside the handpiece holding. Without fixed handpiece a weak magnetic field is measurable inside the handpiece holding (well). - Page 19 Operating Instructions Please refer to manual first (IEC 60601-1 3rd ed.) Please observe the user manual of the laser unit Do not use when packaging is damaged Temperature limitations, transport and storage Protect against moisture, keep dry Fragile, Handle with care This packaging has to be stored and transported this way up It is only allowed to stack up to 4 packages maximum Please refer to manual first (IEC 60601-1 3rd ed.)
- Page 20 Aquamarine Single-use only for sterile delivered fiber tips, no reuse Refers to directive 2002/96/EC and EN 50419 Do not dispose with domestic waste Intermittent operation. The laser can be operated with max. power for 4 minutes. Afterwards, the cooling element will get too warm. The cooling time is 25 minutes.
-
Page 21: Abbreviations
Operating Instructions 3.4.2 Abbreviations NOHD Nominal ocular Volt-ampere hazard distance Continuous Wave Effective voltage Pulsed Frequency or Threshold voltage Chopped Mode cont. continuous Volt per meter approx. approximately Milliampere Infrared diode Ampere per meter Gram Milliwatt Kilogram Watt µs Microseconds Power Milliseconds Maximum power... -
Page 22: Technical Data
~ 200 x 125 x 157 mm*/210 mm** Weight: < 1000 g (incl. handpiece and rechargeable battery) *Only operation unit **With handpiece in holder Aquamarine specification Laser type: Diode laser Wavelengths & optical 445 ± 10 nm / approx. 0.2 - 1.4 W (CW) power:... - Page 23 Operating Instructions Power supply: The Aquamarine may only be operated with the FRIWO FW8030M/18 power supply. Input voltage: 100 - 240 V Input current: 600 - 300 mA Input frequence: 50- 60 Hz Separation of mains: The separation of the mains of Aquamarine...
- Page 24 The Aquamarine comes in a cardboard box that ensures proper and easy transport. CAUTION Do not leave the Aquamarine in a vehicle parked in the sun. The inside temperature of the car could thus heat up to a point where individual components may be damaged.
- Page 25 Operating Instructions Sterile delivered single-use fiber tips Labeling Each tip is sterilized with gas (ethylene oxide). A label on the outer packing of each set of 25 single-use fiber tips indicates the sterilization procedure (see 3.3.1 symbols). A green dot on the label of the outer packing serves as a process indicator for a correct sterilization process (see 3.3.1 symbols).
-
Page 26: Installation
Aquamarine 4 Installation Any national or local regulations stipulating that the Aquamarine may be installed only by trained personnel must be strictly observed. Scope of supply The following components are included in the scope of supply of the Aquamarine: Order-No... -
Page 27: Spare Parts
Operating Instructions Spare parts Order-No Handpiece sleeve with keypad 66 05 484 Keypad finger switch 66 03 604 UniTip 320µm (25 pieces) 66 10 740 EndoTip 200µm (25 pieces) 66 10 773 ActiveTip (Ø 8mm) 66 10 971 Optic protection cap for handpiece (5 pieces) 65 79 580 FiberBend - Bending tool (2 pieces) 66 23 131... -
Page 28: Initial Start-Up - Procedure For Proper Assembly
3. Install remote interlock – optional 4. Start Aquamarine for the first time IMPORTANT Please keep the original packaging of the Aquamarine control unit as well as of the handpiece. It is required for save shipment to service or repair. - Page 29 There will be a warning if the rechargeable battery reaches a low level of capacity. This is indicated by the red LED bar on the top of the control unit. The Aquamarine is fully functional and can be run while charging the battery. ➢ Charge the battery completely.
-
Page 30: Handpiece And Assembly Of Single-Use Fiber Tips And Light Guide
Aquamarine 4.4.2 Handpiece and assembly of single-use fiber tips and light guide Handpiece 4.4.2.1 Magnetic handpiece holder and passive cooling element for the laser source Plunger pin Handpiece body including laser diode Finger switch Orientation notch Handpiece sleeve Keypad for finger switch... -
Page 31: Assembly Of Sterile Single-Use Optical Fiber Tips
UniTip and EndoTip are delivered sterile in a special packaging tube, which also assists the mounting of the fiber tips.The optical single-use fiber tips can be used only with the Aquamarine in the spectral range of 445 nm ± 10 nm. - Page 32 Aquamarine WARNING Do not sterilize the single-use fiber tips again after usage. Sterilization effects strongly the characteristics of the single-use fiber tips (laser power output, form, accuracy,…). 4.4.2.3.2 Preparation for clinical application 1. The UniTip 320µm and EndoTip 200µm are delivered sterile. The handpiece sleeve can be cleaned in the autoclave (high-pressure sterilizer), see chapter "Cleaning, disinfection and sterilization".
- Page 33 "Troubleshooting of simple defects". 8. As soon as the Aquamarine is ready you can check to make sure that the aiming beam illuminates evenly, i.e. projects a circular light pattern (see adjacent picture).To do this, aim the single-use fiber tip...
- Page 34 Aquamarine Bending of the UniTip 320µm and EndoTip 200µm: 1. Please sterilize the bending tool prior to each use to keep the sterile conditions of the single-use fiber tip, see chapter "Cleaning, disinfection and sterilization" 2. Now you can insert the single-use fiber tip into the bending tool and bend the fiber tip to the angle that you need for best handling.
- Page 35 Operating Instructions Adjusting the fiber length with the fiber cutter Generally, all types of sterile delivered single-use fiber tips have the proper fiber length in order to start working immediately without the need of adjusting the length prior to application. However, in some cases it will be necessary to adjust the length of the fiber.
-
Page 36: Assembly Of The Activetip Light Guide
0217 for calendar week 2, 2017). Please replace the light guide accordingly. The optical output can be reduced. The ActiveTip can be used only with the Aquamarine in the spectral range of 445 nm ± 10 nm. - Page 37 Operating Instructions 4.4.2.4.2 Preparation for clinical application 1. The ActiveTip is delivered non-sterile. Make sure that the rod is clean and sterile. The metal handpiece sleeve can be cleaned in the autoclave (high-pressure sterilizer), see chapter "Cleaning, disinfection and sterilization [ → 57]". 2.
-
Page 38: Install Remote Interlock - Optional
NOTICE The installation must be performed by a qualified electrician who is also responsible for the installation and maintenance of the electrical system to which the Aquamarine is connected. NOTICE Additional or different safety precautions required by the applicable national or local regulations for the protection of dentists, assistant personnel, or patients must also be observed. - Page 39 Operating Instructions 4. Connect the interlock plug to the socket until the quick-release perceptibly clicks in. 5. To remove the interlock cable from the operation unit gently pull back the outer sleeve at the cable’s plug to open the quick-release. Please find the technical data sheet with circuit diagram for the installation of the interlock circuit in "Appendix C –...
-
Page 40: Operation
Aquamarine 5 Operation Start the device for the first time NOTICE Touch screen functionality: When the touch screen is touched by the finger the touch field is highlighted. As soon as the finger leaves the touch screen the action will be started. - Page 41 Operating Instructions NOTICE Alphabetic and numeric letters, limitation to data input: • Numbers are displayed with English decimals '.' for all languages/ regions. • The power is displayed with one decimal place. Unit is watt (W). • The time can be set-up as continuous or 1 to 9999 seconds. If continuous is selected it counts up to maximum 9999 seconds after activating application.
-
Page 42: Switch On/Off Power
Aquamarine Switch on/off power Switch on the laser device Start the Aquamarine by switching on the on/off flip switch on the backside of the control unit. While the Aquamarine is booting information about the software version and the set language will be displayed. -
Page 43: Enter Pin Code
It is possible to create 12 different own programs. ● Settings Within this submenu you will be able to configure the Aquamarine to your needs as well as you will find all necessary settings and service programs. -
Page 44: Self Test
NOTICE Legal regulations require a regular safety test of the performance of a laser device. The Aquamarine needs to be tested once every two years. Please contact your local dental dealer or an authorized Customer Service Department for technical support. -
Page 45: Preset Programs
Operating Instructions 5.4.2 Preset programs On the home screen you find the 4 already preset indications for soft- tissue surgery, perio. germ reduction, endo. germ reduction as well as haemostasis. Each of the four programs has preset parameters for the indication. Putting the laser in ready mode Putting the laser in ready mode is described by means of the example „SURGERY“. - Page 46 The laser is now ready for operation. 6. When you activate the finger switch, the laser begins emitting. At the same time, the LED bar at the top of the Aquamarine control unit lights up as well as the laser active symbol on the touch screen and the audible alarm sounds.
- Page 47 Operating Instructions Example: Parameters Laser power (A) In our example, 1.2 W power. By pushing on the 'Minus' or 'Plus' button left respectively right to the parameter value you will be able to adjust the emitted power between 0.2 W and 1.4 W in 0.1 W increments. WARNING The preset power levels are considered to be safe for patients.
- Page 48 Aquamarine Duty cycle (D) In our example, CW (continuous wave mode). The duty cycle is defined as the ratio between the pulse duration (when the laser beam is actually activated) and the total period of time (which is the time from the beginning of a pulse to the beginning of the next pulse).
-
Page 49: Error Messages, Warnings And Instructions
Operating Instructions Error messages, warnings and instructions Error code Error message Cause / Solution PLEASE REDUCE POWER The set power for this application exceeds the max. allowed power for this user. Please reduce the power. PIN ALREADY EXISTS The entered pin code already exists. Define another pin code (user settings) or enter the correct pin code (pin code screen) PROBLEM WHEN READING THE... - Page 50 Aquamarine Error code Error message Cause / Solution TEMPERATURE INVALID Invalid temperature (< -10°C or > 150°C) was detacted. 1. step: Create valid environmental conditions. If error message remains: Software update If error message still remains: Exchange the handpiece CURRENT TO HIGH Current value too high.
-
Page 51: Own Programs
Operating Instructions Own programs Up to 12 applications can be generated and saved to 'Own Programs'. NOTICE If 'Own Programs' is full you have to delete one of the own programs in order to create a new one. Press the own program which should be deleted and press the 'delete button' on the parameter screen of the program. -
Page 52: Settings
(e.g. SMITH instead ADMIN) and to change the standard pin code 2 5 7 6. The admin is the administrator of the Aquamarine and has all rights to create and configurate an additional user as well as to delete it. -
Page 53: Language
Operating Instructions Change preset applications The admin decides if this user will be allowed to change preset applications via 'No' and 'Yes' button. NOTICE If 'No' is entered the user is not able to define own programs as well as not able to change the preset parameters. -
Page 54: Indications, Contraindications And Medical Precautions
Treatment with the laser is low-pain and not pain-free. We recommend using anesthetics if necessary. The Aquamarine may be operated only by trained and qualified personnel. NOTICE In terms of their power settings, all presets for surgical indications are defined in a way to enable fast and efficient cutting performance. -
Page 55: List Of Preset Indications
Operating Instructions List of preset indications Application Used Power Duty Fre- Time Fiber Help Menu wavelen Cycle quenzy [µm] gth [nm] [Hz] Incision/ Stretch the tissue and Excision use laser tip like an (soft-tissue scalpel to excise the surgery) tissue. Caution: Avoid contact to implant and bone! Perio. -
Page 56: Examples Of Treatment Risk
Contraindications All clinical procedures performed with the Aquamarine must be subjected to the same clinical judgment and care as with traditional techniques. Patient risk must always be considered and fully understood before clinical treatment. -
Page 57: Cleaning, Disinfection And Sterilization
Operating Instructions 7 Cleaning, disinfection and sterilization Following treatment, switch off the Aquamarine and disconnect the power cable from the power supply. NOTICE When following these instructions wear gloves. Control unit, handpiece body and handpiece are supposed to be cleaned and wipe-disinfected. -
Page 58: Disinfection
Disinfection Disinfect the upper mentioned parts by wipe disinfection: Aquamarine (wipe disinfection only) NOTICE Use only disinfectants that comply with the requirements of your national authorities and whose bactericidal, fungicidal and virucidal properties have been tested and properly certified. -
Page 59: Cleaning The Control Unit
Store all components so that they are protected against contamination.Sterilize again once the storage period has elapsed. Cleaning the control unit Use a dry, soft cloth to remove dust from the Aquamarine. More stubborn spots can be removed with a damp cloth. NOTICE Please proceed carefully not to scratch and damage the foil on the touch screen. -
Page 60: Maintenance And Service
Aquamarine 8 Maintenance and service Safety checks The following safety checks must be performed every 24 months by a qualified service engineer: ● Visual inspection of the unit and its accessories for mechanical damage that might impair operation ● General function check ●... -
Page 61: Maintenance
Maintenance The Aquamarine does not require special maintenance. In case of malfunctioning, see chapter Technical support, repair and testing. However, the manufacturer recommends taking the following actions at... -
Page 62: Software Update
● The unit must be used in compliance with the instructions provided in the present manual. Software update If a software update for the Aquamarine is available or needed proceed as follows: 1. Load the software update data on a suitable USB stick. -
Page 63: Troubleshooting Of Simple Defects
● Be sure that all operational steps have been carried out correctly. ● Check the functioning of the finger switch The touch screen of the Aquamarine remains dark after switching it on. ● Check the connection of the power cable and/or check the rechargeable battery. -
Page 64: Technical Support, Repair And Testing
Please contact your local dental depot or an authorized Customer Service Department for technical support. The Aquamarine may be sent in for repair or for safety inspection only in its original packaging, including all accessories. Disinfect the Aquamarine and sterilize the accessories according to the relevant instructions for use before shipping them. - Page 65 Operating Instructions 4. Place the guiding ridge (C) of the new battery pack inside the guide groove (D) of the control unit‘s battery slot. 5. Push the battery pack (B) inside the slot until the quick release fastener (A) perceptibly clicks in. 6.
-
Page 66: Replacement Of Parts Subject To Wear And Tear
Aquamarine Replacement of parts subject to wear and tear Check the following parts subject to wear and tear and replace where applicable: ● Light guides (change after 2,000 sterilization cycles or every two years) ● Silicone key pad of the handpiece (change after 400 treatments/ sterilizations) ●... -
Page 67: Electromagnetic Compatibility
Portable RF communications equipment (including peripherals such as antenna cables and external antennas) should be used not closer than 30 cm (12 inches) to any part of the Aquamarine, including cables specified by the manufacturer. Otherwise, degradation of the performance of this equipment could result. -
Page 68: Electromagnetic Emission
Aquamarine Electromagnetic emission The UNIT is intended for operation in the electromagnetic environment specified below. The customer or user of the UNIT should make sure that it is used in such an environment. Emission measurement Conformity Electromagnetic environment - guidelines... -
Page 69: Interference Immunity
Operating Instructions Interference immunity The UNIT is intended for operation in the electromagnetic environment specified below. The customer or user of the UNIT should make sure that it is used in such an environment. Interference IEC 60601-1-2 test level Compliance level Electromagnetic environment –... - Page 70 Aquamarine Interference IEC 60601-1-2 test level Compliance level Electromagnetic environment – immunity tests guidance Conducted RF d= [1.2] √P interference 150 kHz to 80 MHz IEC 61000-4-6 Radiated RF 3 V/m d= [1.2] √P interference at 80 MHz to 800 MHz...
-
Page 71: Working Clearances
Operating Instructions Working clearances Recommended working clearances The UNIT is intended for operation in an electromagnetic environment, between portable and mobile RF where radiated RF interference is checked. The customer or the user of communication devices and the UNIT the UNIT can help prevent electromagnetic interference by maintaining a minimum distance between portable and mobile RF communications equipment (transmitters) and the UNIT - depending on the maximum output power of the communication device, as shown below. -
Page 72: Disposal
Aquamarine 10 Disposal In accordance with Directive 2012/19/EU and national disposal regulations regarding old electrical and electronic devices, please be advised that such items must be disposed of in a special way within the European Union (EU). These regulations require the environmentally friendly recycling/disposal of old electrical and electronic devices. -
Page 73: Batteries
Please dispose the batteries according to the disposal regulations and legal requirements applicable in your country. Prior to disposal, remove the following battery: ● Lithium battery in the Aquamarine 10.2 Accessories ActiveTip glass rod, handpiece sleeve incl. keypad for finger switch, bending tool for UniTip and EndoTip and fiber cutter may be disposed in the domestic refuse. -
Page 74: Appendix
The unit is manufactured in compliance with the provisions of Council Directive 93/42/EEC concerning medical devices. 11.2 Appendix B -Label positions 11.2.1 Control unit The following figures show the positions of the labels on the Aquamarine: Rear side Bottom side... -
Page 75: Appendix C - Safety Circuit (Interlock)
Operating Instructions 11.3 Appendix C – Safety circuit (interlock) Interlock connection supplied with the Aquamarine (Insulate the jumper between pins 1 and 2; connect both of these pins to relay K1 with a two-core cable). Low-level relay (AC) Door switch Must close the interlock circuit when the treatment room door is closed. - Page 76 Aquamarine...
- Page 78 ïïïKëáêçå~KÅçã MTKOMNT 66 24 436 FONA Dental s.r.o. Stefanikova 7 SK – 811 06 Bratislava, Slovakia ïïïKÑçå~ÇÉåí~äKÅçã D3575.201.07.01...
Need help?
Do you have a question about the Aquamarine and is the answer not in the manual?
Questions and answers