Table of Contents
Advertisement
Quick Links
Advertisement
Table of Contents

Subscribe to Our Youtube Channel
Related Manuals for Fona MyCrown Design


Summary of Contents for Fona MyCrown Design
- Page 1 Service manual, jó`êçïå=aÉëáÖå pÉêîáÅÉ=j~åì~ä båÖäáëÜ...
-
Page 2: Table Of Contents
MyCrown Design Table of contents General information....................Structure of the document................1.1.1 Identification of the danger levels............. 1.1.2 Formats and symbols used .............. Safety ......................1.2.1 Basic safety information ..............1.2.1.1 Prerequisites ..............1.2.1.2 Modifications to the product ..........1.2.1.3 Movement and stability of the unit........ - Page 3 Service Manual 4.4.2 Installing the controller ..............4.4.2.1 Preparing the controller ............ 4.4.2.2 Installing the controller............4.4.2.3 Connecting the cables ............4.4.2.4 Attaching the cover............Replacing the hard disk................4.5.1 Removing the back panel..............4.5.2 Dismantling the hard disk ..............4.5.3 Installing the hard disk..............
-
Page 4: General Information
Service Manual 1 General information Structure of the document 1.1.1 Identification of the danger levels To prevent personal injury and material damage, please observe the warning and safety information provided in these operating instructions. Such information is highlighted as follows: DANGER An imminent danger that could result in serious bodily injury or death. -
Page 5: Formats And Symbols Used
Service Manual 1.1.2 Formats and symbols used The formats and symbols used in this document have the following meaning: Prerequisite Prompts you to do something. 1. First action step 2. Second action step Alternative action ➢ Result ➢ Individual action step See “Formats and symbols Identifies a reference to another text used [ →... -
Page 6: Movement And Stability Of The Unit
In order to ensure product safety, this device may be operated only with original FONA Dental accessories or third-party accessories expressly approved by FONA Dental. In particular, only the power cable supplied with the unit or the corresponding original spare part may be used with the unit. -
Page 7: Safety Labels
Service Manual 1.2.2 Safety labels Plug connections of external interfaces CAUTION Additional devices connected to external interfaces must be tested according to the relevant standards, e.g.: EN 60601-1:1990 + A1:1993 + A2:1995 based on IEC 60601-1, EN 60950-1:2001 based on IEC 60950-1:2001, EN61010-1:2001 based on IEC 61010-1:2001, UL 60601-1 Part 1: first edition 2003, UL 60950 third edition 2000, UL 3101-1 Part 1 first edition 1993). -
Page 8: Electrostatic Charge
MyCrown Design 1.2.3 Electrostatic charge 1.2.3.1 ESD protective measures ESD stands for ElectroStatic Discharge. ESD protective measures ESD protective measures include: ● Procedures for preventing electrostatic charge build-up (e.g. air conditioning, air moistening, conductive floor coverings and non- synthetic clothing) ●... -
Page 9: Radio Interference
ESD protective measures. 1.2.4 Radio interference MyCrown Design is Wi-Fi-compatible. It is designed for transmissions (sending and receiving) in various frequency ranges from 2412.0 MHz to 5825.0 MHz By intercepting the transmissions, the wireless network module (WLAN/ Wi-Fi) determines which system frequencies are available and then operates in the available ranges. -
Page 10: General Information
MyCrown Design General information Nominal line voltage ranges MyCrown Design works in the following ranges: Rated line voltage 100 - 250 VAC /50 - 60 Hz Nominal current 3.0A to 2.0A Wireless phone interference with NOTICE medical electrical equipment To ensure safe operation of medical electrical equipment, the use of mobile wireless phones in practice or hospital environments is prohibited. -
Page 11: Additional Information
Service Manual Additional information In addition, you also require: ● FONA spare parts catalog in the OEM shop ● Wiring diagrams MyCrown Design ● Operating Instructions MyCrown Design Tools ● Torx screwdriver, size 6; 10; 20; 30; 40, shank length at least 70 mm ●... -
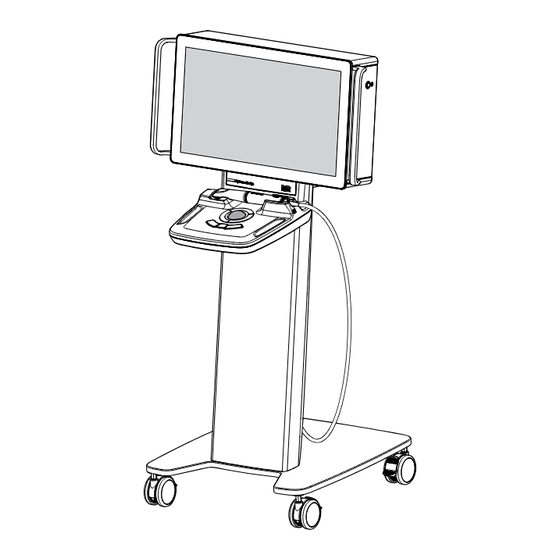
Page 12: Installation
Service Manual 2 Installation Preparing the cart Mounting the columns to the cart ➢ Screw the columns on to the cart with 4 screws. - Page 13 Service Manual Removing the cover and carrier plate 1. Remove the top cover from the column. 2. Remove the carrier plate for the controller from the column.
-
Page 14: Preparing The Controller
MyCrown Design Preparing the controller 1. Mount the carrier plate on the controller with 4 screws. 2. Connect the following cables provided to the controller: ● USB to LAN converter to USB interface (A). ● USB extension to USB interface (B) -
Page 15: Mounting The Control Panel
Service Manual Controller with connected cables Mounting the control panel 1. Route the heating cable as shown in the illustration. NOTICE! Do not jam in the heating cable. - Page 16 MyCrown Design 2. Route the following 3 cables through the feedthrough in the column: LAN cable for radio module (A) USB cable on the trackball unit (B) heating cable (C) 3. Hang the control panel on the column. Both hooks on the control panel must be mounted in the recesses in the column.
-
Page 17: Installing The Controller
Service Manual Installing the controller 1. Insert the controller into the column from above. NOTICE! Weight approx. 14 kg. NOTICE! Do not jam in the cable. 2. Fasten the controller securely with 4 countersunk screws. To do so, the controller must be raised slightly. -
Page 18: Connecting The Cables
MyCrown Design Connecting the cables Fastening the protective ground wires ➢ Fasten the 2 protective ground wires at position (A). Please note the order: screw > washer > protective ground wire > protective ground wire > contact wheel The claw fasteners of the contact wheel must be pointed towards the sheet metal wall (upwards in the illustration). - Page 19 Service Manual ● USB extension cable (from controller) and USB cable from control panel ● LAN cable from column and LAN extension cable from the controller...
- Page 20 MyCrown Design ● LAN cable from the control panel and USB-to-LAN converter ● Fuse on the cover with both heating cables (from control unit und controller) ➢ Route all cables in the column.
-
Page 21: Attaching The Cover
Service Manual Attaching the cover 1. Attach the back cover on the column. 2. Connect the camera cable. -
Page 22: Testing Electrical Safety
1. Connect the unit tester to the power supply, switch it on and wait for it to be initialized. 2. Connect the mains cable of the MyCrown Design to be tested to the measuring socket of the unit tester. 3. On the unit tester select the measurement R with 25 A. -
Page 23: Troubleshooting
● Check the connection to the wireless established to the network. internet. ● Check the Internet connection. ● Restore the connection to the wireless network if necessary (see operating instructions). ● Briefly disconnect the wireless network router from the power supply. Restart MyCrown Design. -
Page 24: Repair
Accessories For reasons of product safety, this product may be operated only with original FONA Dental accessories or third-party accessories expressly approved by FONA Dental. The user is responsible for any damage resulting from the use of non-approved accessories. NOTICE If cable is kinked or twisted. -
Page 25: Replacing The Back Panel
Service Manual Replacing the back panel Removing the back panel ✔ The unit is switched off and the power cable is disconnected. 1. Remove the 6 screws from the back panel. 2. Pull off the back panel parallel to the back. NOTICE! Observe the ground cable and button connection. -
Page 26: Attaching/Removing The Controller
MyCrown Design Attaching/removing the controller NOTICE Backup data Before the old controller is removed, the user has to save personal data to suitable media. For data protection reasons, these data must then be removed from the old controller. 4.4.1 Dismantling the controller 4.4.1.1... - Page 27 Service Manual Unscrewing the protective ground wires ➢ Remove the screw, washer, 2 protective ground wires and contact plate at position (A). NOTICE! Do not allow small parts to fall into the column. Disconnecting the cables ➢ Remove the following cables: ●...
- Page 28 MyCrown Design ● LAN cable from column and LAN extension cable from the controller ● LAN cable from the control panel and USB-to-LAN converter ● Remove both heating cables (from control unit und controller) from the fuse on the cover...
-
Page 29: Removing The Controller
Service Manual 4.4.1.2 Removing the controller 1. Remove the 4 countersunk screws. 2. Lift out the controller upwards. NOTICE! Weight approx. 14 kg. 3. Undo the 4 screws and remove the carrier plate from the controller. -
Page 30: Installing The Controller
MyCrown Design 4.4.2 Installing the controller 4.4.2.1 Preparing the controller 1. Mount the carrier plate on the controller with 4 screws. 2. Connect the following cables provided to the controller: ● USB to LAN converter to USB interface (A). ● USB extension to USB interface (B) -
Page 31: Installing The Controller
Service Manual Controller with connected cables 4.4.2.2 Installing the controller 1. Insert the controller into the column from above. NOTICE! Weight approx. 14 kg. NOTICE! Do not jam in the cable. -
Page 32: Connecting The Cables
MyCrown Design 2. Fasten the controller securely with 4 countersunk screws. To do so, the controller must be raised slightly. Connecting the cables 4.4.2.3 Fastening the protective ground wires ➢ Fasten the 2 protective ground wires at position (A). Please note the order: screw >... - Page 33 Service Manual Connecting cables ➢ Connect the following cables: ● Power cable ● USB extension cable (from controller) and USB cable from control panel ● LAN cable from column and LAN extension cable from the controller...
- Page 34 MyCrown Design ● LAN cable from the control panel and USB-to-LAN converter ● Fuse on the cover with both heating cables (from control unit und controller) ➢ Route all cables in the column.
-
Page 35: Attaching The Cover
Service Manual 4.4.2.4 Attaching the cover 1. Attach the back cover on the column. 2. Connect the camera cable. -
Page 36: Replacing The Hard Disk
MyCrown Design Replacing the hard disk 4.5.1 Removing the back panel ✔ The unit is switched off and the power cable is disconnected. 1. Remove the 6 screws from the back panel. 2. Pull off the back panel parallel to the back. NOTICE! Observe the ground cable and button connection. -
Page 37: Installing The Hard Disk
Service Manual 3. Pull off the 2 connectors from the hard disk. 4. Unscrew the hard disk (4 screws). 4.5.3 Installing the hard disk 1. Screw the new hard drive onto the sheet metal part using the 4 screws. 2. Attach the 2 connectors to the new hard drive. 3. -
Page 38: Mounting The Back Panel
MyCrown Design 4.5.4 Mounting the back panel 1. Reinsert the ground cable and reestablish the link to the button connection. 2. NOTICE! Do not jam in the ground cable or button connection. Carefully place the rear panel back on. 3. Fasten the back panel securely with 6 screws. - Page 39 Service Manual Removing the handles 1. Remove the screws on the handles. 2. Remove the handles. Attaching the handles ➢ Screw on the handles. Mounting the back panel 1. Reinsert the ground cable and reestablish the link to the button connection.
-
Page 40: Replacing The Display
MyCrown Design Replacing the display Removing the back panel ✔ The unit is switched off and the power cable is disconnected. 1. Remove the 6 screws from the back panel. 2. Pull off the back panel parallel to the back. NOTICE! Observe the ground cable and button connection. - Page 41 Service Manual 4. Remove the USB cable from the PC module. 5. Remove the display. Installing the display 1. Connect the DVI cable and the power supply cable to the display. 2. Connect the USB cable to the PC module. 3.
-
Page 42: Replacing The Pc Module
MyCrown Design Mounting the back panel 1. Reinsert the ground cable and reestablish the link to the button connection. 2. NOTICE! Do not jam in the ground cable or button connection. Carefully place the rear panel back on. 3. Fasten the back panel securely with 6 screws. - Page 43 Service Manual Removing the cover and connection board 1. Remove the back cover. The cover can remain hanging on the device. NOTICE! Do not subject the cables to any tension. 2. Remove the connection board with camera connection and Wi-Fi antennas.
- Page 44 MyCrown Design 3. Tilt the PC module slightly outwards. The PC module remains hung at the top of the chassis. 4. Remove all cables from the underside of the PC module: 2x LAN cable (camera connection and network connection) 1x DVI cable...
- Page 45 Service Manual Installing the PC module 1. Mount the display into the chassis from above. 2. Connect all cables to the underside of the PC module: 1x DVI cable 5x USB cable 2x LAN cable (camera connection and network connection) 2x cable for Wi-Fi antennas (fasten with 8 mm open-ended spanner.) 3.
- Page 46 MyCrown Design 4. Unscrew the PC module with 5 screws. 5. Connect the power supply cable for the display and the two other cables marked. Mounting the cover and connection board 1. Connect the connection board. 2. Fasten the back cover.
-
Page 47: Replacing The Lower Cover Of The Control Panel
Service Manual Mounting the back panel 1. Reinsert the ground cable and reestablish the link to the button connection. 2. NOTICE! Do not jam in the ground cable or button connection. Carefully place the rear panel back on. 3. Fasten the back panel securely with 6 screws. Replacing the lower cover of the control panel Removing the lower cover ✔... -
Page 48: Replacing The Control Panel
MyCrown Design Attaching the lower cover ➢ Screw on the cover with 6 screws. 4.10 Replacing the control panel Disconnecting the cables ✔ The unit is switched off and the power cable is disconnected. 1. Remove the camera cable. - Page 49 Service Manual 2. Remove the back cover. The cover can remain hanging on the device. NOTICE! Do not subject the cables to any tension. 3. Remove the following cables: ● USB extension cable (from controller) and USB cable from control panel ●...
- Page 50 MyCrown Design ● Heating cables (from the control unit) from the fuse on the cover. Removing the control panel 1. Remove the 3 screws from the control panel. NOTICE! Do not allow small parts to fall into the column. 2. Unhook the control panel. To do so, lift the control panel and take it...
- Page 51 Service Manual Mounting the control panel 1. Route the heating cable as shown in the illustration. NOTICE! Do not jam in the heating cable. 2. Route the following 3 cables through the feedthrough in the column: LAN cable for radio module (A) USB cable on the trackball unit (B) heating cable (C)
- Page 52 MyCrown Design 3. Hang the control panel on the column. Both hooks on the control panel must be mounted in the recesses in the column. 4. Fasten the control panel with 3 screws at positions (A) and (B).
- Page 53 Service Manual 5. Fasten the 2 protective ground wires at position (A). Please note the order: screw > washer > protective ground wire > protective ground wire > contact wheel The claw fasteners of the contact wheel must be pointed towards the sheet metal wall (upwards in the illustration).
- Page 54 MyCrown Design ● Connect the heating cable from the control unit to the fuse on the cover. ➢ Route all cables in the column. Attaching the cover and connecting the camera 1. Attach the back cover. 2. Connect the camera cable.
-
Page 55: Replacing The Trackball Unit
Service Manual 4.11 Replacing the trackball unit Removing the trackball unit ✔ The unit is switched off and the power cable is disconnected. 1. Remove the lower cover from the control panel. 2. Turn the trackball circlip counter-clockwise and remove it. 3. - Page 56 MyCrown Design 5. Remove the 3 screws. Hold on to the nuts from the bottom using a suitable tool to prevent it from rotating simultaneously. 6. Remove the trackball unit by pulling it down. Installing the trackball unit 1. Screw the trackball unit into the control panel from the bottom. Hold on to the nuts from the bottom using a suitable tool to prevent it from rotating simultaneously.
- Page 57 Service Manual 3. Insert the trackball ball. 4. Turn the trackball circlip clockwise and tighten it. 5. Attach the lower cover to the control panel.
-
Page 58: Replacing The Usb Cable Of The Trackball
MyCrown Design 4.12 Replacing the USB cable of the trackball ✔ The unit is switched off and the power cable is disconnected. 1. Remove the lower cover of the control panel. 2. Remove the USB cable from the trackball unit. -
Page 59: Replace Radio Module
Service Manual 4.13 Replace radio module Removing the radio module ✔ The unit is switched off and the power cable is disconnected. 1. Remove the lower cover from the control panel. 2. Remove the USB cable and the LAN cable from the radio module. - Page 60 MyCrown Design 3. Pull off the radio module from the self-adhesive mounting tape. 4. Remove the rest of the mounting tape. Attaching the radio module 1. Stick in the radio module with double-sided adhesive mounting tape. 2. Connect the USB cable and the LAN cable to the radio module.
-
Page 61: Replacing The Lan Cable On The Radio Module
Service Manual 3. Attach the lower cover to the control panel. 4.14 Replacing the LAN cable on the radio module Removing the LAN cable. ✔ The unit is switched off and the power cable is disconnected. 1. Remove the lower cover from the control panel. - Page 62 MyCrown Design 2. Remove the back cover. The cover can remain hanging on the device. NOTICE! Do not subject the cables to any tension. 3. Remove the LAN cable from the radio module. 4. Remove the LAN cable from USB-to-LAN converter.
- Page 63 Service Manual Connecting the LAN cable 1. Connect the LAN cable to the radio module. 2. Connect the LAN cable to the USB-to-LAN converter. 3. Attach the lower cover to the control panel.
-
Page 64: Replacing The Heater
MyCrown Design 4. Attach the back cover. 4.15 Replacing the heater Removing the heater ✔ The unit is switched off and the power cable is disconnected. 1. Remove the lower cover from the control panel. 2. Remove the back cover. - Page 65 Service Manual 3. Remove the cable from the heater. 4. Remove the 4 screws. 5. Remove the heater with the O-ring. Attaching the heater 1. Insert the heater with the O-ring and fasten it with the 4 screws.
- Page 66 MyCrown Design 2. Route the heating cable as shown in the illustration. 3. Connect the cable to the heater. 4. Attach the back cover. 5. Attach the lower cover of the control panel.
-
Page 67: Replacing Fuses
Service Manual 4.16 Replacing fuses 4.16.1 Replacing mains fuses ✔ The unit is switched off and the power cable is disconnected. 1. Pull out the fuse holder. 2. Replace both fuses. 3. Reinsert the fuse holder into the intake sleeve. 4.16.2 Replacing the heater fuse ✔... -
Page 68: Replacing The Usb-To-Lan Converter
MyCrown Design 4.17 Replacing the USB-to-LAN converter Removing the USB-to-LAN converter ✔ The unit is switched off and the power cable is disconnected. 1. Remove the rear panel. 2. Remove the connection board. The connection board can remain hanging on the device. - Page 69 Service Manual 4. Remove the LAN cable from the USB-to-LAN converter. 5. Remove the USB-to-LAN converter from the PC module. Attaching the USB-to-LAN converter 1. Connect the USB-to-LAN converter to a USB port on the PC module. 2. Connect the LAN cable of the radio module to the USB-to-LAN converter.
- Page 70 MyCrown Design 4. Attach the rear panel. 5. Attach the back cover.
-
Page 71: Replacing The Lan Cable
Service Manual 4.18 Replacing the LAN cable Removing the LAN cable. ✔ The unit is switched off and the power cable is disconnected. 1. Remove the upper back cover. The cover can remain hanging on the device. NOTICE! Do not subject the cables to any tension. 2. - Page 72 MyCrown Design 3. Remove the LAN cable from the respective coupling on both sides.
- Page 73 Service Manual Installing the LAN cable 1. Route the LAN cable through the cart. 2. Connect the LAN cable to both couplings.
- Page 74 MyCrown Design 3. Attach the lower cover. 4. Mount the upper cover.
-
Page 75: Replacing The Camera Cable
Service Manual 4.19 Replacing the camera cable Removing the camera cable 1. Remove the camera cable from the device. 2. Remove the ring nuts from the camera with an open-end wrench SW 3. Remove the grip sleeve from the camera. - Page 76 MyCrown Design 4. Remove the strain relief. 5. Carefully pull the cable plug upwards.
- Page 77 Service Manual Attach the cable to the camera 1. Thread the handle sleeve over the new cable. The ring nut is already threaded. 2. Connect the camera cable.
- Page 78 MyCrown Design IMPORTANT ➢ Ensure that the distance (A) is in place between the strain relief and cable sleeve. ➢ Ensure that the strain relief (B) is positioned in the holder with the wide side downward. 3. Attach the strain relief with two screws M2x4. Tighten the screws with a tightening torque of 1.5 Nm.
-
Page 79: Replacing The Handle Sleeve Of The Camera
Service Manual 5. Attach the handle sleeve to the camera. NOTICE! Make sure that the sealing ring (A) is properly seated. 6. Unscrew the ring nut. NOTICE! Tighten the ring nut only by hand. 4.20 Replacing the handle sleeve of the camera ➢... - Page 80 ïïïKëáêçå~KÅçã NOKOMNT 66 18 917 FONA Dental s.r.o. Stefanikova 7 SK – 811 06 Bratislava, Slovakia ïïïKÑçå~ÇÉåí~äKÅçã D3624.076.02.03 Ä-Nr.: 124 730...
Need help?
Do you have a question about the MyCrown Design and is the answer not in the manual?
Questions and answers