Table of Contents
Advertisement
Advertisement
Table of Contents

Subscribe to Our Youtube Channel
Related Manuals for Fona XPan 3D Plus


Summary of Contents for Fona XPan 3D Plus
- Page 1 OPERATING INSTRUCTIONS FONA XPan 3D Plus_ English...
-
Page 2: Table Of Contents
Operating Instructions ITALIANO Table of contents FOREWORD ................................4 WARNING AND SAFETY NOTES ........................5 GENERAL DESCRIPTION ..........................8 OPERATING CONTROLS AND DISPLAYS ....................9 3.1. UNIT ................................9 3.2. REMOTE HAND-SWITCH ......................... 9 3.3. CONTROL PANEL ..........................10 3.4. OPERATING POSITIONS ........................11 3.4.1. - Page 3 FONA XPan 3D Plus PROGRAMMING............................34 9.1. PROGRAMMING PROCEDURE ......................34 9.2. PROGRAM VALUES ..........................35 10. CARE OF THE SURFACES .......................... 36 11. MESSAGES ..............................37 11.1. WARNING MESSAGES .......................... 37 11.2. ERROR MESSAGES ..........................37 12. INSPECTION AND MAINTENANCE ......................38 13.
-
Page 4: Foreword
Operating Instructions FOREWORD Dear Customer, Thank you for purchasing your new FONA XPan 3D Plus. We provided you with a set of technical literature: Operating Instructions, Installation manual, Service manual, Maintenance manual Warranty conditions Keep this literature for easy and quick reference. -
Page 5: Warning And Safety Notes
FONA XPan 3D Plus 1. WARNING AND SAFETY NOTES Instructions The accompanying documents among which the Operating Instructions and the Installation Instructions supplied with the unit are integral parts of the product. The original language of the Operating Instructions is English. - Page 6 FONA XPan 3D Plus should not be used adjacent to or stacked with other equipment; if adjacent or stacked use is necessary, FONA XPan 3D Plus.
- Page 7 FONA XPan 3D Plus Disassembly and reinstallation For disassembly and reinstallation of the unit proceed as described in the installation instructions for new installation to ensure perfect function of the unit and its stability. Disposal It generally applies that any disposal of this product must comply with the relevant national regulations.
-
Page 8: General Description
Our patients, dentists and partners are inspiring us every day. With all our knowledge, passion and experience, we provide complete modern dental solutions to improve global dentistry. We hope that FONA XPan 3D Plus will help you to provide happy and healthy smiles to your patients, every day. -
Page 9: Operating Controls And Displays
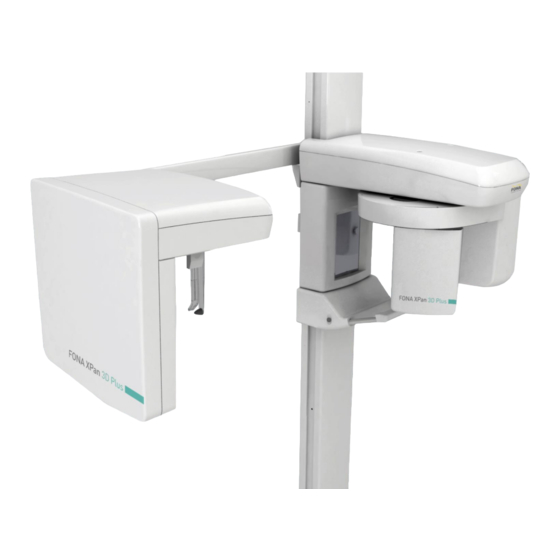
FONA XPan 3D Plus 3. OPERATING CONTROLS AND DISPLAYS 3.1. UNIT 1. X-Ray button 2. Patient positioning mirror 3. 3D-Panoramic Image Mirror 4. Bite block 5. Height adjustment buttons 6. Main switch 7. Knob for Frankfurt plane adjustment 8. Cephalometric image receptor 9. -
Page 10: Control Panel
Operating Instructions 3.3. CONTROL PANEL Unit ON with light on display READY green light ON when system ready ALARM red light ON upon alarm message EXPOSURE key on Hand Switch X-ray Radiation – Orange Light ON PROGRAM Selection INCREASE kV (left side) mA (right side) DECREASE kV (left side) mA (right side) PATIENT build: Small, Medium, Large, Extra-Large... -
Page 11: Operating Positions
FONA XPan 3D Plus 3.4. OPERATING POSITIONS 3.4.1. PANORAMIC EXAMS PATIENT ENTRY position Control panel and X-ray source on the right of the patient and the image receiver on the left. START position System ready to start the exposure. When the unit reaches the START... -
Page 12: Positioning Tools
Operating Instructions 4. POSITIONING TOOLS 1 Bite block with chin rest 5 Bite block for TMJ and sinus exams 2 Chin rest with support for 6 Nasal support for TMJ and edentulous sinus exams 7 Chin rest with support for 3 Bite block 3D TMJ exams (left and right) –... -
Page 13: Application Software
The procedure for image acquisition is described below. The instructions for subsequent processing and storage of the images are described in the OrisWin DG Suite User Manual A. Starting On the PC connected to FONA XPan 3D Plus with OrisWin DG Suite installed: Start OrisWin DG Suite and select the Patient module with the relevant button B. - Page 14 Operating Instructions C. Selecting the X-ray system Start an acquisition session by selecting the FONA XPan 3D Plus button. D. Software Acquisition Interface The two vertical bars (1) on acquisition module can be: Red: system not connected to PC Yellow: system proper connected to PC, but not...
-
Page 15: Exposure Programs
FONA XPan 3D Plus 6. EXPOSURE PROGRAMS The image at receptor’s plane is approximately 27% higher than real size: the vertical magnification on adult standard profile is 1.27:1 approximately with constant vertical magnification on dental arch. 6.1. P1 PROGRAM (Adult standard panoramic image) Program duration time approx.: 16 s... -
Page 16: P4 Program (Right Hemi-Arch Panoramic Image)
Operating Instructions 6.4. P4 PROGRAM (Right hemi-arch panoramic image) Program duration time approx.: 16 s Positioning tool: 1, 2, 3, 4 (see §4. Positioning Program exposure time: 7.3 s tools) 6.5. P5 PROGRAM (Anterior teeth panoramic image) Program duration time approx.: 16 s Positioning tool: 1, 2, 3, 4 (see §4. -
Page 17: P6 Program (Temporo-Madibular Join Tmj, Closed/Open Mouth)
FONA XPan 3D Plus 6.6. P6 PROGRAM (Temporo-madibular join TMJ, closed/open mouth) Two exposures are usually taken with closed and open mouth. (Please refer to “Positioning the patient” paragraph 7.3) Patient is positioned with bite block under the nose. Once taken the first set of two images, return the unit. -
Page 18: P8 Program (Full Mouth 3D Volume)
Operating Instructions 6.8. P8 PROGRAM (Full mouth 3D volume) Program duration time: approximately : 14 s Positioning tool: 1, 2, 3, 4 (see §4. Positioning Program exposure time: 12.3 s tools) 6.9. P9 PROGRAM (TMJ left 3D volume) Program exposure time: 12.3 s Positioning tool: 7 (available on request) 6.10. -
Page 19: P11 Program (Latero-Lateral Cephalometric Image)
FONA XPan 3D Plus 6.11. P11 PROGRAM (Latero-lateral cephalometric image) Positioning tool: 8 (see §4. Positioning tools) Program duration time: 1.6 s (adjustable) Program exposure time: 1.6 s (adjustable) 6.12. P12 PROGRAM (Antero-posterior cephalometric image) Positioning tool: 8, without nasion (see §4. -
Page 20: Operation - P1 To P10 Programs
Operating Instructions 7. OPERATION – P1 to P10 PROGRAMS 7.1. PREPARING EQUIPMENT FOR EXPOSURE A. Switching ON the Unit By pressing the mains switch in the lower part of the vertical carriage under the mirror, the unit is supplied as indicated by the green light of the mains switch. ATTENTION: Following extreme temperature fluctuations, condensate formation may occur;... - Page 21 FONA XPan 3D Plus NOTE The pre-programmed values of technique factors are factory programmed. Different values can be loaded if needed using the available on board programming functionality. Refer to §8, Programming for details. Setting Tube Voltage Key INCREASE at the left of the display to manually raise kV level Key DECREASE at the left of the display to manually lower kV level The tube voltage can be set from 61 to 85 kV in steps of 3 kV.
-
Page 22: Preparing Patient Before Positioning
Operating Instructions 7.2. PREPARING PATIENT BEFORE POSITIONING Ask the patient to remove from head and neck all metallic items such as removable denture, earrings, necklaces, glasses which might cause ghost images on the radiograph. Physical constitution, clothing, bandages, etc. must not interfere with the movement of the arm. -
Page 23: Tmj Exam (P6) And Sinus Exam (P7)
FONA XPan 3D Plus NOTE In case the patient is a child: the use of chin rest is recommended for grater stability the additional support (1) must be mounted on the chin rest (2). Consider to seat the pediatric patient to have it still and stable Execute a free run in test mode for the pediatric patient to familiarize before the actual exposure. -
Page 24: Positioning The Patient - Part 2
Operating Instructions 7.4. POSITIONING THE PATIENT - Part 2 Switch on the light beam localizers. Laser stays ON for 5 minutes; when carriage reaches START Exams the lights are switched OFF automatically. ATTENTION: The light beams are LASER lights. Avoid unnecessary exposure of the eyes of the patient or of the operator to the laser radiation and pay attention that the laser beams are not intercepted by any optical device. - Page 25 FONA XPan 3D Plus Wrong position: Frankfurt plane is NOT horizontal The head is tilted forward thus resulting in a V shaped dental arch on the X-Ray image. Wrong position: Frankfurt plane is NOT horizontal The head is tilted backward, thus resulting in a flat dental arch on the X-Ray image.
-
Page 26: Releasing The Exposure
Operating Instructions The light beam (red line) falls in front of the canine (green line). The roots of the incisors fall outside the layer in focus. The front teeth appear blurred and proportionally larger. Move the rotating arm backward (away from the column) to correct. -
Page 27: After The Exposure
FONA XPan 3D Plus 7.6. AFTER THE EXPOSURE At the end of the X-Ray exposure the unit comes to a complete stop. Move the arm to PATIENT EXIT position using the RETURN Arm Movement key or the EXPOSURE key on the hand switch for short time. -
Page 28: Operation - Cephalometry (P11 To P13 Programs)
Operating Instructions 8. OPERATION – CEPHALOMETRY (P11 to P13 PROGRAMS) 8.1. PREPARING EQUIPMENT FOR EXPOSURE A. Switching ON the Unit By pressing the mains switch in the lower part of the vertical carriage under the mirror, the unit is supplied as indicated by the green light of the mains switch. ATTENTION: Following extreme temperature fluctuations, condensate formation may occur;... -
Page 29: Preparing Patient For Exposure
FONA XPan 3D Plus NOTE The pre-programmed values of technique factors are factory programmed. Different values can be loaded if needed using the available on board programming functionality. Refer to §9, Programming for details. Setting Tube Voltage Key INCREASE at the left of the display to manually raise kV level Key DECREASE at the left of the display to manually lower kV level The tube voltage can be set from 61 to 85 kV in steps of 3 kV. -
Page 30: Positioning The Patient
Operating Instructions 8.3. POSITIONING THE PATIENT A craniostat with auricular rods is available for Latero-lateral or Antero-posterior projection and an adjustable nasion support. Remove the nasion support by acting on the release pin in the case of Antero-posterior or Carpus projection 8.3.1. -
Page 31: Antero-Posterior Program (P12)
FONA XPan 3D Plus 8.3.2. Antero-posterior program (P12) Remove the nasion support by acting on the release pin as illustrated in the side image The configuration of the craniostat for Antero-posterior program is indicated in the side image. Turn the ear plug holder, in order to have ear plug as illustrated in side image Grasp the holders at the very top with both hands. -
Page 32: Carpus Program (P13)
Operating Instructions 8.3.3. Carpus program (P13) Remove the nasion support by acting on the release pin as illustrated in the side image Remove the ear plug from the ear plug holder, by unscrewing them. Pay attention not to lose the washer. Grasp the holders at the very top with both hands. -
Page 33: Releasing The Exposure
FONA XPan 3D Plus 8.4. RELEASING THE EXPOSURE ATTENTION: The operator must observe the radiation protection guidelines (see chapter 1, Warning and Safety Notes). Before releasing the exposure always check in the display that proper exposure technical parameters (kV and mAs) has been set for the the patient. -
Page 34: Programming
Operating Instructions 9. PROGRAMMING 9.1. PROGRAMMING PROCEDURE Default kV and mA values for each program are assigned by default in factory Such values can be re-loaded using a dedicated service function. If you want to modify these default values please follow the instruction below. By keeping pressed the BACK key for 5 s the system enters Service Mode Service function can be selected using the INCREASE or DECRESE keys on the RIGHT side of the display. -
Page 35: Program Values
FONA XPan 3D Plus 9.2. PROGRAM VALUES Factory programmed values Freely programmed values kV/mAs kV / mAs Program P1, P3, P4, P5, P6, P7 61/6.3 67/6.3 73/6.3 79/6.3 61/5.0 67/5.0 73/5.0 79/5.0 P8, P9, P10 61/6.3 67/6.3 73/6.3 79/6.3 Factory programmed values... -
Page 36: Care Of The Surfaces
Operating Instructions 10. CARE OF THE SURFACES ATTENTION: Always disconnect the system from the mains (main switch in the room) before cleaning Cleaning Use a mild soap to remove fingerprints or other traces of dirt being careful not to let liquid substances penetrate the machine. -
Page 37: Messages
FONA XPan 3D Plus 11. MESSAGES 11.1. WARNING MESSAGES Message Action required X-ray generator hot The tube load for the selected exposure does not fit. Wait for tube cool down. CAM init Wait for completion of initialization procedure. Adjust Arm Position The rotating arm is out of position. -
Page 38: Inspection And Maintenance
Operating Instructions 12. INSPECTION AND MAINTENANCE Inspection and maintenance work must be performed at regular intervals to protect the safety and health of patients, users and third parties. As the operator, you should ensure the safety and reliability of your system by performing maintenance on it at regular intervals (at least once annually) or having this work performed by your dental dealership. -
Page 39: Technical Description
93/42/EEC relating to Medical Devices, and subsequent amendments and integrations of which in the Directive 2007/47/EC of the European Parliament and of the Council. Manufacturer FONA S.r.l, via G.Galilei, 11, 20090, Assago (MI) Nominal line voltage 230 V ± 10%, 115 V ± 10%, Nominal line frequency... - Page 40 Operating Instructions Weight 81Kg (carriage), 28Kg (Ceph arm). Self standing base Optional on request. Order code 93 600 09000 Panoramic Projections P1: Adult Standard Panorama: 14.2 s, P2: Child Panorama: 11.5 s, P3: Left hemi-arch: 7.3 s, P4: Right hemi-arch: 7.3 s, P5: Anterior Teeth: 4.8 s, P6: TMJ normal occlusion or TMJ mouth opened: 2 x 2.2 s, P7: Frontal View of Maxillary Sinuses: 12.9 s...
- Page 41 FONA XPan 3D Plus Cooling curve X-ray tube Cooling curve Tube housing assembly Reference axis Used Icons OFF (disconnected from Inherent Filtration mains supply) ON (connected to mains Fragile, Handle With Care supply) Fuse Fear of Humidity Alternate Current Up, Do Not Overturn...
-
Page 42: Electromagnetic Compatibility
The FONA XPan 3D Plus system is intended for use in the electromagnetic environment specified below. The customer or the user of the FONA XPan 3D Plus system should assure that it is used in such an environment. Immunity test... -
Page 43: Systems That Are Non Life Supporting
The FONA XPan 3D Plus system is suitable for use in the electromagnetic environment specified below. The customer or the user of the FONA XPan 3D Plus system should assure that it is used in such an environment. Immunity test... - Page 44 6968380110 11.2016...
Need help?
Do you have a question about the XPan 3D Plus and is the answer not in the manual?
Questions and answers