Table of Contents
Advertisement
Quick Links
Advertisement
Table of Contents

Related Manuals for Ryobi OPP18


Summary of Contents for Ryobi OPP18
- Page 1 ORIGINAL INSTRUCTIONS Pole Pruner Power Head Attachment OPP18...
- Page 2 Important! It is essential that you read the instructions in this manual before assembling, operating, and maintaining the product. Subject to technical modification.
-
Page 3: Intended Use
Safety, performance, and dependability have been given ELECTRICAL SAFETY top priority in the design of your pole pruner power head Power tool plugs must match the outlet. Never ■ attachment. modify the plug in any way. Do not use any adapter plugs with earthed (grounded) power tools. -
Page 4: Additional Safety Warnings
■ Do not let familiarity gained from frequent use of product; use a face mask if operation is dusty. tools allow you to become complacent and ignore ■ Do not wear loose fitting clothing, short trousers, or tool safety principles. A careless action can cause jewellery of any kind. -
Page 5: Personal Protective Equipment
RYOBI service and while moving between pruning positions. centre. The part number is available in the product ■... -
Page 6: Operation
The manufacturer recommends the use of RYOBI bar and chain lubricant, which is available Chain sharpness Before each use, visual from your RYOBI authorised service centre. -
Page 7: Residual Risks
For damaged parts Before each use SYMBOLS ON THE PRODUCT For loose fasteners Before each use Safety alert RESIDUAL RISKS Read and understand all instructions Even when the product is used as prescribed, it is still before operating the product. Follow all impossible to completely eliminate certain residual risk warnings and safety instructions. -
Page 8: Symbols In This Manual
SYMBOLS IN THIS MANUAL Parts or accessories sold separately Note Warning Lock Unlock The following signal words and meanings are intended to explain the levels of risk associated with this product. DANGER Indicates an imminently hazardous situation, which, if not avoided, will result in death or serious injury. WARNING Indicates a potentially hazardous situation, which, if not avoided, could result in death or serious injury. - Page 10 WHAT’S IN THE BOX...
-
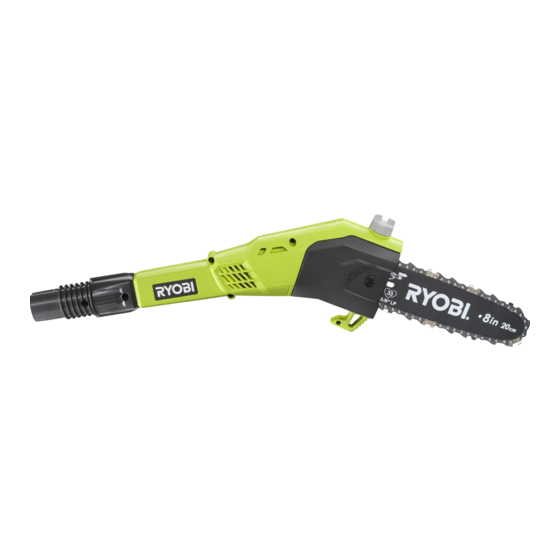
Page 11: Know Your Product
Know your product KNOW YOUR PRODUCT 1. Chain 5. Oil reservoir cap 2. Bar 6. Spiked bumper 3. Pruner attachment 7. Tensioning screw 4. Scabbard / Bar cover 8. Bar bolt... -
Page 12: Getting Started
GETTING STARTED Always wear safety goggles or safety glasses with side Install the shaft to the pruner attachment through the shields when operating the product. Failure to do so could shaft coupling. Tighten the shaft coupling to secure the result in objects being thrown into your eyes resulting attachment. - Page 13 GETTING STARTED Attach the shoulder harness and clip. Loosen and remove the oil reservoir cap. Adjust the chain tension using the allen wrench. Ensure to follow Remove the scabbard / bar cover from the bar and chain. correct chain tensioning procedure.
- Page 14 Know your product KNOW YOUR PRODUCT OVERVIEW Operating the pruner Replacing the chain bar p.13 p.16 Cleaning the product Adjusting the chain Storing the product 3-4 mm p.19 p.15 p.20...
-
Page 15: Operating The Pruner
OPERATION ≤60˚ ≥15m (50’) OPERATING THE PRUNER WARNING: DANGER! Risk of electrocution! Do not operate within 10 m of overhead electrical power lines. Position the product at an angle of 60° or less, depending on the specific situation. Keep bystanders at least 15 m away. WARNING: Ensure that the chain and bar oil has been added to the reservoir before use. - Page 16 OPERATION 3. Make sure to position the spike bumper to the main limb or trunk before making the cut. NOTE: Make a shallow first cut (1/4 of limb diameter) on the underside of the limb close to the main limb or trunk. Then, make a second cut from the top side of the limb outboard from the first cut.
-
Page 17: Adjusting The Chain
MAINTENANCE 3-4 mm ADJUSTING THE CHAIN 1. Turn off the product and then remove the battery pack. NOTE: The product will be hot after use. Allow the product to cool down before adjusting the chain. 2. Using the allen key wrench, loosen the bar bolt off the drive case. - Page 18 MAINTENANCE REPLACING THE CHAIN BAR 1. Turn off the product and then remove the battery pack. NOTE: The product will be hot after use. Allow the product to cool down before replacing the chain bar. 2. Using the allen key wrench, remove the bar bolt from the drive case cover.
- Page 19 MAINTENANCE 4. Place the bar into the bar stud so the chain tensioning pin fits into the chain tensioning pin hole. Fit the chain over the sprocket and into the bar groove. The cutters on the top of the bar should face toward the bar tip, in the direction of the chain rotation.
- Page 20 MAINTENANCE NOTE: Hold the tip of the bar up and tighten the bar bolt securely. The chain tension is correct when the gap is about 3–4 mm. NOTE: If the chain is too tight, it will not rotate, resulting in damage. Loosen the bar bolt slightly and turn chain tensioning screw 1/4 turn counterclockwise.
-
Page 21: Cleaning The Product
MAINTENANCE CLEANING THE PRODUCT 1. Turn off the product and then remove the battery pack. Allow it to cool down before cleaning. 2. Clean all foreign materials from the product using a soft brush or cloth. WARNING: Keep away from corrosive agents such as garden chemicals and de-icing salts. -
Page 22: Storing The Product
STORAGE STORING THE PRODUCT 1. Turn off the product and then remove the battery pack. Allow it to cool down, and make sure the product is clean before storing. 2. Cover the cutting blade with the scabbard. 3. Release the telescoping collar to retract the upper shaft. - Page 23 STORAGE 5. Store the product in a cool, dry, and well- ventilated place that is inaccessible to children. Keep away from corrosive agents such as garden chemicals and de-icing salts. Do not store outdoors.
-
Page 24: Product Specifications
PRODUCT SPECIFICATIONS REPLACEMENT PARTS Cordless Pole Pruner Power Head Attachment When possible, use matching brands of bar and chain for optimum performance. Model OPP18 Bar length 200 mm / 8 inch Parts Manufacturer Type Chain pitch 0.375 inch Chain gauge 0.043 inch... - Page 28 Imported by: Techtronic Industries Australia Pty Ltd RYOBI is a trademark of Ryobi Limited, 31 Gilby Road, Mount Waverley, VIC 3149, and is used under license. Melbourne, Australia TRILINK is a registered trademark of Trilink Saw Chain, LLC. Techtronic Industries N.Z. Limited...
Need help?
Do you have a question about the OPP18 and is the answer not in the manual?
Questions and answers