
Related Manuals for Branach FEU Series


Summary of Contents for Branach FEU Series
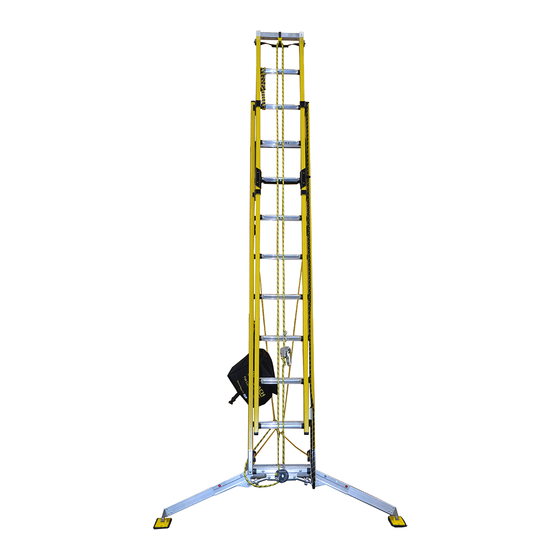
- Page 1 Fall Control User Instructions Procedure BP-FCL-0096-01 branach.com s a l e s @ b r a n a c h . c o m...
- Page 2 - Ref.256502 which is in conformity with the provisions of Council Directive 89/686/EEC and with the EN 353-2:2002 standard. The user must read the Branach User Instructions and the CAMP instruction set provided with the system. The distributor of this ladder must ensure that these instructions are provided with each ladder with the FC Fall Control option.
-
Page 3: Before Use
1. Before Use Ensure that you are fit enough to use a ladder and Fall Control System. ii. The user must be trained to properly fit and use a safety harness. iii. Visually check the ladder, Ropes and Fall Control devise are not damaged and are safe to use at the start of each working day. - Page 4 2. Inspecting the Branach Product Before Use Inspect the ladder after delivery. Before every use visually check the ladder is not damaged and is safe to use. If damaged, do not use the ladder. iii. The following items should be...
- Page 5 3. Ladder System Guidelines The maximum total load for the ladder without fall control option max. is 150kg.Including tools and equipment The maximum load of the system may be limited by the rating on the harness. The maximum load of the system for max.
-
Page 6: Positioning And Erecting The Ladder
4. Positioning and Erecting the Ladder The ladder shall be fully extended with the rungs or treads level with the ground. ii. The ladder must be erected on a firm, unmovable surface with a maximum gradient of 15°. iii. When positioning the ladder take into account the risk of collision with the ladder, e.g. -
Page 7: Using The Ladder
5. Using the Ladder ■ Do not exceed the maximum total load for the ladder. Refer to the ladder label. ■ Do not overreach; the user should keep their belt- buckle/navel inside the rails and both feet on the same step/rung throughout the task. ■... - Page 8 1metre (1m) above the landing point and secured if necessary. Only use the ladder in the direction indicated. Do not lean the ladder against unsuitable surfaces. For pole work use a Branach Pole Strap or Pole Chain combined with a Top Lash.
- Page 9 Do not stand on the top 3 steps/rungs of a leaning ladder. Ensure the latch has fully engaged the rung when extending the ladder. If the latch is not parallel with the ladder, adjust so it is engaged fully. Ensure ladder is at the correct angle. To set the angle, use the angle indicator marked on the rail and/or the bubble level in the TerrainMaster base.
- Page 10 Fall Control Setup Ladder Glossary Top Pulley Rope Termination Attachment Camp Rope Grab Rung Eyelet 3 Lock Carabiner Life-line Rope Work Positioning TerrainMaster Hook Descender Tethers...
-
Page 11: Initial Setup
6. Initial Set Up Take ladder from vehicle and lay on the ground, unclip rope bag from beneath the ladder. (Check rope bag ladder size is greater than or equal to the ladder size being used) ii. Take rope from the bag with termination end in hand. - Page 12 7. Rope Connection to Descender Insert rope termination into descenders top RH keyhole and pull fitting around until fitting is vertically aligned with the ladder. 8. Threading Pulley Run rope up the right hand side and fit the life- line rope through the top pulley attachment in an anti-clockwise direction.
- Page 13 9. TerrainMaster Deployment Slide the leg-lock latch towards the outside of the ladder.
- Page 14 10. Extend TerrainMaster Extend the TerrainMaster legs to their widest setting. ii. Depress the front and rear leg buttons to extend the leg. iii. Check that the lock buttons re-engage in the extended leg position. 11. Levelling Adjust the TerrainMaster step height to be similar to step distance.
- Page 15 12. Positioning Ladder Before standing ladder up check for hazards. ii. Stand ladder up against structure. iii. Extend the ladder to the final work position.
- Page 16 13. Complete Descender Roping Slide thumb catch Unlatch yellow Turn cover clockwise with arrows to right release lever. to expose rope hand side. entry slot. Create 20 cm of Turn cover plate Pull down on rope slack in the rope clockwise until to make sure it exits line, then insert...
- Page 17 14. Check Incline & Step Height 300mm +/-15mm Use level bubble Ensure there is a to ensure ladder is at 300mm +/-15mm step correct angle, and level to from ground to first terrain accordingly. Adjust rung. TerrainMaster wheels to ensure ladder level.
- Page 18 15. Tether Setup Select Anchor Point: Soft ground screw, masonry anchor, pole. iia. For pole attachment, attach ladder tethers around pole or onto structure iib. For ground or masonry attachment, drill into surface, insert ground screw or masonry anchor Release tether lever on Un-clip tether hook from rear side of ladder and housing.
- Page 19 Tether Zone If connecting to a ground attachment point, aim to be greater than 0.8m away from the ladder feet If connecting to a wall attachment point, aim to be within the range of 0 – 1.2m from the ground...
- Page 20 16. Attach Harness onto Fall Arrest Device Un-clip work position hook Attach chest harness point from life-line rope. to fall-arrest device. Never connect to the fall-arrest device via a lanyard or shock pack as this will increase fall distances and overload the ladder system.
- Page 21 Remove slack in life-line If performing pole work, rope by holding the fall- attach the top-lash to arrest device under the rung the pole. hook and pulling the rope line through the fall-arrest device.
- Page 22 17. Rescue BEFORE YOU BEGIN – Assess the position and condition of the worker and continue with rescue procedure if safe to do so. Firmly hold the free end of Pull the yellow release life-line rope in one hand. lever down to start Then partially pull out the lowering the user.
-
Page 23: Storage / Care
Repairs and maintenance shall be carried out by a competent person who has been qualified by Branach and shall be in accordance with Branach’s instructions and procedures. Only use Branach recommended components and fasteners. - Page 24 Inspect Level Stable Before Use Use level bubble TerrainMaster Secured Life-line Tethers Roped Correctly MANUFACTURED BY Branach Manufacturing Pty Ltd a 1/991 Mountain Highway, Boronia, Victoria 3155, Australia w branach.com BRANACH EUROPE e sales@branach.com.au w branacheurope.com INTERNATIONAL DISTRIBUTORS w branacheurope.com/distributors...