Table of Contents
Advertisement
Quick Links
2009 – Current Ram Truck Qi Wireless Charging Kit
Please read thoroughly before starting installation and check that kit contents are complete.
Items Included in the Kit:
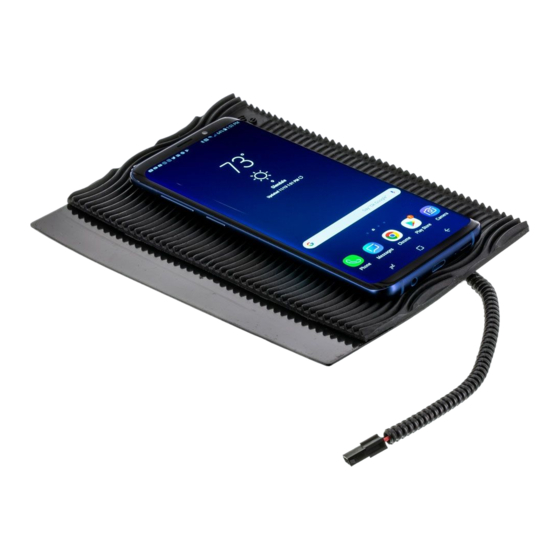
Q i Wireless Charging Module with
Ram Specific Substrate and Mat
Power Harness with 3 amp Fuse
2 – Flat Head Torx 1" Screws
These Instructions with Template
Removable Consumer Product Label
*Note this product is designed to work with Qi compatible devices. Please confirm that
your device is Qi compatible before installation. Visit
compatibility guide.
Safety Precautions:
Work in well ventilated area that is clear of obstructions.
●
Secure vehicle with tire chucks in both front and rear of tires.
●
Turn vehicle accessories OFF and ensure ignition key is in OFF position.
●
Wear safety goggles and snug fitting clothes.
●
Use tools only for their intended purpose and which are in good repair.
●
Only perform this task if confidence, skill, and physical ability permit.
●
NOTE: We strive to provide accurate and up-to-date installation instructions.
1260 Instructions 3-15-18.docx
I NSTALLATION INSTRUCTIONS
(Kit # FDMC-1260)
Tools & Supplies Needed:
P lastic Trim Removal Tool
T-10 Torx Driver
Phillips Screwdriver
Center Punch/Scribe Tool
Power Drill
1/8'' and 1/2" Drill Bits
Soldering Iron & Solder
Tape or Heat Shrink Electrical Tubing
Page 1 of 5
( Recommended)
w ww.brandmotion.com
for phone
Advertisement
Table of Contents

Related Manuals for Freedom Charge FDMC-1260

Summary of Contents for Freedom Charge FDMC-1260
- Page 1 I NSTALLATION INSTRUCTIONS 2009 – Current Ram Truck Qi Wireless Charging Kit (Kit # FDMC-1260) Please read thoroughly before starting installation and check that kit contents are complete. Items Included in the Kit: Tools & Supplies Needed: Q i Wireless Charging Module with ...
- Page 2 I NSTALLATION INSTRUCTIONS Step 1: Remove rubber tray liner from front storage tray. Step 4: Use a Plastic Trim Removal Tool to remove upper console trim. Step 2: Use a Phillips Screwdriver to remove (2) Phillips screws. Step 5: Cut out provided template and mark location for 1/2”...
- Page 3 I NSTALLATION INSTRUCTIONS Step 6: Drill 1/2” hole through rubber mat and upper console trim. Step 7: D isconnect power point plug from vehicles console. Step 9: Route black connector of Charging Module through 1/2" hole of rubber tray liner.
- Page 4 Step 11: Connect Power Harness to Charging Module. Step 14: S wing Charging Module away and Step 12: P lace Freedom Charge Module and Drill (2) 1/8” holes through rubber tray liner rubber tray liner into upper console trim.
- Page 5 I NSTALLATION INSTRUCTIONS Step 16: Install Non-Slip Freedom Charge Mat to Wireless Charging Module. P lace the 4 locator pins in corresponding holes. Step 17: Test system. LED light will illuminate Blue once accessories are on. Once Qi equipped device is placed on Freedom Charge LED will illuminate Green and charging begins....
Need help?
Do you have a question about the FDMC-1260 and is the answer not in the manual?
Questions and answers