Advertisement
Quick Links
4
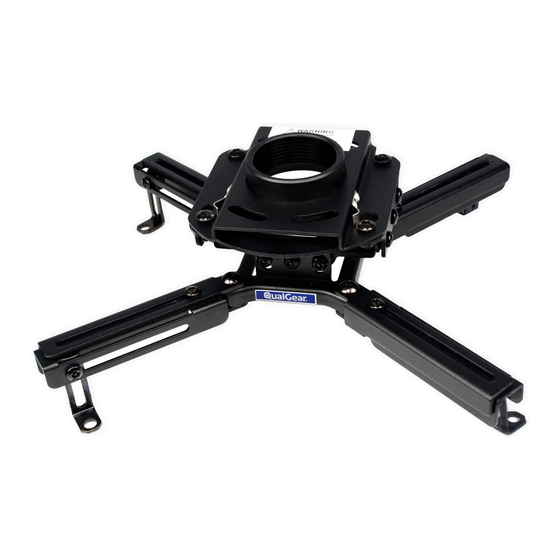
Adjustments
20
20
For a perfect viewing experience, make adjustments
by loosening the screws slightly on the projector mount and
tighten them to secure the position with an allen key.
Roll ±8°, Pitch ±20°, Rotate 360°
HEAVY!
Use an assistant for this step.
IMPORTANT!
Do not loosen screws all the way when making adjustments, this will disconnect the
parts and may cause injury or property damage.
1.5" NPT Pipe
(not included)
8
8
Scan the QR Code™ below
for more info about this product:
QG-PRO-PM-50-B
QG-PRO-PM-50-W
CAUTION!
32kg
Do not exceed the maximum rated weight
(70lbs)
specified. Otherwise, serious injury or
RATED
property damage may occur.
5 Year Limited Warranty
5 Year Limited Warranty
Version August 2017
Version August 2017
Advertisement

Related Manuals for QualGear QG-PRO-PM-50-B


Summary of Contents for QualGear QG-PRO-PM-50-B
- Page 1 QG-PRO-PM-50-B Adjustments QG-PRO-PM-50-W 1.5" NPT Pipe (not included) Scan the QR Code™ below For a perfect viewing experience, make adjustments for more info about this product: by loosening the screws slightly on the projector mount and tighten them to secure the position with an allen key.
- Page 2 Before starting installation, please check that all parts shown in this checklist are included. If any parts are missing or damaged, contact your local distributor or support@qualgear.com for replacement parts and do not start assembly and installation WARNING until you receive all the parts.
- Page 3 Connecting the Pipe to the Projector Plate Making Adjustment for Mounting To connect a 1.5" NPT pipe to the projector plate, twist the male threaded end of the pipe into the female thread on Adapter the projector plate. Allen Key (D) Screws (K) 1.5"...
- Page 4 Attaching the Projector Mount to the Projector Screws (E/ F/ G/ H) Allen Key (C/ D) Projector Plate Washers (I) For screws (E or F) only Click! Projector (not included) Slide projector assembly into the projector plate until you hear a click. Use washers (I) only when NOTE using screws (E or F).
Need help?
Do you have a question about the QG-PRO-PM-50-B and is the answer not in the manual?
Questions and answers