Advertisement
Advertisement
Table of Contents

Related Manuals for Olsson Little Hill

Summary of Contents for Olsson Little Hill
- Page 1 Little Hill INSTRUCTION MANUAL 1.0 Olsson Amplification 2019 – www.olssonamps.com...
- Page 2 This amp sounds great at both, bedroom volume levels and at high volume levels. We are sure that you will love your new Little Hill amplifier. If you have any questions or need assistance don’t hesitate to email us at info@olssonamps.com or call. See our...
-
Page 3: Important Safety Instructions
• Vacuum tube amplifiers generate heat. Maintain at least 25 cm of unobstructed air space behind the unit to allow for proper ventilation and cooling of the unit. Keep away from curtains or any flammable objects. • WARNING: To prevent damage, fire or shock hazard, do not expose this unit to rain or moisture. • Unplug the power supply cord before cleaning the unit exterior (use a damp cloth only). Wait until the unit is completely dry before reconnecting to power. • Never touch a hot vacuum tube. • This product should be located away from heat sources such as radiators, heat registers, or other products that produce heat. • Protect the power supply cord from being pinched or abraded. • Never operate the amplifier without a connected speaker or load since this can cause severe damage to the amplifier. • The power supply cord of this product should be unplugged from the outlet when left unused for a long period of time, or during electrical storms. • This product should be serviced by qualified service personnel when: the power supply cord or the plug has been damaged; or objects have fallen; or liquid has been spilled onto the product; or the product has been exposed to rain; or the product does not appear to operate normally or exhibits a marked change in performance; or the product has been dropped, or the enclosure damaged. • Do not drip or splash liquids, nor place liquid filled containers on the unit. • CAUTION: No user serviceable parts inside, refer servicing to qualified personnel only. • Olsson amplifier and loudspeaker systems are capable of producing very high sound pressure levels, which may cause temporary or permanent hearing damage. Use care when setting and adjusting volume levels during use. -
Page 4: Viktiga Säkerhetsinstruktioner
• Rörförstärkare avger värme. Se till att det finns minst 25 cm fritt utrymme bakom förstärkaren, detta för att säkerställa en ordentlig ventilation och kylning av enheten. Håll apparaten borta från gardiner och annat brandfarligt material. • VARNING: För att undvika skada, eldsvåda eller elektrisk chock, utsätt inte apparaten för regn eller fukt. • Dra ur nätsladden från vägguttaget innan du rengör utsidan av apparaten (använd endast en fuktig trasa). Vänta sedan till apparaten torkat helt innan du ansluter nätsladden igen. • Ta aldrig på ett varmt elektronrör. • Produkten skall hållas på ordentligt avstånd från värmekällor såsom radiatorer, varmluftsutblås eller andra apparater som alstrar värme. • Skydda nätsladden från att bli klämd eller skadad. • Använd aldrig förstärkaren utan ansluten högtalare eller motsvarande last då detta kan orsaka allvarlig skada på förstärkaren. • Nätsladden skall dras ur nätuttaget när förstärkaren inte kommer att användas under en lång tid eller vid åskväder. • Denna produkt skall ses över av kvalificerad servicepersonal när: nätsladden eller nätkontakten har skadats; eller om föremål har ramlat over den; eller om vätska har spillts över produkten; eller om produkten utsatts för regn; eller om produkten inte verkar fungera normalt eller att prestandan skiljer sig från det normala; eller om produkten tappats eller om höljet skadats. • Droppa eller stänk inte vätska på apparaten. Ställ heller inga föremål som innehåller vatten på den. • VARSAMHET: Inga delar inuti apparaten kan repareras av användaren, anlita kvalificerad servicepersonal. Förstärkare och högtalarsystem från Olsson Amps kan producera höga ljudnivåer som kan orsaka temporära eller permanenta hörselskador. Var försiktig vid inställning och justering av ljudvolymen. - Page 5 1 Before operating the amp • Olsson Amps disclaims any liability or responsibility whatsoever for any damage or defect to this and other devices resulting from misuse. • Before you plug the Little Hill into a mains power outlet, make sure its POWER and MUTE switches are off. • Connect the amplifier to a grounded AC outlet in accordance with the voltage and frequency ratings specified for your amplifier. • Make sure that a speaker is connected to the speaker jack. Never operate the amplifier without a speaker connected. Make sure the impedance matching is correct. This amp is designed for a 4, 8 or 16 ohms load. • Connect your instrument to the INPUT jack. • Set the POWER switch to position ON. • Make sure that the Volume controls are set at 7 o’clock (no volume) • Set the MUTE switch to ON. The amplifier is now ready for use. 2 Connection and Control features The Little Hill features Gain and Volume control for the lead channel. Think of Gain and Volume as some sound-shaping controls rather than volume controls. They let you voice the Little Hill’s lead channel in different ways. The best way to discover the amp’s sonic possibilities is to experiment: set all tone control knobs to the 12 o’clock position and then adjust the Gain/Volume settings to get different type of pre/power tube distortion. To avoid very loud surprises, make a habit of backing the Volume knob of the guitar connected to the Little Hill all the way down before switching on the amp.
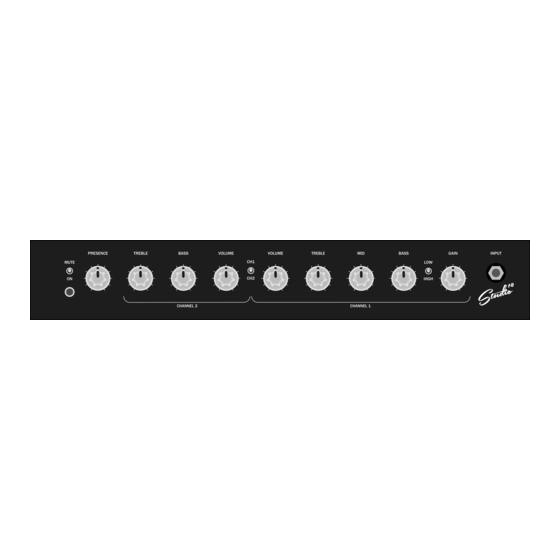
- Page 6 CLEAN Channel CH2 The clean channel is an old school type of channel with separate bass and treble controls. TREBLE, BASS High and low frequency tone controls. VOLUME Pre-amp volume control. CH1/CH2 Selects either the LEAD Channel (CH1) or the CLEAN Channel (CH2). When connecting a foot switch set the CHANNEL switch in position CH1 to get the foot switch to work. LEAD Channel CH1 The LEAD channel delivers many different kinds of harmonically distorted tube sounds depending on gain settings. VOLUME This knob adjusts the LEAD channel’s volume. First set the GAIN to the 9 o’clock position. If you wish to get creamy lead tones, turn the knob well up to dial in smooth power amp saturation. If you’re looking for an edgier metal sound, try backing off the VOLUME knob and turning up the GAIN knob. Usually smooth power amp saturation is less desirable for this type of metal tone. TREBLE, MID, BASS High, middle and low frequency controls. LOW/HIGH In low position the input sensitivity is lower than in high mode. Also a bit more bottom end is added in Low mode. GAIN This knob adjusts the amount of tube distortion. To explore the fantastic range of sounds that this channel puts at your fingertips, we recommend that you first set the GAIN knob to around 10 o’clock position, and then experiment with the guitar’s volume knob and pickup selector. INPUT Connect your guitar to this input. You must use a shielded cord of good quality. 2.2 Rear panel Serial FX Loop The Little Hill is equipped with a series FX loop. The effects loop is connected...
- Page 7 between the pre-amp and the power-amp. Connect your external FX gear input to the Little Hill SEND jack, and the FX output to the Little Hill RETURN jack. The effect loop can be bypassed by the switch between the SEND and RETURN jacks, or by the FOOT SWITCH. The FX loop has separate levels for send and return levels. Adjust the send level to match the connected devices and then adjust the return level for unity gain. You can also use the effects loop as booster. Set the SEND level at 5 o’clock (max) and the RETURN level at 13 o’clock or more. Now turn the effects loop on and you will have an increased volume. This is very useful for soloing. Note that you should set the SEND level as high as possible and the RETURN level as low as possible to minimize the noise. SEND LEVEL Output level to external devices. SEND Output jack to external device. This is the output from the pre-amp. BYPASS FX loop bypass switch. This is a true bypass circuit. RETURN Input jack from external device. This is the power-amp input. RETURN LEVEL Input level from external devices. FOOT SWITCH Connect the supplied footswitch to this jack. Set the channel switch at the front to CH1 and the FX loop bypass switch to ACTIVE. If you don’t do this, the footswitch will not work. LOUDSPEAKERS There are three speaker outputs available on the rear panel. They are labeled according to the intended speaker cabinet impedance. Use a cable between the amp and the cabinet made for speaker purposes. WARNING, although the Little Hill has three speaker outputs connect only one speaker cabinet with the correct impedance, at a time. POWER ON Amps main power switch. MAINS INPUT with MAIN FUSE Connect the included power cord in accordance with the voltage and frequency ratings listed on the rear panel of the amplifier.
-
Page 8: Changing Tubes
4 Changing tubes When changing power tubes, there is no need for adjusting the bias, make sure to use a matched pair of EL84’s of good quality. Remember that tube change is always a job for qualified professionals! -
Page 9: Technical Specifications
LH20 5 Technical Specifications Model: 230/240V 50/60Hz Voltage: 100W Power requirements: 20W RMS into 4, 8 or 16 Ohms T1A Fuse: Power output: Input impedance: >1MΩ Output impedance: 4Ω / 8Ω /16Ω Footswitch (included): 2-button, Channel / FX loop Tubes: 4x12AX7 preamp tubes , 2xEL84 power tubes 10kg (18.08lb) Weight: Height: 220mm (8.66”) Width: 230mm (9.06”)
Need help?
Do you have a question about the Little Hill and is the answer not in the manual?
Questions and answers