Permobil R-net LCD User Manual
Hide thumbs
Also See for R-net LCD:
- User manual (75 pages) ,
- User manual (32 pages) ,
- User manual (24 pages)
Table of Contents
Advertisement
Advertisement
Table of Contents

Related Manuals for Permobil R-net LCD


Summary of Contents for Permobil R-net LCD
- Page 1 User manual British English R-net LCD (CJSM2)
- Page 3 Introduction This user manual covers the functions of your R-net LCD (CJSM2) control panel and is intended as an extension to your power wheelchair’s user manual. Please read and follow all instructions and warnings in all manuals supplied with your power wheelchair and its accessories. Incorrect use may both injure the user and damage the wheelchair.
- Page 4 Text Produced and published by Permobil Edition: 1 Date: 2019-12-16 Order no: 336577 eng-UK...
- Page 5 Regus 6th floor 2 Kingdom Street Email: info@permobil.uk Paddington W2 6BD London United Kingdom Head office of the Permobil group Permobil AB Per Uddéns väg 20 SE 861 36 Timrå Sweden +46 60 59 59 00 Tel.: Fax: +46 60 57 52 50 Email: info@permobil.com...
-
Page 7: Table Of Contents
Contents R-net LCD (CJSM2) Warnings..............................9 R-net LCD control panel ...........................11 Charging socket ..........................13 Buttons and paddle switches .........................13 Jack sockets ............................18 Display..............................18 Bluetooth® mode ..........................28 IR mode.............................41 Locking and unlocking the control system....................52 Seat functions.............................53 ConnectMe ...............................59 Important information..........................59 Flight mode............................61... -
Page 9: Warnings
R-net LCD (CJSM2) Warnings 1 Warnings WARNING! Environmental conditions Protect the wheelchair from exposure to any type of moisture, including rain, snow, mud or spray. If any of the covers or the joystick boot has cracks or tears, it must be replaced immediately. - Page 10 R-net LCD (CJSM2) Warnings...
-
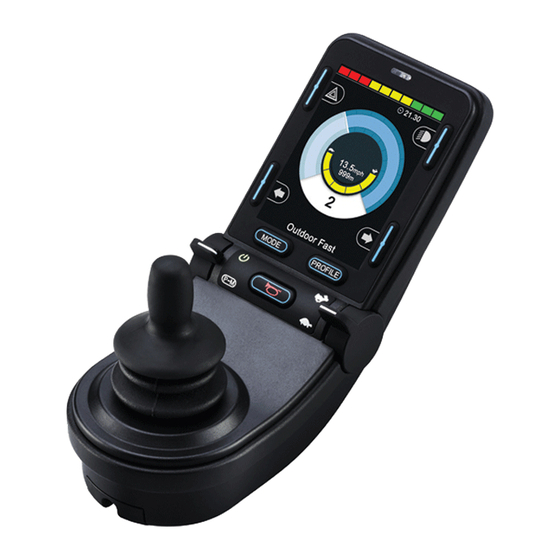
Page 11: Net Lcd Control Panel
R-net LCD (CJSM2) R-net LCD control panel 2 R-net LCD control panel A. Hazard flashers on or off. B. Headlights on and off. C. Screen. D. Left indicators. E. Right indicators. F. Mode button. G. Profile button. H. Main power On or Off; mode or profile selector. - Page 12 R-net LCD (CJSM2) R-net LCD control panel The overview image on the preceding page shows the basic functions of the control panel. All buttons, toggle switches and the joystick may have additional functionality. The charging socket is located on the front of the panel Figure 2 Charging socket Two jack sockets are located on the base of the panel.
-
Page 13: Charging Socket
R-net LCD (CJSM2) R-net LCD control panel Charging socket This socket may only be used for charging or locking the wheelchair. Do not connect any type of programming cable to this socket. Do not use the socket as a power supply for any other electrical device. - Page 14 R-net LCD (CJSM2) R-net LCD control panel 2.2.1 Power, mode and profile paddle The paddle switch is used to switch the control system on or off. Push the paddle forward to switch the power on and pull it backwards to switch the power off.
- Page 15 R-net LCD (CJSM2) R-net LCD control panel 2.2.2 Maximum speed paddle This paddle decreases or increases the wheelchair’s maximum speed. The maximum speed indicator on the display shows the current setting. Push the paddle forward to increase the setting and backwards to decrease the setting.
- Page 16 R-net LCD (CJSM2) R-net LCD control panel 2.2.5 Profile button The profile button allows the user to navigate through the profiles available for the control system. The number of profiles available depends on how the control system is programmed. Figure 8. Profile button.
- Page 17 R-net LCD (CJSM2) R-net LCD control panel 2.2.6.2 Lights button and screen symbol Only active if the wheelchair is fitted with lights. This button switches the wheelchair lights on or off. Push the button to switch the lights on and push it again to switch them off. When on, the lights screen symbol lights up.
-
Page 18: Jack Sockets
R-net LCD (CJSM2) R-net LCD control panel Jack sockets The external On/Off switch jack (A) allows the user to turn the control system on or off using an external device such as a buddy button. The external profile switch jack (B) allows the user to select profiles using an external device, such as a buddy button. - Page 19 R-net LCD (CJSM2) R-net LCD control panel 2.4.1 Screen symbols The R-net drive screen has common components that always appear and components that only appear under certain conditions. A. Speedometer B. Profile name C. Battery indicator D. Clock E. Maximum speed indicator F.
- Page 20 R-net LCD (CJSM2) R-net LCD control panel 2.4.2 Battery indicator This displays available battery charge and can be used to alert the user of the status of the battery. • Steady light: everything is in order. The display shows battery status (from left to right): •...
- Page 21 R-net LCD (CJSM2) R-net LCD control panel 2.4.4 Current profile The profile number describes which profile the control system is currently operating in. The profile text is the name or description of the profile the control system is currently operating in.
- Page 22 When this symbol occurs, drive slowly or stop Figure 22. Motor temperature. the wheelchair. Permobil recommends that you drive slowly for a short period after the symbol has disappeared to prevent unnecessary strain on the wheelchair. If the symbol occurs multiple times and the wheelchair is not being driven in any of the conditions mentioned in , there might be something wrong with the wheelchair.
- Page 23 R-net LCD (CJSM2) R-net LCD control panel 2.4.10 Hourglass This symbol is displayed when the control system is changing states. An example would be entering into programming mode. The symbol is animated to show sand falling. Figure 23. Hourglass. 2.4.11...
- Page 24 R-net LCD (CJSM2) R-net LCD control panel 2.4.12.1 Time The following section describes submenus related to Time. Set Time allows the user to set the current time. Display Time this sets the format of the time display or turns it off.
- Page 25 R-net LCD (CJSM2) R-net LCD control panel 2.4.12.3 Backlight The following section describes submenus related to Backlight. Backlight this sets the backlight on the screen. It can be set between 0% and 100%. Auto Backlight the joystick module contains an ambient light sensor to automatically adjust screen brightness.
- Page 26 R-net LCD (CJSM2) R-net LCD control panel 2.4.12.5 IR Setup Applies to control panels equipped with integrated IR. A right deflection of the joystick will enter a sub-menu for learning and deleting IR codes. Refer to the IR section for more details; see...
- Page 27 R-net LCD (CJSM2) R-net LCD control panel 2.4.12.6 Programming The following section describes submenus related to Programming. Sleep sets the time after which the control system will go to sleep if an input device command is not received. Sounder Volume sets the volume of the sounder used to indicate button presses.
-
Page 28: Bluetooth® Mode
R-net LCD (CJSM2) R-net LCD control panel Diagnostics allows the user to read diagnostic information from the control system. Figure 27. Two examples from the Diagnostic screen. Timers enables the user to view how many hours the chair has been driven for. - Page 29 R-net LCD (CJSM2) R-net LCD control panel 2.5.1 General When a wheelchair is delivered equipped with a control panel containing Bluetooth®, the Bluetooth® functions are pre- programmed to a basic setup. This setup is described below. The basic setup is prepared for pairing of up to four Bluetooth®...
- Page 30 R-net LCD (CJSM2) R-net LCD control panel 2.5.2.1 Settings Menu Press the hazard flasher button for 2 seconds in order to open the Settings Menu. Select Bluetooth®. Figure 28. Select Bluetooth® to get access the submenu. The screen now displays the submenu as illustrated.
- Page 31 R-net LCD (CJSM2) R-net LCD control panel 2.5.2.2 Pairing setup The control panel Bluetooth® must then be put into Discovery Mode by following this sequence description: • Deflect the joystick in a forward direction and hold until there is a beep. This takes approximately 10 seconds; then release.
- Page 32 R-net LCD (CJSM2) R-net LCD control panel 2.5.2.4 Pairing with a PC The following process should be carried out on a PC: • Open the window where you can select a Bluetooth® device to add to the PC. The name and path will differ slightly for different versions of Windows.
- Page 33 R-net LCD (CJSM2) R-net LCD control panel 2.5.2.6 Pairing with iDevice® The following process should be carried out on the iDevice®. • Select settings and set Bluetooth® to on. • Select R-net iDevice® X from the list of available devices.
- Page 34 R-net LCD (CJSM2) R-net LCD control panel 2.5.3.2 To enter Bluetooth® mode Joystick module with 2.8" screen is more compact and lacks Mode and Profile buttons. Press button Mode button (A) a number of times until Bluetooth® mode is entered or press and hold key B for more than 2 seconds to enter Bluetooth®...
- Page 35 R-net LCD (CJSM2) R-net LCD control panel When a Bluetooth® device is selected, the screen will show an icon representing the chosen device type. If only one Bluetooth® device is enabled, this screen will appear as soon as Bluetooth® mode is activated.
- Page 36 R-net LCD (CJSM2) R-net LCD control panel 2.5.3.3 Operating buttons in Bluetooth® mode A. Access settings, page 37. B. Return to drive mode, page 37. C. Left mouse click, page 38. D. Right mouse click, page 38. E. Scroll up or down, page 38.
- Page 37 R-net LCD (CJSM2) R-net LCD control panel Buttons A to D, paddle switch E and joystick F, as shown in the previous overview illustration, have predefined functions when a Bluetooth® device is selected in Bluetooth® mode. The functions are described below.
- Page 38 R-net LCD (CJSM2) R-net LCD control panel 2.5.3.6 C – left mouse click Press button to perform a left mouse click. Figure 37. Left button for left mouse clicks. 2.5.3.7 D – right mouse click Press button to perform a right mouse click.
- Page 39 R-net LCD (CJSM2) R-net LCD control panel 2.5.3.9 F – joystick functions Move cursor in desired direction by deflecting the joystick. Nudge forward to scroll up. Nudge back to scroll down. Left mouse click; left nudge. Right mouse click; right nudge.
- Page 40 R-net LCD (CJSM2) R-net LCD control panel 2.5.4 Notes - Bluetooth® mode settings changed after delivery Function Button, toggle switch or joystick...
-
Page 41: Ir Mode
R-net LCD (CJSM2) R-net LCD control panel IR mode Applicable only for R-net control panels with integrated IR, 3.5” or 2.8” colour display with IR. 2.6.1 General The infrared control, integrated in the joystick module, makes it possible to replicate commonly used IR devices, such as remote controls for TV, audio, cable, satellite or environmental controls. - Page 42 R-net LCD (CJSM2) R-net LCD control panel 2.6.2 IR setup IR Setup menu can be accessed via the Settings Menu; see 2.4.12 Settings Menu , Page 23. On entering the IR Setup menu, the default appliances will appear. When an appliance is selected, its commands are shown.
- Page 43 R-net LCD (CJSM2) R-net LCD control panel 2.6.3 Learning an IR code The IR receiver is located above the screen on the control panel, marked with an A in the figure. When learning a code, the remote control device must be held so that its IR transmitter points towards the IR receiver on the control panel, i.e.
- Page 44 R-net LCD (CJSM2) R-net LCD control panel The commands for the appliance will appear on the screen as shown in the figure. Select a command to learn. In this example; Channel Up will be selected from the TV MENU. Figure 45. The screen displayed when an appliance has been selected.
- Page 45 R-net LCD (CJSM2) R-net LCD control panel Point the TV remote control towards the control panel’s IR receiver and press the channel up button twice. Figure 47. Point the remote control at the IR receiver. Press the button twice. If the Learn Code operation has been successfully completed, a green tick will be displayed on the screen.
- Page 46 R-net LCD (CJSM2) R-net LCD control panel If the Learn Code operation fails, a red cross will be displayed on the screen. Please retry the Learn Code operation. Figure 49. Learning operation unsuccessful. After the code has been learned, scroll down to highlight Exit.
- Page 47 R-net LCD (CJSM2) R-net LCD control panel 2.6.4 Learning sequenced IR codes Multiple IR codes can be learned for a single command in the IR Setup menu. This enables multiple IR codes to be transmitted through a single command when in IR mode.
- Page 48 R-net LCD (CJSM2) R-net LCD control panel 2.6.4.1 Create a sequence • Select the command to use as the sequence initiator. In this example, TV – ON. • Select Learn Code, by deflecting the joystick to the right while the command is highlighted.
- Page 49 R-net LCD (CJSM2) R-net LCD control panel 2.6.5 Enabling and disabling IR codes IR codes can be enabled or disabled in the IR Setup menu. If a code is disabled, it will not transmit and will not appear in IR mode.
- Page 50 R-net LCD (CJSM2) R-net LCD control panel 2.6.6 Deleting IR codes To delete an IR code for a specific command, highlight the command in the appliance menu and deflect the joystick to the right. Then select the Delete Code option.
- Page 51 R-net LCD (CJSM2) R-net LCD control panel To delete all IR codes stored in the control panel, select Delete All Codes within the IR Setup menu. Figure 55. Delete all codes from the IR Setup menu.
-
Page 52: Locking And Unlocking The Control System
R-net LCD (CJSM2) R-net LCD control panel Locking and unlocking the control system 2.7.1 Locking • Switch the control system on and move the paddle backward. • After 1 second, the control system will beep. Now release the Figure 56. The lock symbol is displayed when the paddle. -
Page 53: Seat Functions
R-net LCD (CJSM2) R-net LCD control panel Seat functions 2.8.1 Not applicable to all seat models On some seats, the powered functions can be controlled using the control panel joystick. Some models can memorise three seat positions. The seat adjustment mechanism stores each memorised seat position. - Page 54 R-net LCD (CJSM2) R-net LCD control panel 2.8.2 Manoeuvring the seat 1. Press the Mode button once or more times until a seat function icon appears in the control panel display. 2. Move the joystick to the left or right to select a seat function.
- Page 55 R-net LCD (CJSM2) R-net LCD control panel 2.8.2.1 Return to drive mode Press the Mode button once or more times until a standard display image with a speed indicator appears in the control panel display. Figure 58. Standard display image with speed...
- Page 56 R-net LCD (CJSM2) R-net LCD control panel 2.8.3 Memory 2.8.3.1 Retrieving position from memory Some seat control systems can memorise three seat positions. The seat adjustment mechanism stores each memorised seat position. This makes it easy to retrieve a seat position saved earlier.
- Page 57 R-net LCD (CJSM2) R-net LCD control panel 2.8.3.2 Return to drive mode Press the Mode button once or more times until a standard display image with a speed indicator appears in the control panel display. 2.8.3.3 Saving a seat position to memory 1.
- Page 58 R-net LCD (CJSM2) R-net LCD control panel 2.8.4 Return to drive mode Press the Mode button once or more times until a standard display image with a speed indicator appears in the control panel display. Figure 61. Save function activated.
-
Page 59: Connectme
• for safety research or wheelchair diagnosis purpose; • in response to an official request by law enforcement or other government agency; • for use in dispute resolution involving Permobil, its affiliates or sales/ service organisation; and • as otherwise required or permitted by law. - Page 60 R-net LCD (CJSM2) ConnectMe WARNING! Flight mode The ConnectMe device contains a radio transmitter. In certain areas radio transmission is not allowed and ConnectMe must be set to flight mode, see 3.2 Flight mode . Examples of these types of areas include, but are not limited to: •...
-
Page 61: Flight Mode
R-net LCD (CJSM2) ConnectMe Flight mode ConnectMe contains a radio transmitter. In certain areas, radio transmission is not allowed and ConnectMe must be set to flight mode. 3.2.1 Activating flight mode 1. Turn the powered wheelchair ON. 2. Go into seat mode by using the mode button on the joystick or Omni display. - Page 62 R-net LCD (CJSM2) ConnectMe 4. Push and hold the input device left for 15 seconds. A beep will sound. Figure 63. Push and hold left for 15 seconds.
- Page 63 R-net LCD (CJSM2) ConnectMe 5. The message “Flight Mode ON” is shown on the display and the ConnectMe’s transmitting modem is off. The message will continue to show on the display as long as the flight mode is active. However, the wheelchair will work as normal.
- Page 64 R-net LCD (CJSM2) ConnectMe 7. Push and hold the input device forward, or give and hold an equivalent command, for 5 seconds. Figure 65. Give and hold a forward command for 5 seconds.
- Page 65 R-net LCD (CJSM2) ConnectMe 8. The yellow arrows will disappear and the message “Flight Mode ON” is shown on the display and the ConnectMe’s transmitting modem is off. The message will continue to show on the display as long as the flight mode is active. However, the wheelchair will work as normal.
- Page 66 R-net LCD (CJSM2) ConnectMe 2. Go into seat mode by using the mode button on the joystick or Omni display. If the control panel does not have a mode button, use the left paddle switch for mode selection. A switch plugged into the 1/8”...
- Page 67 R-net LCD (CJSM2) ConnectMe 4. Push and hold the input device left for 15 seconds. A beep will sound. Figure 68. Push and hold left for 15 seconds.
- Page 68 R-net LCD (CJSM2) ConnectMe 5. The message ”Flight Mode ON” will disappear indicating that the flight mode is OFF. ConnectMe is now fully operational again. Figure 69. Flight mode is off. 6. Continue from here for an Omni programmed for switched...
-
Page 69: Turning Off Connectme Completely
R-net LCD (CJSM2) ConnectMe 7. Push and hold the input device forward, or give and hold an equivalent command, for 5 seconds. Yellow arrows will appear, indicating that the ConnectMe’s transmitting modem is back on and that the flight mode is OFF. -
Page 70: Eu Declaration Of Conformity
R-net LCD (CJSM2) ConnectMe EU declaration of conformity Permobil hereby declares that the radio equipment type ConnectMe is in compliance with Directive 2014/53/EU. The full text of the EU declaration of conformity is available at the following internet address: https://legal.permobil.com/declaration-of-conformity/EU- ConnectMe.pdf... -
Page 71: Product Approval
R-net LCD (CJSM2) ConnectMe Product approval ConnectMe fulfils the requirements of the following standards: EN 14971 EN 303 413 EN 60601-1 + A1 EN 50 665 EN 300 328 EN 62311 EN 301 489-1 ISO 7176-9 EN 301 489-17 ISO 7176-14...
Need help?
Do you have a question about the R-net LCD and is the answer not in the manual?
Questions and answers