
Related Manuals for Deepace KC901V


Summary of Contents for Deepace KC901V
-
Page 1: Table Of Contents
Contents Introduction Installation guide 1.1 How to choose batteries 1.2 How to Install Batteries 1.3 How to mount shoulder Strap 1.4 How to carry and hold Quick guide 2.1 Power switch and keyboard 2.2 Measuring ports 2.3 Auxiliary ports 2.4 Function description 2.5 Adjust operating state 2.6 Local oscillation mode 2.7 Set the basic testing parameter... -
Page 2: Introduction
Combining intelligence in the community, KC901V is the tool to study RF for stu- dents and hobbies. In professional situations, it is used in communication engineering, antenna manufacturing, daily maintenance of broadcast, RF circuits development and so on. - Page 3 Keep it from children. When KC901V is lent to someone else, urge the borrower to read the user manual first and inform him/her the safety information before using...
- Page 4 In the allowance of the law, KECHUANG and MEASALL will NOT take any respon- sibility of the loss which beyond KC901V’s own price in any situations. Meanwhile, we also will NOT take the responsibility of any direct/indirect loss from the terms of time, business, inconvenience, profit and abuse maintenance etc.
-
Page 5: Installation Guide
Thought KC901V can work with two or four batteries, four-batteries set is pre- ferred. The rated charging current of KC901V is 1A. If there are only two batteries, for single battery, the peak charging current is 1.2A. Peak discharging current is 1.5A; if there are 4 batteries, charge/discharge load should be considered according to the current which is lightly higher than the ones mentioned above. - Page 6 Chart 1-1 Step 2: pull the keyboard side of the shell and slide it 2cm out from the bottom (Chart 1-2). To do it, your fingers must hold the two sides of the shell hard and put the RF adapter out at the same time. If it’s really hard to slide it, you can knock the bottom on the lower shell lightly.
-
Page 7: How To Mount Shoulder Strap
Step 3: lift the upper shell lightly, and then turn it around to the left side. Step 4: Install the batteries. Batteries’ positive poles should be heading toward the RF adapter. If there are only two batteries be installed, install them separately to the most left side and the most right side. -
Page 8: How To Carry And Hold
Be careful that the instrument may hit the body when carrying it with the strap laying over on the shoulder. KC901V is designed to be held with left hand and be operated with right hand. So when you are using while standing, the instrument should be held on its left-upper part with left hand and the thumb is in charge of operating the knob. -
Page 9: Quick Guide
Chapter Two Quick Guide With the help of the community, KC901V’s designers have tried their best to make the it easily and straightaway to operate the instrument. User who has basic related knowledge can be familiar with using KC901V within two days. Therefore, this user manual is simplified and will not detail the settings of every function. -
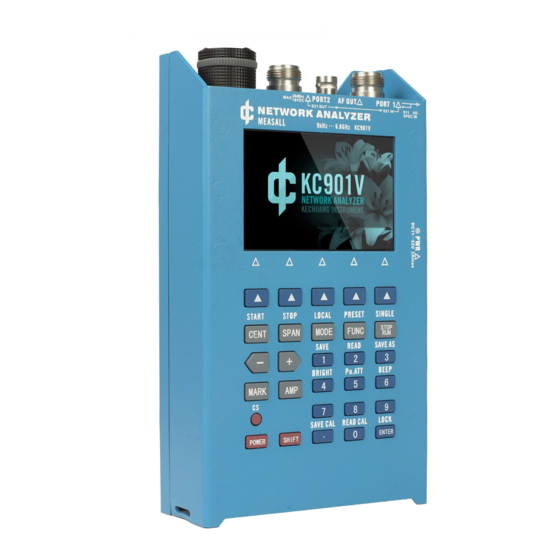
Page 10: Measuring Ports
Chart 2-2 2.2 Measuring Ports There are three signal ports in KC901V. Two RF ports, one AF port. The far right one is the input/output port for testing specturm and reflection. The far left one is the output port for transmission measurement and the output of RF signal source. -
Page 11: Auxiliary Ports
TF card slot, RJ45 Ethernet port, power input jack, and USB port. (Shown as Chart 2-5) Chart 2-5 Ports from the right side 2.4 Function Description Six basic functions of KC901V Reflection test (S11) Transmission test (S21) Spectrum (SPEC) - Page 12 RF signal source (RF SOURCE) Audio signal source (AF SOURCE) MODE button is for function selection. Function can be switched by pressing MODE repeatedly. In most situations, user can switch back to the function menu/function selection menu by just pressing MODE, it can be used as a HOME button.
-
Page 13: Adjust Operating State
DC block which are con- catenated with KC901V while detecting the transmitter. After some experience, users can use field strength mode to quickly judge if radio station’s emission is strong enough. -
Page 14: Local Oscillation Mode
Single sweeping mode. Instrument sweeps only once with each RUN/STOP press. continuous sweeping mode. Instrument will do the constant sweeping. In the single sweep mode, this sign will also be shown while sweeping. Stop sweeping. RF circuit’s power will be cut entirely. If the main setting parameters are changed when not sweeping, instrument will scan once automatically. -
Page 15: Filed Strength Mode Setting
It’s for observing the transient strength change of signal strength. Attention KC901V is a network analyzer, so there is no protection for local oscillation’s leak. If used for observing the spectrum or field strength, there must be local oscillation signal flow into the receiving antenna and its strength degree can reach -30dBm. -
Page 16: Insertion Loss Mode
2.9 Insertion Loss Mode Insertion loss test is actually a single point S21 measurement. Firstly, enter field strength mode, then choose “Insertion” on the bottom right corner on the screen. After choosing it, there will be a “GEN ON” sign. Data on the left side of the screen is the absolute level value. -
Page 17: User Calibration And Preparations
Preparation before Measurement 3.1 Overview KC901V has been calibrated on its ports at factory so that the field calibration can be skipped. Due to various reasons, the factory calibration can’t correct error in field-use perfectly, so the curves will have some imperfect drifts. But in normal engi- neering applications, as long as the testing result can help with analyzing and judging, there is not necessary to spend time on user calibration. - Page 18 Calibration procedure In the displays of S11 and S21 functions, every menu on the right side has “CAL Select”. It’s for switching among system calibration, user calibration and no calibra- tion. If user needs to do the user calibration, choose “RE CAL”. In FUNC menu, using combined key SHIFT+7 can access system calibration.
-
Page 19: Calibration Before S21 Measurement
avoid the drive signal being too strong. Before this kind of test, all the attenuators and cables should be connected in series to do the calibration. To start the user calibration, choose “Re CAL” in the function menu and then follow the guilds. -
Page 20: Calibration Before S11 Measurement
KC951011/KC951012 is the SOL standard that we (Kexinshe) provide. User can also use other proper standard, but keep in mind that standard’s terminal effect must be small. Because there is no compensation for KC901V (non-commercial version). KC951011’s nominal electric length is 5.26mm and KC951012’s one is 0. If user chooses other standard, the actual electric length must be input into instrument’s... -
Page 21: Using The External Bridge
Press SHIFT + 7 button in FUNC menu, set the "bridge" option to "EXT". Connect the External Bridge's INPUT to KC901V's Port 2 (at the left), connect the bridge's Re- flection to Port 1 (at the right). Before measurement must use "User Calibration" to calibrate. - Page 22 If user insists on doing so, please connect the ground of KC901V (the external layer of the coaxial connector) to the ground of the DUT in equipotential connection to prevent the damage which is caused by the voltage difference between the instrument and DUT.
-
Page 23: Common Measurement Methods
Take band trap theory’s six-cavity duplexer as an example to introduce the ad- justing steps. Set KC901V to S21 and then set its center and span to make the frequency range cover the original frequency and the new frequency of the duplexer. AMP can be set as 0dB or +10dB (AMP and ordinate range can be switched according to curve’s posi-... - Page 24 which are near the RX port and then make the dip move to mark2 position as well as to make them superposition possibly. Fine-tune these three screws repeatedly from center to right side one by one under the monitoring of mark2’s S reading. In normal situation, it should be down to -60dB.
- Page 25 lower than -70dB. Finally read the S parameter of mark1, which is the insertion loss of the duplexer to the receiving signal. Chart 4-2: Typical curve of duplexer’s LOW side, uncompensated cable loss Try to switch LO mode and choose which ever makes the curve’s bottom the lowest.
-
Page 26: Antenna Measurement
4.2 Antenna Measurement attention The output port of the KC901V may transmit up to 10dBm(10mW). When the antenna is tested, the output of the 901V will be transmitted through the antenna to the air. Regulated output attenuation (SHIFT+Po.ATT) can reduce emission, but 901V must be recalibrated (Re CAL). - Page 27 (for example, 2400MHz), this way is not reliable. 4.2.4 Simple Measurement of Antenna’s Gain and Antenna Pattern KC901V can test antenna’s horizontal pattern or the front-to-back ratio by using its S21 (or insertion loss) function with another set of antenna; If there is another set of antenna which the gain is already known, then the antenna gain can be tested too.
- Page 28 Equipment: Two antenna stands, one of them should have a turntable on the top. Antenna stands’ heights should reach the using conditions of antenna’s design. In principle, it should be larger than two operating wavelengths. The distance between the two stands should be longer than 10 times of the operating wavelength (short-wave antenna and other antennas which the operating wavelengths are very long, shortening the spacing is acceptable).
-
Page 29: Measuring Electric Length Of Cable
(in the same way, users can use a PC to control two pcs of KC901V at the same time if they need the larger dynamic range to do other S21 tests). -
Page 30: Spectrum
When there is an antenna in cable connection, the echo loss in an- tenna’s non-working frequency can be used for evaluating the cable loss preliminarily. 4.4 Spectrum Analysis We have enhanced the performance of KC901V’s input circuit. Therefore, it can provide simple spectrum analysis display. Warning: KC901V’s input port’s allowed level is +20dBm. -
Page 31: Detecting Interference Source
KC901V is a VNA, its spectrum test results are for suggestion only. KC901V’s frequency spectrum mode can be interfered by the mirror image. So if it is used for monitoring, concatenating a narrow-band filter on the input port is sug- gested. - Page 32 Warning: Unless there is permission, DO NOT test the space frequency spectrum of the non-working frequency with KC901V. Even you test it accidentally, don’t pass it on other people. - 31 -...
-
Page 33: Maintenance
Chapter Five Maintenance 5.1 How to Clean the Screen, Keyboard and Ports Remove the protective films from screen. The glass pane of the display screen is replaceable. So it’s not necessary to place a protective film to protect the screen, otherwise if will reduce the visibility under the sun. - Page 34 4. Protect the instrument from the rain and moisture. Keep the back of the in- strument upward when it’s raining and try to keep it from the rain. If there is water get into it accidentally, turn off the power immediately and swing the water out from instrument’s bottom.
-
Page 35: Technical Notes
Finally, it converts into digital signal and enter FPGA to be processed. KC901V takes the inner product of vectors to do digital phase discrimi- nation as well as takes root-mean-square detector to measure the range. About the data of RF measurement, they all come out by calculating the forward/reserve signal and the phase difference. -
Page 36: Charging Time And Time Of Endurance
KC901V’s endurance time is depended on battery’s capacity and its applying function. The power which is run out by different functions of KC901V is different. In S11, S21 function, it needs to start up the signal source as well as one or more than one receivers at the same time. -
Page 37: Technical Parameters
Spectrum/Field Strength RF Signal Source Audio Signal Source Stop/Run If there are only two batteries installed, the discharge rate becomes higher, so the endurance time will be half less than the time above. 6.3 Technical Parameter Frequency Range (RBW=1KHz): Transmission Measurement 9KHz……6.8GHz Reflection Measurement 9KHz……6.8GHz Frequency range which can be set: 5KHz(SPEC:0)……7GHz Output Electric Level (Typical Level)... - Page 38 20dB(1MHz—6GHz) Absolute Directionality(After SOL vector calibration,calibration kit’s direction performance is superior to the one in 48dB) 45dB(50kHz—3GHz) 35dB(3GHz—6GHz) 25dB(6GHz—6.8GHz) Phase’s Uncertainty(Preheat 1min,operate it continuously,reflection coefficient >0.25,typical value) 8°(9kHz—100kHz) 2°(100kHz—1GHz) 5°(1GHz—3GHz) 8°(3GHz—6.8GHz) Port Characteristic VSWR of Port 2:about 1.5 VSWR of Port 1:about 2.0 Concatenate a 10dB attenuator on the input port.
Need help?
Do you have a question about the KC901V and is the answer not in the manual?
Questions and answers