Table of Contents
Advertisement
Quick Links
Advertisement
Table of Contents

Related Manuals for PERSEE PF7


Summary of Contents for PERSEE PF7
-
Page 2: Table Of Contents
2.1.4 Power Supply Requirements ..............7 2.3 Installation ......................8 2.3.1. Connecting the computer system: ............8 2.3.2. Connecting with the PC system............9 2.3.3 PF7 installation ..................9 2.4 Acceptance ...................... 11 2.5 Testing method ....................12 2.5.1 Test Conditions ..................12 2.5.2 Repeatability (Relative Standard Deviation /RSD)... - Page 3 Instruction manual Chapter 5 AFWin Functions ..................18 5.1 Parameter settings ..................18 5.1.1 Instrument Control .................18 5.1.2 Sampling and measurement settings ............20 5.2.2 Standard Sample Concentration ............21 5.2.3 Sample Settings ..................24 5.2 Sample Measurement ..................28 5.3.1 Measurement ..................28 5.2.2 Save result ....................29 5.2.3 Print result .....................29 5.3.4 Print preview ..................30 5.3.5 Right key menu in chart .................30...
-
Page 4: Chapter 1 Preface
Instruction manual Chapter 1 Preface The Atomic Fluorescence Spectrophotometer is an excellent element analysis instrument whichhas the advantages of atomic absorption spectrophotometer and atomic emission spectrophotometer but overcomes their shortages in techniques. The instrument has good accuracy, high sensitivity, simple structure, small volume and easy operation. It is designed to test elements that could easily form hydride, gaseous constituents or deoxidizes to atomic smoke. -
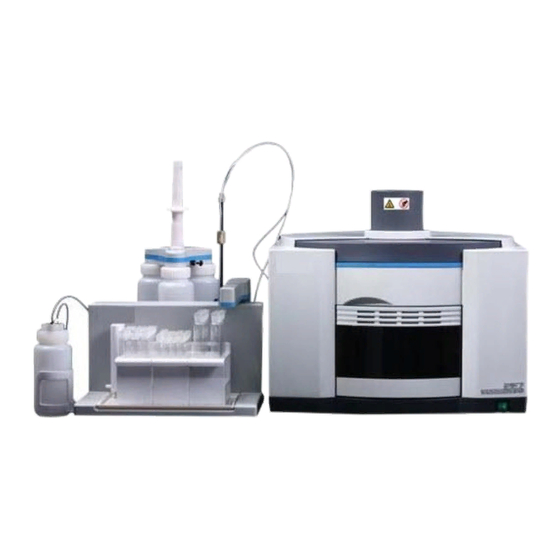
Page 5: Structure
Instruction manual N---------Units within the length of the ground state atoms Fig. 1.1 Principle of PF7 1.3 Structure The PF7 basic instrument information is shown in figure 1-2: Figure 1-2 Sketch photo of PF7... -
Page 6: Main Features
Instruction manual 1.4 Main Features 1.4.1 Special pneumatic flow system Argon is used as a driving source to achieve the automatic sampling, quantitative, discharge functions with no need for maintenance. The pneumatic flow system is used instead of a sipper pump system to avoid ripple caused by sipper pump and sampling errors caused by tube deformation. -
Page 7: Scientific Structural Design
Inward optical design avoids ultraviolet light damage to personnel. 1.5 Specifications 1.5.1 Performance The instrument should be allowed to warm up for > 30 minutes Table 1.1 Specifications of PF7 Drift ≤1.5% Stability Noise ≤1.5% ≤1.0%... -
Page 8: Optional Accessories
TGU7 Exhaust treatment accessory MIU7 Micro-volume Syringe accessory Fingerprint identification Humidor Meter accessory Laser Bar Code Reader Bar code printer 1.5.4 Optional Accessory Information Please contact your local dealer or Persee Analytics Inc. directly for information about our optional accessories. -
Page 9: Chapter 2 Installation And Acceptance
2.1.2 Equipment requirements for the lab The laboratory bench should be large enough to install the PF7 instrument, Auto Sampler and Speciation Accessory (if required), at a recommended height of 0.75 meters; it should be stable and solid with a flat surface. -
Page 10: Gas Source Requirements
Instruction manual A suitable extraction system should be fitted as Figure 2-1 above 2.1.3 Gas Source Requirements It is the responsibility of the user to ensure that the gas installation conforms to the local safety regulations. The Argon gas, when configured with the AFS system, should have a purity of 99.99%. Thesupply pressure should be set using a gas regulator. -
Page 11: Installation
Instruction manual element lamps. 2.3 Installation This chapter is for the installation engineer, and a reference only for the user. 2.3.1. Connecting the computer system: The computer system comprises of a main frame, a display, a keyboard and a printer. Connect the keyboard, the display and the printer to the respective interfaces on the computer mainframe. -
Page 12: Connecting With The Pc System
13. Reductant: Connect to the reductant bottle of Reagent bottle assembly (Blue connector). 14. Carrier: Connect to the Carrier liquid bottle of Reagent bottle assembly (Pink Connector). 2.3.3 PF7 installation According to Installation requirements, position the instrument on the table, connect power, gas circuit, and flow path. - Page 13 Fig.2-5 Power Connection of main unit and auto-sampler • Flow path and gas circuit connection Gas circuit connection of PF7 reagent bottles assembly (Fig. 2-6) is shown in Fig 2-7, according to Test Method requirement, load required solutions. For auto-sampler connection, please refer to AS420 Auto-sampler Operating manual.
-
Page 14: Acceptance
Instruction manual Fig. 2-7 Flow path and gas circuit connection • Pre-aligned lamp installation, is shown in Fig. 2-8 Plug Pre-aligned lamp in corresponding lamp socket, after start-up, set the lamp current In the AFWin software. Fig. 2-8 Element lamp installation 2.4 Acceptance After installation, the instrument can be adjusted and accepted. -
Page 15: Testing Method
Instruction manual the operator must read the instruction manual carefully to get familiar with the operation and acceptance method. The following provides the testing methods for the specifications: 2.5 Testing method 2.5.1 Test Conditions Under normal working conditions, preheat the instrument and As, Ti, Bi hollow lamps for 30 minutes. -
Page 16: Detection Limit (Dl) And Correlation Coefficient (R)
Instruction manual 2.5.3 Detection Limit (DL) and Correlation Coefficient (R) 2.5.3.1 Test tools a) Hollow Cathode Lamp: Arsenic, Antimony and Bismuth. b) Standard Sample: 0.0ug/ml、1.0 μg / L、2.0 μg /L、 4.0 μg /L、8.0 μg /L and 10 μg/L of arsenic, antimony and Bismuth. c) Hg standard sample: 0.0 μg /L, 0.1 μg /L, 0.2 μg /L, 0.4 μg /L, 0.8 μg /L, 1.0 μg /L d) Carrier Liquid: 3% (V/V) Hydrochloric Acid. -
Page 17: Chapter 3 Software Installation
Instruction manual Chapter 3 Software Installation 3.1 PC Configuration System software: AFWin can be used with all Windows Operating Systems. The operating environment is: Windows XP system, Vista, Win7 and Win8. Basic Configuration: Processor: higher than 2.0GHZ EMS memory: higher than 2Gb ... -
Page 18: The File System
Instruction manual 3.3 The File System 1. Customize Document. Stated as follows: afd file: Measure data file. All the measured data and standard curves are saved in this file. 2. In addition to the Customized Document, there are some system files already defined. -
Page 19: Chapter 4 Afwin Software Introduction
Instruction manual Chapter 4 AFWin Software Introduction 4.1 Login Before running, the software offers a login window as showed in Figure 4-1. There are two ways to login. The first way, the user is asked to input there “User Name” and password to enter. -
Page 20: Main Operating Interface
Instruction manual Fig 4-2 Initialization items choice 4.3 Main Operating Interface The main operating interface of the AFWin software adopts the display mode as a single file switch interface. The benefits of this mode are: friendly interface, clear function and modularization design. -
Page 21: Chapter 5 Afwin Functions
Instruction manual Chapter 5 AFWin Functions 5.1 Parameter settings Parameter settings: Include instrument settings, sampling and measurement settings, standard concentration settings and sample settings. Click “Set parameters” in navigation bar to set. When finished, click lower righter corner “Apply”, system will adjust instrument according to these settings. - Page 22 Instruction manual Fig 5-2 intelligent lamp Information Carrier gas and temperature setting Carrier gas flow range: 100~1000 ml/min. Shield gas flow range: 0~1500 ml/min. Atomizer temperature range: 50C~250C (recommended is 200C) Note: For cold vapor analysis (Mercury) set temperature to 100C with no ignition. Brightness of furnace filament: Range 160 - 240.
-
Page 23: Sampling And Measurement Settings
Instruction manual lamps. 5.1.2 Sampling and measurement settings In Parameter Setting window, click sampling and measurement. Shown in Fig 5-4 Fig 5-3 Sampling and Measurement Settings Sampling Mode The AF-402 has two sampling modes, one is automatic sampling and the other is manual sampling. -
Page 24: Standard Sample Concentration
Instruction manual •Reading of blank: If the D-value of two successive results is in the range of the blank, it means the instrument is operating correctly and can continue to measure the samples. If it is beyond the range, you need to measure the carrier blank until the D-value is in the range. •Interval of blank correction: is the quantity of samples before re-adjusting the Carrier Blank and Sample Blank. - Page 25 Instruction manual Figure5-5 Standard Concentration • Standard concentration Set standard sample number, rack number, rack type andconcentration. If you choose auto-sampling, you need to choose rack number and rack type, as shownIn Fig 5-6. The standard concentration panel provides quantity and concentration value ofeach standard sample.
- Page 26 Instruction manual softwaresystem is to use 32 vial rack in the first rack position. After choosing sample and rack, thecorresponding diagram will display on auto-sampler interface. Click the right button of the mouse on standard sample rack position, to set 【Modify vial position】...
-
Page 27: Sample Settings
Instruction manual you want toadd a standard sample, you can select (Add standard sample). If you want to insert a standardsample, select corresponding number, then click (Insert standard sample), it will insert a standardsample in front of selected standard sample. If you want to delete a standard sample, selectcorresponding number, click (Delete standard sample) .If you want to delete all standard samples,click (Delete all) .If you want to load default concentration, click (Default concentration). - Page 28 Instruction manual Fig 5-10 Sample blank settings Note: The tube position of the sample blank should be different to the position of the standard sampleor sample tube position. After choosing the sample tray, the following dialog box will be displayed: Fig 5-11 Sample settings If you choose the 32 vial sample rack in the first rack position, when you add a sample, it willautomatically deduct standards and blank samples amount.
- Page 29 Instruction manual Fig 5-12 sample detailed information settings Sample name: Input sample name, sample full name consists of name and serial number. Start ID: Set start number of sample serial number (serial number from x to y), which makes iteasier to add and insert batch samples. Sample state: Original state of unknown sample, “liquid”...
- Page 30 Instruction manual Modify sample blank correction as shown in Fig 4-14 and Fig 5-15 Fig 5-14 Sample Blank correction settings Fig 5-15 Sample Blank correction setting 2 In the Blank correction column, select samples which need to be blank corrected, right click, ablank correction check box will be seen.
-
Page 31: Sample Measurement
Instruction manual 5.2 Sample Measurement Click Sample Measurement under the Navigation bar to open the window, see Fig 5-16. Fig 5-16 Sample measurement There are two panels in the sample measurement window, one is the Graph display paneland the other is the Measuring result panel. The Graph display panel dynamically displaysa real-time data signal of every channel. -
Page 32: Save Result
Instruction manual 5.2.2 Save result After finishing the sample measurement, select Save function below the File menu, or click(Save) button. The software system will open a save file window, input your file name and click(Save) button to save. If you need to open the file that you have saved, select (open) functionbelow File menu, or click (Open) button, and select the file that you require, then click (Open)which will open the file. -
Page 33: Print Preview
Instruction manual 5.3.4 Print preview Select the Print preview submenu below the File menu and you can open the print previewwindow. In this window, you can set the print effect according to your requirement. See fig5-19. Fig 5-19 Print preview 5.3.5 Right key menu in chart In the Spectrum display panel right click key will display a menu, see fig 5-20 Fig5-20 Spectrum display panel for right key menu... -
Page 34: Calibration Curve
Instruction manual Fig 5-21 Spectrum Setting Auto radar after scanning: If you select this item, horizontal and vertical coordinates willchange automatically. Maximum A and Minimum A: Setting the height of vertical coordinates for channel A. Youcan adjust the background color of the spectrum. The other channels can be set the sameas this channel. -
Page 35: Testing Result
Instruction manual can clickthe (Print) button to select. See Fig 5-25 Fig 5-25 Print option window In print option window, select the calibration curve to print, and click (OK) button. You can alsoselect the Print preview button in the File menu to view the result. 5.4 Testing result Click Testing result icon in Navigation bar and open the window as Fig 5-26List of results, that show serial number, sample name, IF of every channel, concentration and unit. - Page 36 SeeFig 5-28. In this panel, you can input some information, Report No., Temperature, Humidity,Sample category, Sample source, Pretreatment, Consignor, Measurement units. TheInstrument SN cannot be entered, it is according to the instrument. If the PF7 is equippedwith the Temperature & Humidity accessory, it will automatically input according to themeasurement value.
-
Page 37: User Management
Instruction manual 5.5 User management User management function is additional protection for system security. This function allows you tocreate an operator, and set the rights and password. Select Administrate submenu in the Systemmenu to open the management window. See Fig 5-29 Fig 5-29 User management The system Administraor of AFWin is SYSTEM, in addition, you can click the Create button toestablish a new operator. -
Page 38: Set Communication Port
Instruction manual account andpassword, just input old password and new password. In order to keep secret, the passwordshows as “#”. 5.6 Set communication port Communication port is an exclusive interface for communication between computer andinstrument You can set the communication port by Set communication port submenu in Systemmenu, or click Comm button on tool bar. - Page 39 Instruction manual...
-
Page 40: Chapter 6 Analysis Conditions
Instruction manual Chapter 6 Analysis Conditions 6.1 Arsenic (As) Arsenic (As) Standard Stock Solution Standard stock solution (1mg/ml) Weigh 1.3203g As solid powder precisely and mix the sample with 3ml of 8mol/L HCL solution. Dilute the solution in 1000ml. In order to dilute the oxidation, put 2g NaOH into 20ml of de-ionized water and diluted in 200ml. -
Page 41: Antimony (Sb)
Instruction manual Carrier:Ar (99.99%) Carrier flow rate: 0.3---0.5L/min Sheathing flow rate: 0.6----1.0L/min Lamp current of main cathode: 20---100mA Furnace temperature: 200C Linear range: 0.2 μg/L --200 μg/L Arsenic (As) interference and elimination Interference and elimination: Cu, Co, Ni etc. will interfere with the detection of the As element. These interferences can beeliminated by a mixed reagent of sulfourea (5%)-vitamin C (5%). -
Page 42: Bismuth (Bi)
Instruction manual sulfourea(5%)-vitamin C (5%)into the sample, wait for 30 minutes, then measure the sample. Mineral sample: Dissolve the sample in acid. Evaporate the sample in concentrating liquid at low temperature, thenadd 3mol/L HCL and dilute the sample in the flask. According to the different elements, poursufficient mixed reagent of sulfourea (5%)-vitamin C (5%) into the sample. - Page 43 Instruction manual solution whilegently boiling. Drive away brown smoke, then diluted the solution in 1000ml.Use Bi element standard solution (1000ug/ml) of national institute of standards and technology. Analytical standard solution: Before analysis, dilute the standard stock solution with de-ionized water and acidify. Bismuth (Bi) sample Water sample: Acidify the water sample with 3mol/L HCL and mix with a reagent of sulfourea...
-
Page 44: Mercury (Hg)
Instruction manual Sheathing flow rate: 0.6----1.0L/min Lamp current: 20---100mA Furnace temperature: 200C Linear range: 0.2 μg/L --200 μg/L Bismuth (Bi) interference and elimination Interference and elimination: Cu, Co, Ni etc. will interfere with the detection of the Bi element. Among them, the Cu and Auinterference could be eliminated by using sulfourea, but the detection limit will be lower. -
Page 45: Selenium (Se)
Instruction manual 1%---2%KBH (NaBH ) (heated vapor atomic fluorescence spectroscopy) 0.5% KOH(NaOH) Carrier: 3% HCl Valence state: divelent Sample acidity and blank sample: 2%-20% (V/V) HCL Analysis condition Carrier: Ar(99.99%) Carrier flow rate: 0.3---0.5L/min Sheathing flow rate: 0.6----1.0L/min Lamp current: 15---50mA Furnace temperature: 25—250C(It is recommended room temperature in cold vapor atomicfluorescence spectroscopy, temperature is higher than 100C in heating vapor atomic fluorescencespectroscopy) -
Page 46: Tellurium (Te)
Instruction manual Mineral sample: Dissolve the sample in a mixed reagent of HNO and H , heat the solution until white smokecan be seen. Cool down the external side of the beaker, then heat again until boiling. Afterdissolving the salt, move the solution into a flask. Add 1ml of the solution in the flask, pour 4ml 2mol/L HCL in the solution (include 1.25mg/ml Fe salt ) for hydride generating and for measuringin AFS. - Page 47 Instruction manual Use Te element standard solution (1000ug/ml) of national institute of standards and technology. Analytical standard solution Before analysis, dilute the standard stock solution with de-ionized water and acidify. Tellurium (Te) sample Water sample: For Se, Te element in water mix La(OH) to produce settling in order to pre-concentrate.
-
Page 48: Tin (Sn)
Instruction manual 6.7 Tin (Sn) Tin (Sn) Standard Stock Solution Standard stock solution (1mg/ml): Weigh 1.000g high grade Tin powder precisely, mix the sample with 15ml hot HCL, and dilute thesolution in 1000ml. Use Sn element standard solution (1000ug/ml) of national institute of standards and technology. -
Page 49: Germanium (Ge)
Instruction manual theycannot interfere with the detection of tin. If the content of contaminant hydride element is higher than 200ug/ml, the interference is thefluorescence and scattering of molecules. 6.8 Germanium (Ge) Germanium (Ge) Standard Stock Solution Standard stock solution (1mg/ml) Weigh 1.4408g GeO solid powder precisely, mix the sample in 100ml de-ionized water withcontent of 50g oxalic acid. -
Page 50: Lead (Pb)
Instruction manual Cu will seriously interfere with the detection of the Ge element. The interference can be eliminatedby using sulfourea. The other elements can form a hydride, when their concentration is lower than10ug/ml, they cannot interfere with the detection of germanium. The high concentration of As could cause a gas phase interference, but this interference could beeliminated by an absorption liquid content HgCl If the content of the contaminant hydride element is higher than 200ug/ml, the... -
Page 51: Zinc (Zn)
Instruction manual Interference and elimination Fe, Cu, Mo will interfere with the detection of the Pb element. The interference of Fe can Fe (CN) beeliminated by using H . The interference of Cu can be eliminated by using K as anoxidant. If the content of the contaminant hydride element is higher than 200ug/ml, the interference is thefluorescence and scattering of molecules. -
Page 52: Cadmium (Cd)
Instruction manual For complex samples, it is recommended that you mix the sample with 2mol/L HCL reagent for theion exchange (use anion-exchange resin), zinc will be separated. 6.11 Cadmium (Cd) Cadmium (Cd) Standard Stock Solution Standard stock solution (1mg/ml) (1 + 1)and Weigh 1.000g high grade cadmium powder, mix the sample in10ml HNO move thesolution in 1000ml to a flask. - Page 53 Instruction manual There are no interferences in the water sample during the detection of cadmium, but whenanalyzing biological samples, there will be an interferance in the solution if the concentration of Cuand Pb is higher than 1mg/ml. The interference of Pb could be eliminated by using 2ml 5% K and 1ml 5% BaCl in the sample solution.
-
Page 54: Chapter 7 Notice Of Storage Andtransportation
Instruction manual Chapter 7 Notice of Storage andTransportation Avoid sunlight, rain and serious vibration during transportation; move, load and unloadgently. Do not sling. The packed instrument should be stored in a well ventilated room where the ambient temperature is between 15C~35C and the relative humidity does not exceeded 75%. -
Page 55: Chapter 8 Daily Care And Maintenance
Instruction manual Chapter 8 Daily Care and Maintenance The AF400 simultaneous atomic fluorescence spectrometer is a precision optical instrument.Every instrument has been rigorously tested before leaving the factory. Correct maintenance andservicing should be carried regularly, to ensure reliability, stable performance, and extend the lifeof the instrument. 8.1 Daily care ... -
Page 56: The Problem Of Software
Instruction manual isloose, some pins are bent or the solder at the connection of the wires are broken,replace the lead. Check the supply power of the instrument, turn on the power switch if the lightindication is off, the power wire may be loose, or the 3 A fuse of power supplycould be broken. -
Page 57: The Problem Of Element Lamp
Solution: Make sure the recognition of element lamp is correct. Please use the special elementlamps which are provided by PERSEE. Note: It is not easy to light the Mercury (Hg) lamp; it needs a very high voltage to build-up ofluminance. Inset the Hg lamp in the instrument and turn on, the lamp may require warmingprior to installation in the instrument to ignite. -
Page 58: Injection Needle Error Of Auto-Sampler
Instruction manual The temperature is too low, adjust the temperature, but you cannot exceed 250C. The standard solution is out of date or incorrect, change the standard solution. The carrier gas is on or not, please check the pipe and the pump winding is ok. Gas: If the argon gas has been opened, but the sound of pit-a-pat can be heart during the testing, it ispossible that the argon gas is not present in the reaction pipe, please adjust the... - Page 59 Instruction manual Fig: 8-3 Follow the steps of prompt, perform the first step (Auto-sampler zero position reset), thenperform the second step: After that (Locate at center of washing slot, note that you need justselect the washing area), using the front, back, left and right buttons to adjust the position ofthe needle, perform the fourth step [save settings], and finally load the new settings tocalibrate the sampler position problem.
-
Page 60: Appendix 1 Replacement Of Furnacefilament
Instruction manual Appendix 1 Replacement of furnacefilament The furnace filament is the important part of the ignition with the hydride gas in the AFS. Becausethe filament is working at a high temperature with corrosive acid gases, the filament may breakand a replacement may be necessary. The replacing procedure is as follows, as picture below: ... -
Page 61: Appendix 2 After Sales Service
It is recommended that a full service of the instrument is carried out at one yearlyinterval to maintain the performance and reliability. Please ask your local distributor formore details. PERSEE provides services to users, including: Installation and validation for instrument ... - Page 62 Instruction manual...
Need help?
Do you have a question about the PF7 and is the answer not in the manual?
Questions and answers