Dish Network Joey Getting Started Manual
Hide thumbs
Also See for Joey:
- User manual ,
- Getting started manual (44 pages) ,
- Quick start manual (2 pages)
Table of Contents
Advertisement
Advertisement
Table of Contents

Related Manuals for Dish Network Joey


Summary of Contents for Dish Network Joey
- Page 1 JOEY GETTING STARTED GUIDE...
- Page 2 For Your Safety Warning: Do not try to open the case of the Joey. There is risk of electrical shock, which may cause damage to the Joey and/or personal injury or death to you. There are no user-serviceable parts inside the Joey. Opening the Joey’s case or making unauthorized changes will void the warranty.
- Page 3 Equipment and Software Covered by this User Guide This Joey Getting Started Guide covers the Joey and software models Joey. This Joey Getting Started Guide may cover other devices not listed here. Publishing Information Copyright © 2012. EchoStar Technologies L.L.C., Englewood, Colorado 80112.
- Page 4 The power plug must be readily accessible so that the apparatus can be easily disconnected from the AC power. The Joey is still connected to the AC power whenever it is plugged into a live power outlet, even if it is turned off using the remote control or front panel buttons.
- Page 5 Do not install the Joey in any area where the temperature can be less than 40°F or more than 113°F. If the Joey is cold to the touch, do not plug it in immediately. Let it sit unplugged at room temperature for at least 45 minutes before plugging it in.
- Page 6 Increase the separation between the equipment. • Connect the equipment into an outlet on a circuit different from that to which the Joey is connected. • Consult the dealer or an experienced radio/TV technician for help. Note to Satellite TV System Installer: This reminder is provided to call the satellite TV system installer’s attention to Article 820-40 of the National Electrical Code (NEC) that...
- Page 7 A single Hopper supports up to three Joeys through the coaxial connections, or two Hoppers support up to four Joeys. A Joey must never be directly connected to a Hopper; it must use a Node, a Tap, or an Isolator for connection to a Hopper.
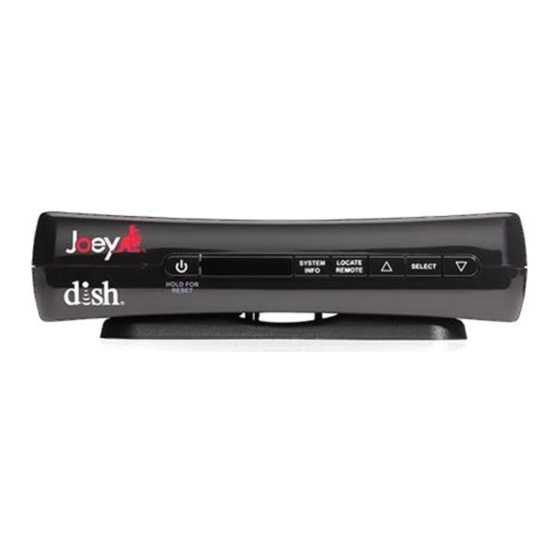
- Page 8 Joey, continued The front and back panels of the Joey are provided below. Front Panel Controls Power System Info Select Turn the Joey on Displays the System Select menu and off or hold Info screen items and events to reset it...
- Page 9 SAT Mode To use the features described in this section, make sure you are in SAT mode by pressing the SAT Mode button. Use SAT Mode to control the Joey. Note: Some features may not be available. Power & TV Power...
- Page 10 Recall Return to last TV channel viewed Number Buttons Enter a channel number PIP (Picture-In-Picture) Buttons Not available at this time Note: Remote operation is different on DISH Network TVs. See your DISH Network TV User’s Guide for proper operation.
- Page 11 DVD Mode To use the features described in this section, make sure you are in DVD mode by pressing the DVD Mode button. In addition to operating a DVD player, you can also use this mode to operate a VCR or Blu-ray Disc™ (BD) player. Remote programming is required.
- Page 12 DVR Functions • Displays a list of recorded programs. • Plays a live or recorded program. • Pauses a live or recorded program. • Stops recording a program or playing a recorded program. • Records a program. • Press BACK once to reverse the program four times as fast as normal play.
- Page 13 DVR Functions, continued • Press FWD (Forward) once to fast-forward through the program four times normal speed. Press FWD twice to forward at 15 times normal speed, three times to forward at 60 times normal speed, and four times to forward at 300 times normal speed. The on-screen bar shows how far you’ve gone.
- Page 14 Using Remote Button Shortcuts In addition to their normal functions, some buttons on your remote control have special shortcut functions. These shortcuts are enabled while navigating the on-screen Electronic Program Guide (EPG) or viewing the scrollable list of events. DVR Buttons The following table lists some of these shortcuts for the gray set of buttons that normally control your DVR functions.
- Page 15 Using Remote Button Shortcuts, continued Colored Buttons The following table lists some of the shortcuts for the colored set of buttons on your remote control. Note: Scheduled updates to your receiver software may add to or modify these shortcuts. Buttons From Live TV Elsewhere Jumps to menu bar and...
- Page 16 Securing Joey to the Base Secure the Joey onto the included base, even if it is sitting on a shelf or table. Note: If you want to mount the base to a surface, see Mounting Options for Joey on page 11.
- Page 17 Mounting Options for Joey If you prefer to mount the Joey, the base can be mounted onto a surface either vertically or horizontally with screws. Note: However the Joey is mounted, the vents on its top must be clear. Mounting the Base to a Surface Horizontally...
- Page 18 Use the screws if Holes Holes mounting into wood, and use the anchor bolts if mounting into drywall. Secure the Joey into the base (see Securing Joey to the Base on page 10). Note: Do not Note: Do not Note: Do not...
- Page 19 Removing Joey from the Base Holding the Joey and base firmly, forcefully push the Joey away from the base until it releases. Lift Joey away from the base.
- Page 20 Connecting to Home Video Network The Joey uses your home’s coaxial TV cable to communicate to the host receiver, Hopper. Once the Joey is connected to your home’s network, it uses the content and features of the receiver to display programming on another HDTV or SDTV in the home.
- Page 21 Turn on the Joey and TV. Change your TV to the correct input or source. Consult your TV user’s guide for assistance. If this is the first time that the Joey has been turned on, the Setup Wizard appears. See page 17 for going through the Setup Wizard.
- Page 22 Inserting the Batteries Pull the remote battery cover off. Insert 4 AAA batteries of the same type and kind, making sure to match the plus (+) ends with the plus markings on the battery case. Replace the remote battery cover.
- Page 23 Setting Up the Joey Before setting up the Joey, make sure your Hopper is set up first. To set up the Joey, follow the steps below. Turn on the Joey and your TV. The Starting Up screen appears. The cursor appears on the screen.
- Page 24 Setting Up the Joey, continued Select a Location Name for the Joey and select Next. The system updates the software and reboots; this process takes several minutes. If your connection is recognized, the video resolution is correctly selected; select Next. If you change the format...
- Page 25 The system looks for an available Hopper. If the Joey finds more than one Hopper, select the Hopper to which you want to link the Joey. To link the Joey to the Hopper, press Select. Select Save. This step takes several minutes to complete.
- Page 26 Programming Remote to Control Another Device You can program your DISH remote to control another device, such as a TV, DVD, Blu-ray Disc™ player, VCR, audio receiver, or ampliflier. The receiver scans the database of codes for the particular device and tries each code.
- Page 27 Programming Remote to Control Another Device, continued Scroll the Sort By (or Aux Device) list to Sort by position the selected option within the blue highlight bar. Highlight the device’s name in the Brand list Brand and select Next. RadioShack Realistic Reoc RevolutionHD...
- Page 28 Programming Remote to Control Another Device, continued Using the remote, turn the device on and try some other remote buttons to make sure they work. When finished, press and release SAT to switch modes. If the code worked for other buttons, select Yes and continue to step 11.
- Page 29 Setting Parental Controls To place parental controls on the programming coming to the TV connected to this Joey, you can either copy the settings from the Hopper, or you can set different parental controls for a particular Joey. To copy the parental controls that have been set for the Hopper, go to your Hopper, press MENU, select Settings, select Parental Controls, and select Copy Settings.
- Page 30 Setting Parental Controls, continued Select one of the following from Ratings Ratings Restrictions: Restrictions • None None • • Medium Medium • High High Select Yes to hide adult channels or Hide Adult leave No selected. Channels Select Yes to restrict purchases or Restrict leave No selected.
- Page 31 Sharing Content If all three Hopper tuners are in use, you may either join one of the events or watch a program found under PrimeTime Anytime™, On Demand, or recorded on the DVR. If you select a program to watch and the TV Viewing Status screen appears, all tuners on the Hopper are in use.
- Page 32 Backing Up Settings After setting up the remote and the Joey, you can back up your settings. If you back up your settings, you can easily restore your settings. Press MENU, select Settings, and then select System Wizard. If you have finished setting up a...
- Page 33 Restoring Settings If you should lose settings that have been backed up (see Backing Up Settings on page 26), you can restore the remote and receiver settings. Press MENU, select Settings, and then select System Wizard. If you are setting up a new remote Restore and used Backup with the previous remote, click on Restore to restore...
- Page 34 Locating the Remote When you are looking for the remote, try the LOCATE REMOTE feature on the front panel of the Joey. Press LOCATE REMOTE on the front panel of the Joey. LOCATE REMOTE If the missing remote control is paired to...
- Page 35 Troubleshooting Use this information if you have a problem using the Joey. To solve a particular problem, do the following: • In the following section, find the information that relates to the problem you are experiencing. Try the suggested solution for that problem.
- Page 36 Confirm the remote is in the correct mode for the device you want to control. For example, to control the Joey, press SAT on the remote before the function you want performed.
- Page 37 Troubleshooting, continued If your remote is showing that it is paired but isn’t working, select Un-Pair on the System Info screen and listen for the confirmation tone. Press PAIR to pair the remote again. If you do not hear the tone, continue with the next suggestion.
- Page 38 Limited Warranty This Limited Warranty is a legal document. Keep it in a safe place. Remember to retain your Bill of Sale for warranty service! Any items returned without a copy of the Proof of Purchase will be considered out of warranty. What the Warranty Covers This warranty extends only to the original user of the equipment and is limited to the purchase price of each part.
- Page 39 Limited Warranty, continued Legal Limitations REPLACEMENT AS PROVIDED UNDER THIS WARRANTY IS YOUR EXCLUSIVE REMEDY. ECHOSTAR SHALL NOT BE HELD LIABLE FOR ANY INCIDENTAL OR CONSEQUENTIAL DAMAGES FOR BREACH OF ANY EXPRESSED OR IMPLIED WARRANTY ON THIS SYSTEM, NOR FOR ANY INCIDENTAL OR CONSEQUENTIAL DAMAGES RESULTING FROM THE USE OF, OR INABILITY TO USE, THIS SYSTEM.
- Page 40 DISH Network Exchange Program DISH Network offers two options if you need to replace your satellite receiver equipment or its accessories. Advance Exchange Program The Advance Exchange Program allows you to have replacement equipment shipped immediately to you (depending upon where you live, it could take three to five business days).
- Page 41 Services and/or equipment from DISH Network (each, a “Package Plan Agreement”): (i) “you” and “your” refer to you, the DISH Network subscriber; and (ii) “DISH Network”, “DISH,” “we,” “us” or “our” refer to DISH Network L.L.C. (formerly known as EchoStar Satellite L.L.C.) or, where applicable under the particular circumstances, third party billing...
- Page 42 G. Accessing the Internet Through Your Receiver. Some of our receivers can be used to access websites and information on the Internet. DISH Network does not have any control over such websites and information, and we do not make any representations, warranties or guarantees as to the availability or content of such websites and information, including without limitation: (i) the accuracy, availability, sequence, completeness, timeliness, copyright compliance, legality, content, validity, or quality of any such websites or information;...
- Page 43 DISH Network does not extend credit to our customers, and the Late Payment Fee (as detailed in Exhibit 1) is not interest, a credit service charge or a finance charge. Certain fees and charges may apply in certain circumstances to your payment for the Services, including without limitation, those expressly set forth in Exhibit 1 attached hereto and incorporated herein by reference.
- Page 44 C. Disconnection of Services. In addition to all other rights that DISH Network may have to disconnect your Services, DISH Network may disconnect your Services if: (i) you fail to pay any bill in full when it is due; (ii) we receive confirmation that you have received Services, or any part of the Services, without paying for them;...
- Page 45 Smart Cards remain the property of DISH Network at all times and must be returned to us upon our request. Smart Cards are not transferable. Your Smart Card will only work in the DISH Network receiver to which it was assigned by DISH Network.
- Page 46 Equipment. Options to return your Equipment include, but are not limited to, the use of a shipping label and empty box provided by DISH Network by paying a Box Return Fee (as detailed in Exhibit 1) (which price is subject to change at any time) or scheduling a DISH Network in- home service call to remove the Equipment by paying a Service Call Fee (as detailed in Exhibit 1) charge (which price is subject to change at any time).
- Page 47 THEIR AFFILIATES, SHALL HAVE ANY LIABILITY WHATSOEVER FOR ANY SPECIAL, INDIRECT, INCIDENTAL OR CONSEQUENTIAL DAMAGES ARISING OUT OF OR RELATING TO: DISH NETWORK EQUIPMENT OR ANY OTHER EQUIPMENT; OUR FURNISHING OR FAILURE TO FURNISH ANY SERVICES OR EQUIPMENT TO YOU; OR ANY FAULT, FAILURE, DEFICIENCY OR DEFECT IN SERVICES OR EQUIPMENT FURNISHED TO YOU.
- Page 48 (iii) other services provided by our third-party billing agents, including without limitation, local telephone service, may need to be restored before DISH Network Services can be restored, and a restoral fee and/or deposit may be required to restore third-party billing agent services. Partial payments on third-party billing agent bills may be applied first to the balance due for other services billed on your third-party billing agent bill, including without limitation, local telephone service, according to the third-party billing agent’s billing procedures and applicable state statutes and regulations.
- Page 49 Such credit checks may require you to provide DISH Network with your social security number. Under the Fair Credit Reporting Act, you have the right to notify DISH Network if you believe we have reported inaccurate information about your account to any credit reporting agency.
- Page 50 $7.00 You have a Hopper 2000 receiver on your account. Receiver Fees $7.00 You have a Joey 1.0 receiver on your account. Whole Home DVR $4.00 You have a Whole Home DVR Hopper 2000 on your account. Service Fee...
- Page 51 Late Payment Fee $7.00 receiving Services pursuant to a Pre-Pay Promotion). Returned Payment You make an EFT or check payment to DISH Network and it is $10.00 subsequently returned. DISH Network delivers hardware to you via regular delivery. (A $20.00 Shipping and $15.00...
- Page 52 FCC Compliance The following text is extracted from Federal Communications Commission (FCC) regulations, as of the publication date of this User’s Guide. Contact the FCC (see following) or your library for the complete text of the regulations. This device complies with Part 15 of FCC Rules. Operation is subject to the following two conditions: This device may not cause harmful interference This device must accept any interference received, including interference that...
- Page 53 The software contained in the receiver may reference, display, link to, and provide users access to web services, sites, and information located worldwide through the Internet. Because EchoStar Corporation and DISH Network have no control over such sites and information, we make no representations, warranties or guarantees as to...
- Page 54 1. Review the Hopper and Joey guides available at mydish.com/manuals. 2. See Troubleshooting on page 29. 3. On your Hopper/Joey, select the Help tile from the Main Menu 4. Visit mydish.com/chat for 24/7 support. 5. Call the Customer Service Center at 1-800-333-DISH (3474).
- Page 55 Index Back up Settings 26 FCC 46 Front Panel Controls 2 Connect Joey to Home Video Network 14 Insert Batteries 16 Connect Joey to TV 15 Internet Usage Agreement 47 DVD mode 5 Limited Warranty 32 DVR buttons Locate Remote 28...
- Page 56 Index SAT mode 3 Secure Joey to Base 10 Set up Joey 17 Share Content 25 Troubleshooting 29 TV mode 4 Warranty 32...
- Page 57 You may need to provide this information if you call the Customer Service Center. Note: Some of the items listed below may not be used at this time. Purchase Location Name: Purchase Location Telephone Number: Joey Serial Number: Receiver Smart Card Conditional Access Number: Remote Control Settings Television Code (TV Mode):...
- Page 58 For all your customer needs, go to www.mydish.com/chat or call the Customer Service Center at 1-800-333-DISH (3474) 194052...
Need help?
Do you have a question about the Joey and is the answer not in the manual?
Questions and answers
Can I restrict a Joey from accessing the dvr?
Yes, a Dish Network Joey can be restricted from accessing the DVR. Some users report that restrictions apply to certain channels or content, such as on-demand, PPV, and rented programming. Additionally, limitations may be due to design, channel restrictions, or possible bugs.
This answer is automatically generated
My remote control seems to have quit working, like it's not connected to the Joey I have an older dish remote but I don't understand how to program it to my TV and Joey
To program an older Dish Network remote to work with your Joey and TV:
1. Pair the remote with the Joey:
- If the remote is not working, press and hold the SAT button until all mode buttons light up, then release.
- Press RECALL and 0 at the same time, then release.
- Press SEARCH, then release.
- Press VOL+, then release.
- Press STOP, then release.
- This process re-pairs the remote using RF (radio frequency).
2. Ensure line-of-sight for TV control:
- The remote uses IR (infrared) to control the TV, so it must have a clear line of sight to the TV’s IR receiver.
3. Set the correct input on the TV:
- If using an RCA connection, set the TV to the proper input and adjust the settings on the Joey to match.
4. Check batteries:
- Make sure the remote has fresh batteries. Replace them if the "Remote Battery Low" warning appears.
These steps should allow your older Dish Network remote to control both your Joey and your TV.
This answer is automatically generated
We bought a new TV and need to configure the Joey for it. We had a Hisense and now own a Visio
To configure the Dish Network Joey remote for a Vizio TV:
1. Select "TV" on the remote setup menu.
2. Use the "TV Pairing Wizard" as recommended.
3. Choose your TV brand—scroll A to Z or select from popular brands (e.g., Vizio).
4. The wizard will send codes to your TV.
5. Test the mute and volume buttons.
6. If the remote works, click "Finish."
7. If not, select "Next Code" and repeat the process until it works.
This answer is automatically generated
There are no lights on the Joey. is it dead? It's plugged om and connected with the cable.