Munters Communicator 2.0 Manual For Use And Maintenance
Hide thumbs
Also See for Communicator 2.0:
- Manual for use and maintenance (54 pages) ,
- Installation and user manual (41 pages)

Related Manuals for Munters Communicator 2.0


Summary of Contents for Munters Communicator 2.0
- Page 1 Communicator Manual for use and maintenance Communicator 2.0 Communication System Ag/MIS/UmGb-2634-10/18 Rev 1.3 P/N: 116641...
- Page 2 Munters reserves the right to effect modifications to the apparatus in accordance with technical and legal developments. © Munters AB, 2019...
-
Page 3: Table Of Contents
3.7 Connecting the Communicator 2.0 to a Phone Line ----------------------------------------------------------------------------------- 3.8 Attaching the Antenna -------------------------------------------------------------------------------------------------------------------------------------------------- 3.9 Connecting the Communicator 2.0 to a Peripheral Device -------------------------------------------------------------------- 3.10 Connecting the Communicator 2.0 to a Controller or RLINK One ---------------------------------------------------- 3.10.1 Controller Connection ........................3.10.2 RLINK One Connection ........................ - Page 4 6.2 Adding Contacts -------------------------------------------------------------------------------------------------------------------------------------------------------------- 6.3 Alarm and Events History -------------------------------------------------------------------------------------------------------------------------------------------- 6.4 Digital Inputs ----------------------------------------------------------------------------------------------------------------------------------------------------------------------- 6.5 Disable Alarms ------------------------------------------------------------------------------------------------------------------------------------------------------------------ 6.6 Testing the Communicator 2.0 --------------------------------------------------------------------------------------------------------------------------------- 6.7 Responding to Alarms --------------------------------------------------------------------------------------------------------------------------------------------------- 6.7.1 Responding to an Audio Message ....................Receiving the Message -------------------------------------------------------------- 43 6.7.1.1 Responding to the Alarm Message ------------------------------------------------- 43 6.7.1.2...
-
Page 5: Introduction
The information contained herein has been prepared by qualified experts within Munters. While we believe the information is accurate and complete, we make no warranty or representation for any particular purposes. The information is offered in good faith and with the understanding that any use of the units or accessories in breach of the directions and warnings in this document is at the sole discretion and risk of the user. -
Page 6: Introduction To The Communicator 2.0
2 Introduction to the Communicator 2.0 Communicator 2.0 provides complete access to your Munters controllers, including monitoring and control capabilities, from any device, anywhere, along with alarms and events sent directly to your mobile device, PC, or tablet. From one computer, tablet, or smartphone, you can manage an entire network. -
Page 7: Hardware Installation
3.1 Precautions Observe the following precautions when using your unit. Keep the Communicator 2.0 as far as possible from heavy contactor boxes and other sources of • electrical interference. Do not connect communication wire shields, which go from one house to another at both ends. -
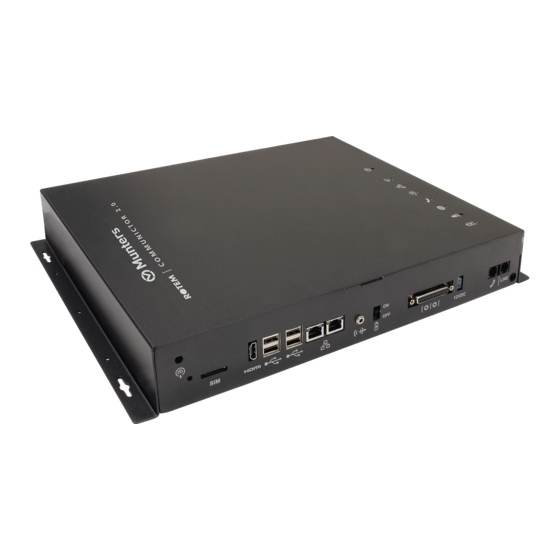
Page 8: Interior
Connecting the Communicator 2.0 to Communicator 2.0 to the Internet, page a Peripheral Device, page 11) LAN ports Phone line port (refer to Connecting the Communicator 2.0 to a Phone Line, 11) Grounding (refer to Grounding, Power cord page 10) Battery disconnection switch 3.3 Interior... -
Page 9: Mounting The Communicator 2.0
This card is under the LED board Not used Communication Card, RS485 Communication Card, RS232 Board Cell Modem SSD Card Main CPU 3.4 Mounting the Communicator 2.0 Figure 3: Dimensions (mm) Mount the unit using the four supplied screws. • © Munters AB, 2019... -
Page 10: Grounding
3.5 Grounding Connect the ground cable to the dedicated ground terminal. • CAUTION The Communicator 2.0 must be grounded at all times! © Munters AB, 2019... -
Page 11: Connecting The Communicator 2.0 To The Internet
If the Communicator 2.0 comes with a cell modem, attach the antenna. 3.9 Connecting the Communicator 2.0 to a Peripheral Device If required, connect a screen and key board to the Communicator 2.0 (via the four USB or single •... -
Page 12: Connecting The Communicator 2.0 To A Controller Or Rlink One
3.10 Connecting the Communicator 2.0 to a Controller or RLINK One The only step in installing a Communicator 2.0 that requires wiring is when connecting the Communicator 2.0 to the controllers or to the RLINK One RF Communication Unit. Plug the 25 plug connector into Communicator External Box cable. -
Page 13: Controller Connection
3.10.1 C ONTROLLER ONNECTION Figure 5: External Box – Controller Isolated RS-485 Connection Figure 6: External Box – Controller RS-232 Connection © Munters AB, 2019... -
Page 14: Rlink One Connection
RLINK One supports RS-485 infrastructure only. NOTE: 3.10.3 W IRING OPOLOGY When connecting the Communicator 2.0 to controllers via an RS-485 infrastructure, use one of the following allowed topologies to ensure signal integrity. Figure 8: Direct connections Figure 9: T-Junction (permitted) © Munters AB, 2019... -
Page 15: Termination
3.10.4.1 Termination Topologies Figure 11: Topology 1: Communicator 2.0/House Termination Figure 12: Topology 2: House Termination The following two topologies require Munters RS-485 Repeaters. CAUTION Install the repeater within one meter of the Communicator 2.0 T-Box © Munters AB, 2019... - Page 16 Figure 13: House and Repeater Termination Figure 14: House and Multiple Repeaters Termination Figure 15: RLink and House Termination NOTE When using an RLINK One Wireless Communication unit, refer to the RLINK One Manual, which provides detailed information on RLINK termination. © Munters AB, 2019...
-
Page 17: Termination Wiring
3.10.4.2 Termination Wiring • Communicator 2.0: Install the termination resistor in the T-Box. Figure 16: T-Box termination Repeaters: Move the S2 dipswitch on the Output card to ON. • Figure 17: Repeater termination © Munters AB, 2019... -
Page 18: Enabling Sms Messages
Sending SMS message requires a Communicator 2.0 having an internal modem (supplied by • Munters if ordered). This modem will support your cellular infrastructure and region (4G US, 4G ROW, 3G) Insert a 3G or 4G standard SIM card as indicated: •... -
Page 19: Using Communicator To Manage Controllers
• Attaching the Farm to a Group • 4.1 Introduction to Controller Management When using the Communicator 2.0 to connect to your farm(s), you must: Connect (activate) the Communicator 2.0 to a RotemNet Web account • Create a group •... -
Page 20: Activating The Account
Figure 19: Assigning Farms to Groups 4.2 Activating the Account NOTE It is not required to physically connect the Communicator 2.0 to controllers to activate the account. This step can be done at a later time. 1. Install the unit and connect the Communicator 2.0 to a computer screen and keyboard (Connecting the Communicator 2.0 to a Peripheral Device, page 11). - Page 21 5. At the bottom of the screen click Activate. 6. The following screen appears: At this point, you can use Communicator 2.0 to configure your controllers locally. Click • To enable web control, click . RotemNet Web scans the controllers.
-
Page 22: Connecting The Communicator 2.0 To Rotemnet Web
NOTE Users having a local account with no internet access, uncheck the Allow to Manage Farms From the Internet checkbox. 2. In your browser, enter the Communicator 2’s URL address (Munters supplies this information). The Activation screen appears. © Munters AB, 2019... - Page 23 Name the account. • Click Next. • The following screen appears. Figure 22: Farm Definition 5. Type in the farm name and define the fields. 6. Click Activate. 7. In the following screen, click Start scan. © Munters AB, 2019...
-
Page 24: Login To An Existing Account
XISTING CCOUNT 1. Connect the Communicator 2.0 to your LAN (i.e. your modem). 2. In your browser, enter the Communicator 2’s URL address (Munters supplies this information). The Activation screen appears. Figure 25: Login screen 3. Under Login to your account, fill in the fields and click Login. -
Page 25: Attaching The Farm To A Group
If the farm is part of a group or if the owner has created groups do one of the following: Check the radio box next to the group to which you want to attach your farm and click Attach • to Group. Figure 28: Attach Farm to Group Screen © Munters AB, 2019... -
Page 26: Lan Logon
Users connected to the Communicator 2.0 via a LAN connection can log on by typing the serial number into the URL. 1. On the back side of the Communicator 2.0 is a white label with an 12 character serial number: 2. In a browser type http://rcbox-XXXXXXXX, where XXXXXXXX represents the eight digits in the serial number. -
Page 27: Rotemnet Web
Click on House # to go to the Platinum Touch functions. • Click on to configure RotemNet Web functionality. • Click on to configure the user definitions. • Click on to view the battery status. • Click on to view the connection to controllers. • © Munters AB, 2019... -
Page 28: Rotemnet Web Functionality
House Scan Tab • About Tab • Only the farm owner can view the Farm Settings and House Scan tabs. NOTE: 5.1.1 F ETTINGS Farm Settings • Local Users • Data Collect • Activity Log • © Munters AB, 2019... -
Page 29: Farm Settings
5.1.1.1 Farm Settings Use this screen to define functions related to Communicator 2.0’s connection to your farm. Farm Name: This name appears on your screen. • Farm Type: Poultry or Pigs. Make sure that the definition matches the Communicator 2.0 •... -
Page 30: Local Users
• Each user name and password is the same. For example, User 1’s password is User 1. User 2’s password is User 2. • The Farm Owner can edit these names, passwords, and to whom they are assigned. © Munters AB, 2019... -
Page 31: Data Collect
Fill out the form with the required data and click Save. • 5.1.1.4 Activity Log This screen displays the history of events connected to the Communicator 2.0. Under Event, Sub Event, User, and Cmd ID you can select filters to narrow down the results. © Munters AB, 2019... -
Page 32: House Scan Tab
5.1.3 A BOUT This screen displays the product and software version. Send this information to technical support in the even that you require assistance. The Support ID enables remote technical support from Munters or from your dealer. © Munters AB, 2019... -
Page 33: User Settings
Pressure Units o Wind Speed Units o Disable or enable standby by mode (if the latter, define the amount of time that needs to pass before the mode is activated). Click to save any changes. • © Munters AB, 2019... -
Page 34: Software Upgrade
You cannot upgrade product software! Upgrade your product software using the procedures NOTE: given in the product manuals. If you are using a disk on key start here. If you are updating your Communicator 2.0 via the NOTE: web, go to step 4. -
Page 35: Battery Status
If you did not place the disk on key in the USB port or if the disk does not contain a program, an NOTE: error message appears. 5.4 Battery Status Click on the battery symbol to view the Communicator 2.0's battery status. • An alarm is sent when the Battery switch is turned off. NOTE: 5.5 Controllers Connectivity Click on the hyperlink symbol to view the status of the controller connectivity. -
Page 36: Alarms
This section describes how to configure the alarms. All other functions are described in the Platinum Touch manual. Alarms can be only configured locally. Anyone viewing the Communicator 2.0 screen via the web • will not see Alarm System in the Settings icon. -
Page 37: Editing The Settings
6.1 Editing the Settings 1. Click the Settings icon and select Alarm System. The following screen appears. The screen displays the current alarm settings along with Communicator 2.0 parameter settings. 2. To edit the Alarm Settings click © Munters AB, 2019... - Page 38 Country of installation: Choose from the drop down list. o Generator Ip Address (US customers only): Users having a backup generator connected to the Communicator 2.0 can enter the generator’s IP address. Communicator 2.0 will transmit any alarms from the generator.
-
Page 39: Adding Contacts
To receive push notifications, use the email address used to activate each account. You can NOTE: enter any email address but only the activation address enables push notifications. Message Type: Mark the checkbox(es) next to message type(s) that this contact is to receive. • © Munters AB, 2019... -
Page 40: Alarm And Events History
The first level of security is the contact list; only these numbers can interact with the Communicator 2.0. If a pin code is added, only someone having the code can reset the alarms, even when calling from an authorized phone number. -
Page 41: Digital Inputs
6.4 Digital Inputs Communicator 2.0 supports an eight dry contact digital input card (found in the External Box) that can be programmed as normally open / normally closed input. These inputs can be connected to a wide variety of sensors such as generator operation, magnetic door or window, thermostat, etc. -
Page 42: Disable Alarms
UDIO ESSAGE Communicator 2.0 sends voice messages to the designated people on the contact list. This section details the procedure to follow when an audio alarm is received. This service is provided by the Communicator 2.0 ONLY if the contact is properly defined with NOTE: contacts and the "VOICE"... -
Page 43: Receiving The Message
6.7.2 R ESPONDING TO A ESSAGE This section details how to respond to a text message sent from Communicator 2.0 to a mobile phone. The response can reset a siren, an alarm, or acknowledge the messages. Resetting the Siren •... -
Page 44: Resetting The Siren
• Acknowledging a Message • 6.7.2.1 Resetting the Siren After typing the text message, press the 'Send' button to send it to the Communicator 2.0. NOTE: In the procedures below, the shows the SMS text to be sent. highlighted text Resetting the Siren of One House •... -
Page 45: Diagnostics
7 Diagnostics Tests • LEDs • 7.1 Tests Communicator 2.0 includes a basic diagnostics package. On the Activation screen click Diagnostics. • The following screen appears. Use this screen and the information it supplies when speaking with technical support. •... -
Page 46: Leds
No light: No modem installed o Red: Modem installed but no connectivity to house o Green Blinking LED: OK Cell phone modem o No light: No modem installed o Red: Modem installed but no connectivity o Green: OK © Munters AB, 2019... - Page 47 Off: No active alarm(s) o On: Active alarm Battery o Red: Battery is disconnected o Red Blinking: Battery is not charging (consult with dealer immediately) o Green Blinking LED: Battery is charging o Green: Battery is charged © Munters AB, 2019...
-
Page 48: Appendix A: Changing The Battery
8 Appendix A: Changing the Battery Munters recommends installing a new battery every two years. Change the battery between flocks or herds. • Order a new battery from your dealer. • To replace the battery: 1. Disconnect the AC power. - Page 49 11. Place the cover in place and insert the screws. 12. Place the unit on the wall (optional) and reconnect the cables. 13. Turn on the battery switch, apply AC power, and verify that the Power LED is lit. © Munters AB, 2019...
-
Page 50: Warranty
Munters plant was required: if this is not done, the user is fully responsible for the damage which they could suffer. - Page 51 The use of non-original spare parts or incorrect assembly exonerates the manufacturer from all liability. Requests for technical assistance and spare parts can be made directly to the nearest Munters office. A full list of contact details can be found on the back page of this manual.
- Page 52 Munters Brasil Industria e Comercio Ltda, Phone +55 41 3317 5050, Canada Munters Corporation Lansing, Phone +1 517 676 7070, China Munters Air Treatment Equipment (Beijing) Co. Ltd, Phone +86 10 80 481 121, Denmark Munters A/S, Phone +45 9862 3311, India...
Need help?
Do you have a question about the Communicator 2.0 and is the answer not in the manual?
Questions and answers
how to change admin password
The manual states that the Farm Owner can edit user names and passwords. To change the admin password on Munters Communicator 2.0, access the Local Users screen, locate the admin account, and update the password. Then, save the changes.
This answer is automatically generated