Table of Contents
Advertisement
Advertisement
Table of Contents

Related Manuals for HiWeigh X706


Summary of Contents for HiWeigh X706
-
Page 3: Before Use
Before Use Safety precautions WARNING! ▲ Do not use X706 weighing terminal in hazardous area! Do not use it within areas classified as hazardous division 1/2 or zone 0/1/2/21/22 because of combustible or explosive atmospheres. Never immerse it in corrosive chemical liquid. Static sensitive device, it must be handled only by qualified technicians. Improper handling may damage the circuit card and the device, which is not covered by the warranty. DANGER! Electric shock hazard! Make sure the indicator is grounded well. Always unplug AC cable before performing any service work on the indicator! And wait for at least 30 seconds before any operation on the indicator. DISPOSAL In conformance with the European Directive 2002/96/EC on Waste Electrical and Electronic Equipment (WEEE), this device may not be disposed of in domestic waste. This also applies to countries outside the EU as per their specific regulations. Please dispose of this product in accordance with local regulations at the collecting point specified for electrical and electronic equipment. If you have any questions, please contact the responsible authority or the distributor from which you purchased this indicator. Should this indicator be passed on to other parties (for private or professional use), the content of this regulation must also be related. The indicator has a rechargeable internal battery. The battery contains heavy metals. Please observe the local regulations on the disposal of environmentally hazardous materials. OPERATION Use an independent electric source to prevent electronic disturbances. Don’t place any object on the platform when switch on the indicator. Please warm-up the scale for 2-3 minutes before operation of it. Avoid sudden changes in temperature and humidity. Don’t overload the scale – do not exceed its maximum capacity. All Rights Reserved, any copying, reproducing, republishing, posting, distributing by any means is prohibited without permission of HiWEIGH Technologies Limited and Shanghai Softmeasure Industry Development Co.,Ltd. - Page 4 Index Techniccal Specifications Model Identification Packing List Connecting (Load Cell | RS232) Keypad Description Display description User Functions (Weighing | Counting | Checkweigh | Multi-Range | Multi-Interval) User’s Parameter Configuration - UF-1: A/D Internal Code - UF-2: Configuration of Checkweigh - UF-3: Auto Off - UF-4: Display Backlight - UF-5: Hold Function - UF-6: RS232 Data Output - UF-7: Configuration of Converter Speed - UF-8: Initial Weighing Value - UF-9: Configuration of Gravity User’s Calibration Trouble Shooting Warranty...
-
Page 5: Technical Specifications
1. Technical Specifications Model X706 Enclosure Type ABS Product Dimension 180x220x85mm Accuracy Class III Display Resolution 1/3,000 – 1/15,000 Internal Resolution 1/300,000 – 1/600,000 Sampling Rate 20times/s Display 6 digits LCD (30mm) with backlit Power 100-240V-10V600mA AC/DC Adapter Rechargeable Battery 6V4Ah Working Time 160hours (no backlight) | 120hours (with backlight) Load cell Sensitivity 1.5 – 3.0mV/V Load Cell Quantity 1-4 * 350O or 1-8*750 Ω Ω Excitation voltage 5 VDC about 18mA Power consumption about 32mA with backlit about 48mA with backlit and RS232 Units Kg | lb, g | oz, etc. Operating Temperature -10 ~40... -
Page 6: Packing List
3. Packing List After the weighing terminal received, please open the box carefully and check the following items included: Indicator x 1 Connectors and screws bag x 1 Column adapter x 1 Manual x 1 Other parts Optional 4. Connecting 4.1 LOAD CELL For 4-wire load cells for 6-wire load cells (short connect: +EXC and +SEN , – SEN and -EXC .) +EXC ……………… Excitation + +EXC ……………… Excitation + +SEN ……………… Excitation+ +SIG ……………… Signal + +SIG ……………… Signal + SHIELD ……….……. Shield -SIG ………………... -
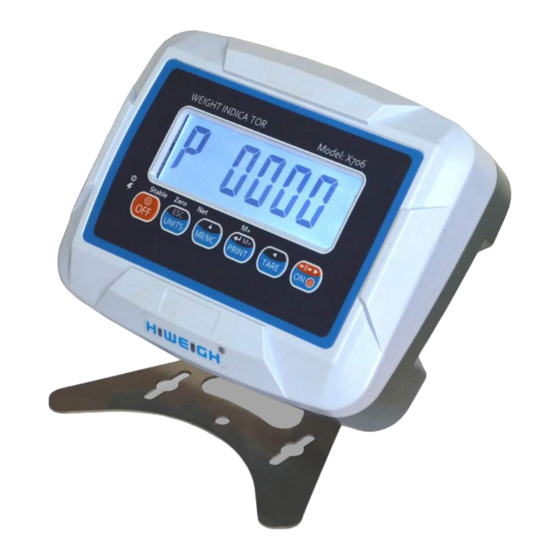
Page 7: Keypad Description
5. Keypad Description function: Press this key to switch on the scale. function: To place the reading of the display at “0”, the value of the display must be lower to +2% of the maximum capacity. function: To move to the right in the programming mode. function: Press and hold the key during 3 seconds to switch of the indicator. function: To choose the unit of weight. function: To exit from the programming mode. function: To remove (tare) the weight of a container. function: To move to the left function: To view the number of accumulations and the accumulated weight. (TOTALIZING) function: To remove the memory of the accumulations. function: To increase the values inside the programming. function: To accumulate in memory the value of the weight that appears in the screen. function: Manual transmission of data through RS-232 port to a PC or printer. function: Confirmation key in the programming mode. -
Page 8: User Functions
6. User Functions 6.1 Weighing Operation Switch on the equipment when all the parameters have been correctly configured and the equipment has been calibrated • If there is nothing on the platform (without load on the platform), it should display 0, if not, please press • Place the weight on the platform and the platform will show the weight. • The accumulation and sending of data will depend on the mode chosen in the section of RS232 (UF-6) • You can display the accumulated values at any time by pressing (TOTALIZING) 6.2 Counting Operation Switch on the equipment when all the parameters have been correctly configured. If there is nothing on the platform (with no load on the platform), it should display 0, if not, please press the key Press the key until the symbol appears on the screen Press the key successively to choose the quantity of pieces of the sample. On the screen, it will appear successively, C10/C20/ C50/C100/C200. Place the sample on the platform, and wait until the sign of stability and press the key Place the product on the platform and the screen will show the number of pieces. The accumulation and the sending of data will depend on the mode chosen in the section UF-6. • To turn to the normal weighing mode, press the key • If the user wants to go back to the counting mode, using the same sample of reference, press the key again. • If the user want to change the sample of reference, the user must repeat the steps described above. 6.3 Checkweigh The user can configure the superior and inferior limits of the sample placed on the platform. The display will show if the sample is lower to the inferior limit , above the superior limit or in the zone between the two limits The user can configure when he wants to make the alarm ring and the stability needed to make it happen. All the procedure is described in the section UF-2. If the user wants to define the limits in the normal weighing mode and wants to use the limits in piece counting mode, he must define the new limits for this mode, when it changes to weight mode again, the user will recover the limits he already has. The same happens otherwise. 6.4 Multi-Range | Multi-Interval The indicator can be configured with an only range, a maximum weight and a value of step. It can also be configured as multi range or multi interval, in such cases there is a maximum weight. - Page 9 7. User’s Parameter Configuration Parameter Description UF-1 Internal calculation (A/D) UF-2 Limit Configuration of weight ( checkweigh) UF-3 auto auto off UF-4 Back illumination of display UF-5 4 modes of hold UF-6 RS-232 Output (PC/PRINT) UF-7 Configuration of the speed of the converter (A/D) UF-8 blind UF-9 Configuration of gravity To access the configuration of parameters when the screen display of zero, the user must press the keys and at the same time. Press the key or to choose the desired character (UF-1 ~ UF-11). To go back to the previous mode, press the key UF-1 7.1 Internal Code (A/D) | 1. Press the key to view the internal code of the indicator. 2. To go to the next parameter, press the key , the screen will show the value of the voltage of the battery. 3. To exit this mode and go back to the normal weighing, the user must press the key or UF-2 7.2 Configuration of Checkweigh | 1. Press the key to access this parameter. 2. The display will show the message “000.000L” (lower limitation = Lo). 3. Use the keys and to move the cursor and the key to choose the number desired. 4.
- Page 10 UF-3 7.3 Auto Off| Modes: • AoFF 00 – Auto switch off deactivated • AoFF 01 – Auto switch off activated in a minute. The scale is going to switch off automatically after 1 minute of not being used. • You can configure the value wished from 1 to 99 minutes. 1. Press the key to have an access to the parameter. 2. Press the key and to move the cursor and the key to choose the desired number. 3. Press the key to confirm. UF-4 7.4 Display Backlight | Modes: • A: Automatic. • ON: Illumination Activated. • OFF: Illumination Deactivated. 1. Press the key to have an access to the parameter. 2. Press the key to select the desired mode. 3. Press the key to confirm. UF-5 7.5 Hold Function | (Once the object is retired from the plate, the display maintains the weight fixed for a period. This function is very useful for the weighing of animals) 1. Press the key to have an access to the parameter. 4. Press the key to select the desired mode. 5.
- Page 11 UF-6 7.6 RS-232 Data Output| 232 0 EXIT RS-232 Deactivated FORMAT OF THE DATA Format 1 PC ST, GS, +0005. 28kg <CR> <LF> ST, GS, +0000150pcs <CR> <LF> 232 1 Stable output, without accumulation, when it achieves a stability with Format 1 232 2 Continuous sending with Format 1 232 3 Manual output, without accumulation, manual by pressing the key with Format 1 Format 2 PC +0005. 28kg <CR> <LF> +0000150pcs <CR> <LF> 232 4 Stable output, without accumulation, when it achieves a stability with Format 2 232 5 Continuous sending with Format 2 232 6 Manual output, without accumulation, manual by pressing the key with Format 2 Format 3 Printer Weighing Bill Counting Bill S/N WT/pcs S/N WT/kg ------------------------------ ------------------------------ 0001 20 0001 0.25 0002 10 0002 0.20 0003 0.75 0003 55 ------------------------------ ------------------------------ 0003 85 0003 1.20 232 7 Manual accumulation, and press the key to output Format 3 232 8 Automatic accumulation when the weight stable, and output Format 3 If the user presses the key twice (when the display back of 0), the total line to be printed: -------------------------- -------------------------- 0003 1.2 0003 85 And the memory of the weights will be cleaned.
- Page 12 If the user presses the key twice (when the display back of 0), the summarization to be printed: TOTAL NUMBER OF TOTAL NUMBER OF TICKETS 0002 TICKETS 0002 NET 2.12 NET 50 And the memory of the weights will be cleaned. 7.6.1 Speed of Communication Press the key to access the parameter Press the key to choose the data exit mode wanted. Press the key to confirm. Speed of Transmission b1200 1200 baud b2400 2400 baud b4800 4800 baud b9600 9600 baud b19200 19200 baud b38400 38400 baud Press the key to choose the speed of transmission needed. Press the key to confirm. 7.6.2 Protocol of Communication UART SIGNAL OF EIA-RS232-C Baud rate 1200 / 2400 / 4800 / 9600 / 19200 / 34800 bps Bits of data 8 bits Bits of data 8 bits Bits of parity Bits of stop 1 bit headboards information Headboard 1 (2 BYTES) Headboard 2 (2 BYTES)
- Page 13 Format 2 (232 4 ~ 6): B YTES ASCII FOR THE UNITIES kg, g, t, lb data Unit B YTES ASCII FOR THE UNITIES tl, T, lboz data Unit B YTES ASCII FOR THE UNIT pcs data Unit UF-7 7.7 Configuration of the Speed of the Converter | 1. Press the key to access the parameter. 2. Press the key to choose the desired mode: •Mode 1: Normal •Mode 2: Fast •Mode 3: Slow 3. Press the key to confirm. UF-8 7.8 Initial Weighing Value| It appears 0 on screen until the next division is selected. It starts to show values from that division. Example: Scale with e =2g Blind in 5 divisions It will show 0 until it reaches 25= 10 g, the first value it will show will be 12g. 1. Press the key to access the parameter. 2.
-
Page 14: Troubleshooting
Err H Zero point too high Recalibration firstly to see whether it can be solved. Load cell connector loose – weld and connect again Z Err Zero point too high Load cell problem – Replace Err L Zero point too low Internal code is not stable Err n Weight is not stable Put the platform steadily on ground or floor If for animal weighing, use HOLD function Load cell problem - Replace Overloading Remove the overload items O Err Overloading hhhhhh Overloading Linearity not correct or cancel Do linearity calibration again LLLLLLL Weight is too low Add more object Internal code is too low Load cell connector check and readjust Load cell problem - Replace Err4 E2ROM abnormal Change the mainboard B Err Battery volume is too low Recharge or replace the battery 10. Warranty This indicator has a warranty against all manufacture and material defects, for a period of a year starting with the delivery date. During this period, HiWEIGH, will be in charge of the repairing of it. This warranty does not include the damages done by overload or wrong use. The warranty does not cover the delivery expenses necessary for the repair of the indicator.
Need help?
Do you have a question about the X706 and is the answer not in the manual?
Questions and answers