
Related Manuals for Kronos InTouch DX


Summary of Contents for Kronos InTouch DX
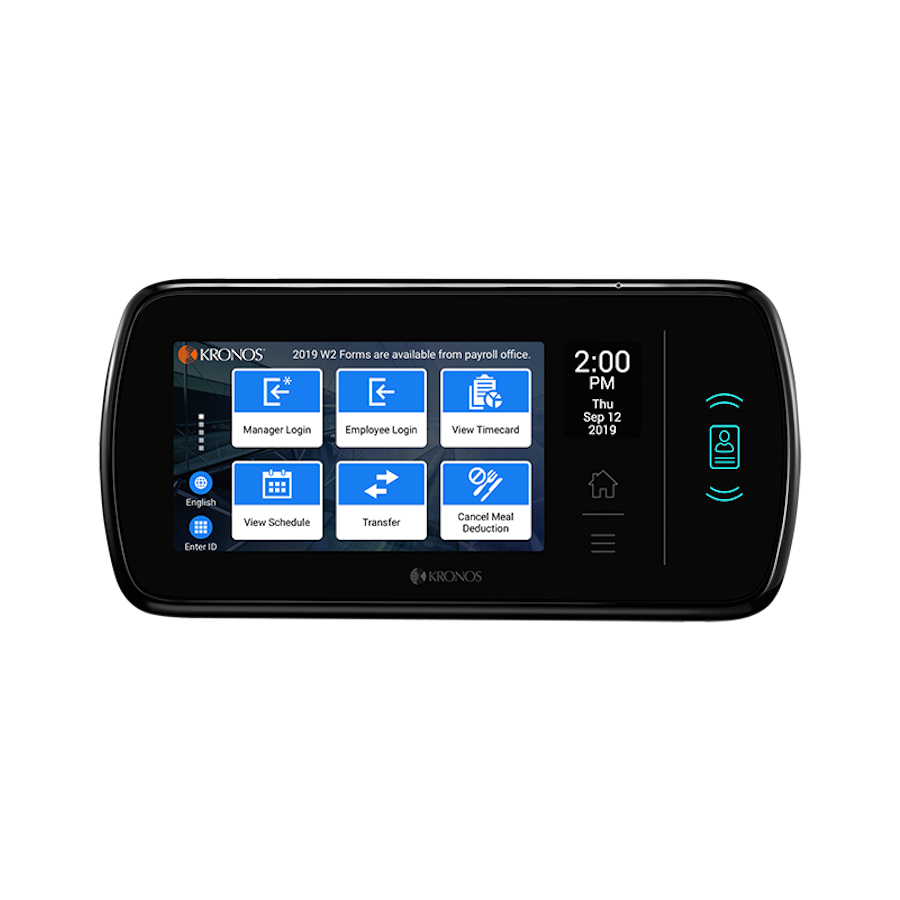
- Page 1 Kronos InTouch ® User Guide How to use and administer the Kronos InTouch DX timeclock. Document Revision: 2...
- Page 2 Fair Labor Standards Act. Nothing in this Guide shall be construed as an assurance or guaranty that Kronos products comply with any such laws.
- Page 3 Published by Kronos Incorporated 900 Chelmsford Street, Lowell, Massachusetts 01851 USA Phone: 978-250-9800, Fax: 978-367-5900 Kronos Incorporated Global Support: 1-800-394-HELP (1-800-394-4357) For links to information about international subsidiaries of Kronos Incorporated, go to http://www.kronos.com Document Revision History Revision Release Date...
-
Page 5: Table Of Contents
Contents Chapter 1: Overview Introduction ....................12 How InTouch DX works ................13 How the timeclock operates with the host application ......13 Cross-punching ..................13 Modes of operation ................14 InTouch DX features ................... 15 Schedule enforcement ................15 Default transactions ................ - Page 6 View Schedule (Smart View) ..............54 View Timecard (Smart View) ...............55 View Totals (Smart View) ..............55 Chapter 3: Manager Mode Transactions Introduction ....................58 Access manager mode ..................59 Community home page ...............59 Individual home page ................60 Biometric transactions: Kronos Touch ID Plus ..........61...
- Page 7 Contents Templates ....................61 Terminology ..................62 Enroll or Re-Enroll Employee .............. 65 Unenroll Employee ................73 Standard transactions ................... 75 Add Punch ..................... 75 Delete Punch ..................76 Manage Bell ..................77 Manage Gate ..................79 Override Global Home ................81 Override Global Non-Home ..............
- Page 8 Contents Connect to Network ................108 Date and Time ..................111 Audio ....................111 Display ....................112 VNC Remote Access ................112 SSH Remote Access ................113 Bar Code Symbology ................114 Remote Readers ...................114 Strong Passwords .................115 Edit Advanced Settings ................116 Failure Override ...................116 Employee Enroll Count ...............116 Restart Device ..................117 Change Maintenance Mode Password ..........117 Change Database Password ..............118...
- Page 9 Contents Run Tests ....................127 Sequential .................... 127 Communications ................. 127 Integrated Badge ................. 128 Display ....................129 Tone ....................129 LED ..................... 129 GPIO Output Bits ................130 Monitor GPIO Inputs ................130 Microphone ..................130 Remote Badge ..................130 Network Connectivity .................
- Page 10 Contents...
-
Page 11: Chapter 1 Overview
Chapter 1 Overview Note: If you are configuring the Kronos InTouch DX for the first time, go to “Initial setup and configuration” on page 93. -
Page 12: Introduction
Chapter 1 Overview Introduction The InTouch DX is a data collection device that communicates with the Kronos host applications. The timeclock collects information that employees enter using a badge reader, biometric device, or keypad. The host application software collects data from the timeclocks to track and process labor-related data, generate management reports, and transfer information to the payroll service. -
Page 13: How Intouch Dx Works
How InTouch DX works How InTouch DX works How the timeclock operates with the host application Administrators: Use the host application to configure employees and information such as schedules, punch restrictions, and labor categories. The host application downloads this information to the timeclock, which uses it to accept or restrict employee punches. -
Page 14: Modes Of Operation
Chapter 1 Overview Modes of operation InTouch DX operates in three modes: • Employee • Manager • Maintenance Each mode has its own set of transactions, depending on how the host application is configured. To access a mode, authorized users can swipe a badge or use other methods, as described in this document. -
Page 15: Intouch Dx Features
Default transactions Administrators: You can use the device configuration settings to set up default transactions for InTouch DX users. When an employee swipes a badge or enters a badge ID, the timeclock automatically initiates the transaction that you designate as the default. Default transactions include punches, labor category transfers, job transfers, and so on. -
Page 16: Transaction Persistence
Chapter 1 Overview When the default transaction for a home employee’s badge swipe is a punch, you can assign a different default transaction for a badge ID entry. For example, if a group of home employees routinely change job assignments when they start a shift, you can set the default transaction to a Job Transfer for a start-of-shift badge read. -
Page 17: Soft Key Schedules
View Totals or View Schedule soft keys. Each soft key schedule can contain up to eight time intervals for each day of the week. Language support The InTouch DX includes pre-installed, translated versions of the user interface and error messages. The device currently supports the following languages: •... - Page 18 Administrators: You can translate the user interface into other languages, or customize the text in any of the supported languages. For details, see the Guide to Translating and Customizing the InTouch DX Interface. Multi-language support Administrators: The timeclock can display the interface in one or more of the supported interface languages.
-
Page 19: Badges
Badges Badges Integrated badge readers The InTouch DX is equipped with one of the following integrated badge readers: • ® Prox • Smart card: MIFARE/DESFire, iCLASS, or FIPS 201 • Bar code • Magnetic stripe If the timeclock is equipped with a proximity or smart card reader, hold the badge within one inch of the timeclock, as shown in the following illustration. - Page 20 After configuration is completed, you use FIPS 201 PIV cards at the InTouch DX in the same way that you use other smart cards and proximity cards.
-
Page 21: Remote Badge Readers
CIV (Commercial Identity Verification). • CAC (Common Access Card). • TWIC (Transportation Worker Identification Credential). Also, the InTouch DX does not support reading or using additional data from PIV cards, including: • Personal Identification Number (PIN) for multi-factor authentication. •... -
Page 22: Navigation
Chapter 1 Overview Navigation Gesture support Select To select an item (for example, a labor category) from a list, press the item with one finger for at least one second. Release your finger to complete the action. If you cannot view an item’s description in its entirety (for example, the location transfer set Hospital A/Nursery/RN1), press and hold the item until all of the text appears. - Page 23 Navigation...
-
Page 24: Home And Menu Keys
Chapter 1 Overview Home and Menu keys The front of the timeclock contains two keys. The Home key returns users to the respective employee mode, manager mode, or maintenance mode home page. The Menu key (below the Home key) allows authorized users to access the following: •... -
Page 25: Alphanumeric Keypad
Navigation Alphanumeric keypad Interface standards: • The “X” in the text box clears your entire entry. • The “X” on far right is the Backspace key. • To close the keypad without saving, tap the Back icon. • The 123? key toggles between the alphabetic and numeric keypads. -
Page 26: Calendar
Chapter 1 Overview Calendar... - Page 27 Navigation Interface standards: • The selected date is orange. • The calendar defaults to the current date, which is in a blue circle. • The horizontal arrows allow you to scroll through the months.
-
Page 28: Customize The User Interface
Chapter 1 Overview Customize the user interface For details about performing these tasks, see the device configuration online help. Logo Administrators: Use the device configuration settings to add your company logo to the home page. First, import your company logo to the device. Access the Device Configuration page, open the Main Menu, and select Manage Imports >... -
Page 29: Chapter 2: Employee Mode Transactions
Chapter 2 Employee Mode Transactions... -
Page 30: Introduction
Introduction Employee mode enables you to perform activities such as punching in, requesting time off, or viewing your schedule. When the InTouch DX is in employee mode (the default mode), you initiate a transaction by tapping the appropriate soft key. -
Page 31: Access Your Employee Home Page
Access your employee home page Access your employee home page Note: This section assumes that your administrator has configured a punch as the default transaction for a badge swipe or finger scan. Your employee home page contains your photo or initials, a link to the Message Center (if configured), and a log-out button. -
Page 32: Individual Home Page
Chapter 2 Employee Mode Transactions Option 1 1. Scan your finger, swipe your badge, or tap Enter ID and enter your badge ID. 2. Enter your password. A message confirms that your punch was successful. 3. Do one of the following: –... -
Page 33: Smart Landing
When you swipe left on the last open message, Smart Landing closes. Biometric scanning Timeclocks that include the Kronos Touch ID Plus option can validate your identity based on a finger (or biometric) scan. This option offers three types of biometric scanning: biometric verification, biometric identification, and biometric identification with badge ID. - Page 34 ID before you scan a finger—on a timeclock that is configured for biometric identification. Before you can use biometric scanning to perform transactions, your manager must enroll you for biometrics. Managers: For details about enrolling employees for biometric scanning, see “Biometric transactions: Kronos Touch ID Plus” on page 61.
-
Page 35: Standard Transactions
Standard transactions Standard transactions Standard (or local) transactions use information that is stored in the timeclock. Administrators: You can configure the following options for standard transactions. For details, see the device configuration online help. • Enable biometric verification or biometric identification for home employees. Access the Device Configuration page, and select Cards and Readers >... -
Page 36: Add Missed Punch
Chapter 2 Employee Mode Transactions The following standard employee transactions are included with the InTouch DX. All procedures assume that you have already entered your credentials. Add Missed Punch Allows you to add a missed punch to your timecard. 1. Tap Add Missed Punch. The punches for each day in the current pay period appear. -
Page 37: Edit Paycode
Standard transactions 1. Tap Add Transfer. 2. Depending on your configuration, complete one or more of the following fields: – Business Structure – Pay Cost Center – Work Rule – Project – Work Order – Comment Code 3. Enter the Date. 4. - Page 38 Chapter 2 Employee Mode Transactions Hours 1. Tap Edit Paycode. 2. Tap Hours. 3. Tap the Date text box, and select the date. You can enter a date up to 29 days in the past or in the future. 4. Enter the number of hours. 5.
-
Page 39: Enter Gate
Standard transactions Enter Gate Tap Enter Gate to unlock a door or turnstile without affecting your punch status. Enter Tips Allows you to record your tips. 1. Tap Enter Tips. 2. Enter the Tip Amount. 3. Select the Business Structure. 4. -
Page 40: Request Time-Off
Chapter 2 Employee Mode Transactions Request Time-Off Enables you to request vacation time, sick time, or other time off from work. In a single transaction, you can make one or more requests for time-off. 1. Tap Request Time-Off. 2. If prompted, select a time-off sub-type. Otherwise, go to the next step. 3. -
Page 41: Review Punches
Standard transactions Review Punches Enables you to view successful punches, rejected punches, and labor transfers that have occurred during a specified time period. Administrators: To configure the number of hours’ worth of data that the timeclock displays, see the online help for the host application. 1. -
Page 42: View Attendance Balance
Chapter 2 Employee Mode Transactions 4. Depending on your configuration, do one of the following: – To add missing punches to your timecard, tap Continue. The Add Missed Punch transaction opens. For details, see “Add Missed Punch” on page – To approve your timecard as is, tap Review. -
Page 43: View Punch Status
Standard transactions View Punch Status Tap View Punch Status to view the date and time of your last punch. The time span that the system searches is configurable. -
Page 44: Smart View Transactions
Smart View transactions Unlike standard transactions, Smart View transactions do not rely on information that is stored in the InTouch DX. Instead, they allow you to perform transactions at the timeclock and submit the information directly to the host application database. -
Page 45: Edit Paycode (Smart View)
Smart View transactions Administrators: You can create custom Smart View transactions for your employees. For example, you can configure a Smart View transaction that plays a training or educational video that resides on the host application. For more information, see the device configuration online help. Edit Paycode (Smart View) Use the Edit Paycode transaction to associate a positive or negative amount of time or money with a paycode. -
Page 46: Message Center (Smart View)
Chapter 2 Employee Mode Transactions 5. (Optional) Select the business structure, and one or more labor levels. 6. Tap Submit. Money 1. Tap Money. 2. Select the date. You can enter a date up to 29 days in the past or in the future. 3. - Page 47 Smart View transactions Navigation • Unread messages contain bold text and color graphics. Messages that you have read are grayed out. • By default, all messages appear in the list, but you can view only unread or only read messages by tapping the appropriate button (if configured). •...
-
Page 48: Move Paycode (Smart View)
Chapter 2 Employee Mode Transactions Move Paycode (Smart View) Use this transaction to deduct hours charged to a paycode and add them to a different paycode. 1. Tap Move Paycode. 2. Tap the Date text box, and select the date. You can enter a date up to 29 days in the past or in the future. -
Page 49: Request Open Shift (Smart View)
Smart View transactions Request Open Shift (Smart View) 1. Tap Request Open Shift. 2. If prompted, select a shift sub-type. Otherwise, go to the next step. 3. Tap the Select Shift text box. A list of open shifts appears (to view details, tap the shift). -
Page 50: Request Shift Swap (Smart View)
Chapter 2 Employee Mode Transactions Request Shift Swap (Smart View) This transaction allows you to exchange one of your shifts for the shift of another employee. 1. Tap Request Shift Swap. 2. Tap the Offered Shift field to view your shifts. Select the shift that you are offering to swap, and tap Select. -
Page 51: Respond To Shift Swap Request (Smart View)
Smart View transactions Respond to Shift Swap Request (Smart View) Use this transaction to respond to requests for shift swaps from other employees. 1. Tap Respond to Shift Swap Request. The requests for the current pay period appear. 2. Tap an employee to view the offered and requested shifts. To view details, tap the information icon. -
Page 52: View My Time (Smart View)
Chapter 2 Employee Mode Transactions 2. To view details about an accrual, tap its row. 3. (Optional) Depending on your configuration, you can perform the View Totals or Request Time-Off transactions. View My Time (Smart View) View My Time allows you to compare actual punches to your schedule, and includes transfers, exceptions, paycodes, and hours per day. - Page 53 Smart View transactions The page defaults to current pay period, but you can select the previous or next pay periods, and view past punches and upcoming shifts. Tap Scheduled or Actual to view the scheduled or actual shifts for the day. The number of timecard exceptions for the day is denoted by a counter.
-
Page 54: View Schedule (Smart View)
Chapter 2 Employee Mode Transactions • Approve Day: Allows you to approve the day that you are viewing. When you tap Approve Day, the button toggles to Remove Day Approval, which allows you to revert an approved day to its unapproved state. Note: If the timeclock is not configured to permit daily approvals, the Approve Day button is replaced by Approve Timecard button. -
Page 55: View Timecard (Smart View)
Smart View transactions View Timecard (Smart View) The View Timecard transaction displays timecards for employees whose assigned time entry method is hourly. 1. Tap View Timecard. 2. At the prompt, tap Proceed. A read-only view of the timecard for the current pay period opens. - Page 56 Chapter 2 Employee Mode Transactions Use the View Totals transaction to view total hours for each job in a selected pay period. 1. Tap View Totals. A list of total hours per job appears. 2. Tap a row to view the hour amounts categorized by type, such as regular, evening, and overtime.
-
Page 57: Chapter 3: Manager Mode Transactions
Chapter 3 Manager Mode Transactions... -
Page 58: Introduction
Chapter 3 Manager Mode Transactions Introduction Administrators: Use the device configuration function to set up access to manager mode. You can configure a device to include one or more employee mode transactions while the device is in manager mode. For information about Employee mode transactions, see “Employee Mode Transactions”... -
Page 59: Access Manager Mode
Access manager mode Access manager mode Manager mode allows you to perform supervisory transactions (such as enrolling employees for biometric authentication, adding punches, or overriding schedule and punch restrictions). You can access manager mode (that is, the manager home page) in different ways, depending on how the host application is configured. Your administrator can configure the timeclock to open either your manager home page or your employee home page after you enter your credentials. -
Page 60: Individual Home Page
Chapter 3 Manager Mode Transactions Individual home page There are two ways to access manager mode when the timeclock is configured to display the individual home page. Option 1 Scan your finger, swipe your badge, or tap Enter ID and enter your badge ID. Your employee home page opens. -
Page 61: Biometric Transactions: Kronos Touch Id Plus
Biometric transactions: Kronos Touch ID Plus Biometric transactions: Kronos Touch ID Plus If you are using the Kronos Touch ID Plus option, the Enroll Employee and Unenroll Employee transactions are available. These transactions also require some configuration in the host application. For details, see the device configuration online help. -
Page 62: Terminology
Chapter 3 Manager Mode Transactions Terminology cuticle finger core finger core A finger contains a pattern of ridges, with typically one innermost ridge that curves in on itself, near the center. The fingerscan device uses the unique characteristics of a fingertip’s ridges to construct the template. arches (plain and tented) loops (singular and twin) - Page 63 Biometric transactions: Kronos Touch ID Plus whorls and central pocket loops Managers: Before you attempt to enroll employees, practice enrolling yourself several times, and observe how finger placement, pressure, and moisture affect the scan results. Then enroll a small group of employees to familiarize yourself with the process.
- Page 64 Chapter 3 Manager Mode Transactions Place your finger on the sensor with your cuticle at its center. cuticle in center of sensor...
-
Page 65: Enroll Or Re-Enroll Employee
Biometric transactions: Kronos Touch ID Plus Enroll or Re-Enroll Employee Administrators: When an employee places a finger on the sensor, the timeclock displays a live image of the fingertip. The image helps the employee position the fingertip on the sensor to achieve a Good enrollment. - Page 66 Chapter 3 Manager Mode Transactions Employee instructions 1. Tap the target (+) that corresponds to the finger you are enrolling. In order of preference, select your index finger, middle finger, or thumb. Enroll your ring finger or pinky only if you cannot successfully enroll the other fingers. If you do tap the ring finger or pinky, a warning message appears;...
- Page 67 Biometric transactions: Kronos Touch ID Plus Note: If the system directs you to reposition your finger, do not slide the finger into place. Rather, lift your finger from the sensor and then place the finger in the recommended position. d. Apply firm, even pressure. If you apply too little pressure, the sensor might not detect your finger.
- Page 68 Chapter 3 Manager Mode Transactions The results pages vary, depending on the enrollment score: Good, Fair, or Poor. Good Enrollment After a few seconds, this screen times out. Fair Enrollment Do one of the following: • Tap Retry. Return to step 2. Re-scan the same finger, and try to achieve a Good enrollment.
- Page 69 Biometric transactions: Kronos Touch ID Plus Poor Enrollment Note: A low Quality score might indicate that your finger is too dry. Moisten it using the PreScan® fingertip enhancer pad. Do one of the following: • Tap Retry. Return to “Capture Fingerscan.” Re-scan the same finger, and try to achieve a Good enrollment.
- Page 70 Chapter 3 Manager Mode Transactions If you tap Continue, and thereby accept a Poor enrollment, you can use only biometric verification or biometric identification with badge ID at the timeclock. That is, you must first swipe a badge or enter a badge ID before scanning the finger that you enrolled.
- Page 71 Biometric transactions: Kronos Touch ID Plus Tap one of the following: • Yes: Return to “Select Finger to Enroll,” and select another finger. • No: The enrollment process is completed. Failed Do one of the following: • Tap Retry. Return to step 2. Re-scan the same finger, and try to achieve an Accepted enrollment test.
- Page 72 Chapter 3 Manager Mode Transactions Biometric identification with badge ID Biometric identification with badge ID is designed for employees who attempt to enroll for biometric identification, but whose fingerscans are consistently Poor. The “Biometric identification with badge ID” feature thus allows organizations to use InTouch devices for biometric identification for the majority of its employees—that is, those employees who achieve Good or Fair enrollments can identify themselves by using a fingerscan only.
-
Page 73: Unenroll Employee
Biometric transactions: Kronos Touch ID Plus Troubleshooting Result Possible cause Dark image You are applying too much pressure. Your finger is too moist. Your finger is not clean. The sensor is not clean. Wipe the sensor with a soft cloth dampened with water or diluted dishwashing liquid. - Page 74 Chapter 3 Manager Mode Transactions 1. To start, tap Unenroll Employee. 2. To select the employee, use one of the following methods: – Swipe the employee’s badge. – Enter the employee’s badge ID. – Search by employee name. – Browse the employee list. Note: If you select an employee who is not yet enrolled, you have the option to enroll the employee.
-
Page 75: Standard Transactions
Standard transactions Standard (or local) transactions use information that is stored in the timeclock. The following standard manager transactions are included with the InTouch DX. The instructions for all manager mode transactions assume that you are already in manager mode. -
Page 76: Delete Punch
Chapter 3 Manager Mode Transactions Note: Midnight (enter as 00:00) is the first minute of a day; 11:59 P.M. (enter as 23:59) is the last minute of a day. 5. (Optional) Select a comment code. 6. Depending on how your system is configured, you can make selections from one or more transfer-related fields. -
Page 77: Manage Bell
Standard transactions – Swipe the employee’s badge. – Enter the employee’s badge ID. – Search by employee name. – Browse the employee list. 3. Select the date. 4. Select the time. 5. (Optional) Select a comment code. 6. Tap Submit. If successfully deleted, a confirmation message appears. Depending on the system configuration, you have the option of performing the View Employee Timecard or View Employee Schedule transactions. - Page 78 Chapter 3 Manager Mode Transactions Ring Bell To ring the bell at unscheduled times (such as during an emergency): 1. Tap Manage Bell. 2. From the Duration Seconds menu, select the duration. 3. Tap Ring Bell. Silence Bell To either prevent the bell from ringing as scheduled (for a specified duration), or to silence a bell that is ringing: 1.
-
Page 79: Manage Gate
Standard transactions Manage Gate Administrators: You can connect a timeclock to a door latch, to control employee access to a locked building or room. To do the following, access the Device Configuration page, and select Bells & Gates > Gates. •... - Page 80 Chapter 3 Manager Mode Transactions Note: If a gate is already overridden for an employee, this transaction cancels that override and replaces it with the current one. 1. Tap Manage Gate. 2. Tap Override Gate for All. 3. Enter the duration of the override, in minutes. Maximum amount: 10,080 (or 7 days).
-
Page 81: Override Global Home
Standard transactions View Gate Times To view the gate schedules downloaded to the timeclock: 1. Tap Manage Gate. 2. Tap View Gate Times. A summary of the gate open and gate close schedules appears. Override Global Home Administrators: For information about punch interpretation rules, see the device configuration online help. -
Page 82: Override Global Non-Home
Chapter 3 Manager Mode Transactions Override Global Non-Home Use this transaction to temporarily or indefinitely allow non-home employees to punch at restricted times. For example, this feature enables non-home employees to punch out early because of inclement weather. 1. Tap Override Global Non-Home. 2. -
Page 83: Override Single Home Employee Restriction
Standard transactions Override Single Home Employee Restriction When unusual circumstances occur, use this transaction to override schedule and punch restrictions for a specific home employee. For example, you can allow an employee to start or leave work earlier than scheduled. 1. -
Page 84: Override Single Non-Home Employee Restriction
Chapter 3 Manager Mode Transactions Override Single Non-Home Employee Restriction Use this transaction to enter a punch for a non-home employee when there is a Global Restriction in effect. You can perform this transaction for several employees in succession. 1. Tap Override Single Non-Home Employee Restriction. 2. -
Page 85: Override Schedule
Standard transactions Override Schedule This transaction allows managers to modify an employee’s schedule from the timeclock—without needing to use the host application. The host application validates these revisions against the punch interpretation rules that apply to the employee. If the changes are accepted, the revised schedule is saved to the host application database. - Page 86 Chapter 3 Manager Mode Transactions Add shift 1. Tap Add Shift. 2. Enter the following information: – Start Date – Start Time – End Date – End Time – Paycode – Comment Code (optional) 3. Tap Add Shift. If the override is accepted, a confirmation message appears. Edit shift 1.
-
Page 87: View Biometric Template Reports
Standard transactions 3. Tap Select. 4. (Optional) Select a comment code. 5. Tap Submit. If the override is accepted, a confirmation message appears. View Biometric Template Reports Displays a list of some or all of the biometric templates that are stored in the biometric device. -
Page 88: View Employee Information
Chapter 3 Manager Mode Transactions Note: For details about these terms, see “Biometric transactions: Kronos Touch ID Plus” on page 61. View Employee Information 1. To display a set of data for a specific employee, tap View Employee Information. 2. To select the employee, use one of the following methods: –... -
Page 89: View On Or Off Premises Employees
Standard transactions View On or Off Premises Employees Use the View On or Off Premises Employees transaction to view a list of home employees (that is, those who are assigned to this timeclock) who are currently on or off the premises. 1. - Page 90 Chapter 3 Manager Mode Transactions...
-
Page 91: Chapter 4: Maintenance Mode Functions
Chapter 4 Maintenance Mode Functions... -
Page 92: Introduction
Chapter 4 Maintenance Mode Functions Introduction Maintenance mode allows you to display technical information about the InTouch DX, perform configuration tasks, and execute diagnostic tests. These tests can help you troubleshoot hardware malfunctions. Important: The application software for the device resides on the SD (Secure Digital) card, which is in the unit. -
Page 93: Initial Setup And Configuration
Initial setup and configuration Initial setup and configuration The procedure for setting up and configuring a newly installed InTouch DX can vary, depending on which options are installed and which features your organization is using. Some configuration tasks, such as defining which transactions users can perform at the timeclock, require you to use the device configuration settings in the host application. -
Page 94: Launch Quick Setup
Chapter 4 Maintenance Mode Functions Launch Quick Setup When a new InTouch DX powers up, the Launch Quick Setup feature guides you through the initial setup process. Note: If the device times out during the initial setup, you can re-access maintenance mode in three ways: use a Maintenance badge;... -
Page 95: Step 3: Add Device Id
Launch Quick Setup By default, you are required to create a strong password to access maintenance mode. Strong passwords require at least eight characters, including one uppercase letter, one lowercase letter, one digit, and one special character (, . / \ + -). If strong passwords are required, but a user creates a password that does not meet the criteria, the system rejects it. - Page 96 Chapter 4 Maintenance Mode Functions 3. Complete the following fields: – IP Address: Enter the IP address for this timeclock. – Subnet Mask: Enter the IP address for the sub-network. – Gateway Address: Enter the gateway IP address. – Primary DNS: Enter the IP address for the primary DNS server. 4.
-
Page 97: Step 5: Connect To Server
Launch Quick Setup Proxy Server (Optional) 1. Tap Proxy Server (Optional). 2. Complete the following fields: – Host Name: Enter the IP address of the proxy server. – Port: Enter the port number. – Proxy Type: Select HTTP-Connect or SOCKS5. 3. - Page 98 Chapter 4 Maintenance Mode Functions • Define which type of data to download from the host application to the timeclock (for example, activity codes, paycodes, and so on). • Download or initialize the timeclock with the configuration that you defined in the device configuration settings.
-
Page 99: Access Maintenance Mode
Use a Maintenance badge Note: Some InTouch DX configurations do not ship with a Maintenance badge. Swipe the Maintenance (“M”) badge within two inches of the target area. Depending on how the timeclock is configured, the system prompts you for a... -
Page 100: Use The Tools Menu
Maintenance Mode. Enter the maintenance mode password, and tap Enter. Use the maintenance mode button 1. Use the security wrench that was supplied with the InTouch DX to loosen the screws on the sides of the timeclock. By design, the screws remain attached to... - Page 101 Access maintenance mode 2. Grasp the sides of the timeclock assembly, and gently pull it down so that it swings open on its hinge:...
- Page 102 Chapter 4 Maintenance Mode Functions 3. Grasp the curved ridge, and pull open the cover of the microSD card compartment. Do not remove the cover from the hinges. 4. Press and hold button (see the following illustration) for at least fifteen seconds.
- Page 103 Access maintenance mode Note: If you are prompted to calibrate the touchscreen, contact your Kronos Representative before proceeding. For more information, see “Calibrate the touchscreen” on page 202. 5. Slightly rotate the timeclock assembly into view to confirm that the timeclock is in maintenance mode.
-
Page 104: Maintenance Mode Functions
Chapter 4 Maintenance Mode Functions Maintenance mode functions Note: The instructions for maintenance mode functions in this chapter assume that you are already in maintenance mode. -
Page 105: Edit Settings
Edit Settings Edit Settings General Communication Note: The communication settings for the device must match the corresponding settings that you enter in the host application. Server-Initiated 1. Tap Edit Settings. 2. Tap General Communication. 3. Server–Device Initiated: Tap Server-Initiated. 4. Device ID: Enter the same ID that you enter in the host application (on the Device Configuration page, select Communication Settings >... - Page 106 Chapter 4 Maintenance Mode Functions 4. Server–Device Initiated: Tap Device-Initiated. 5. Device ID: Enter the same ID that you enter in the host application (on the Device Configuration page, select Communication Settings > Communication Settings tab). 6. Primary Server Password: This password allows the host application to identify the device when it performs operations such as Smart View transactions.
- Page 107 • Do not configure InTouch DX devices to use DHCP on a network that does not support DHCP. Otherwise, each device performs an address request every five seconds for an indefinite period. These requests can adversely affect network performance.
-
Page 108: Connect To Network
Chapter 4 Maintenance Mode Functions 8. Speed—tap one of the following: – Auto – 10 Full Duplex – 10 Half Duplex – 100 Full Duplex – 100 Half Duplex 9. Primary DNS Server: Enter the IP address and tap Enter. 10. - Page 109 Edit Settings Wi-Fi Supported Wi-Fi networks InTouch DX supports connections to wireless local area networks (WLAN) that meet the following requirements: • 802.11 b, g, or n 2.4 GHz compatible wireless local area networks. • WPA and WPA2 Personal and Enterprise security protocols.
- Page 110 Proxy Server The proxy server feature allows you to direct all incoming traffic from the InTouch DX through a proxy server before it reaches an internal network. It supports communication through HTTP and SOCKS5 proxy servers, on both device-initiated and server-initiated devices. Basic authentication is supported for both HTTP and SOCKS5.
-
Page 111: Date And Time
Edit Settings 4. Enter the Proxy Server IP address. 5. Enter the Proxy Server Port. 6. Select the Proxy Server Type: – HTTP – SOCKS5 7. Tap Submit. The changes you submitted are effective immediately. Traffic from the timeclock will now be routed through the proxy server to the network. Date and Time Use the Date and Time setting to set the date and time on the timeclock. -
Page 112: Display
Chapter 4 Maintenance Mode Functions 3. Slide the Volume control, and tap Test Volume to listen to the setting. 4. Enable the Key Click control : Indicates whether the device emits a clicking tone when users tap the touchscreen. 5. Tap Save Settings. Display Use the Display setting to adjust the brightness of the timeclock screen. -
Page 113: Ssh Remote Access
Edit Settings To remotely access this timeclock using a VNC viewer, you must have the following information: • IP address of the timeclock. • Remote access password for the timeclock (created in step 4). When you connect to this timeclock using a VNC viewer, you can access the two icons on the front of it: To access the tools menu icon from a viewer session, press Ctrl+m. -
Page 114: Bar Code Symbology
Chapter 4 Maintenance Mode Functions Bar Code Symbology Use the Bar Code Symbology setting to specify the types of bar codes that employee badges use, so that the timeclock can read the badges properly. When the host application sends the device configuration to this timeclock, it overwrites the settings that you select here. -
Page 115: Strong Passwords
Edit Settings 3. Remote Readers 1: Select a reader type. 4. (Optional) Remote Readers 2: Select the same reader type that you chose in the previous step. 5. Tap Save Settings. The device automatically restarts. Strong Passwords 1. Tap Edit Settings. 2. -
Page 116: Edit Advanced Settings
Failure Override Note: This setting is available only for timeclocks that include a biometric device. Use Failure Override to specify whether the InTouch DX accepts or rejects biometric punches when authentication fails. This setting defaults to Reject Punches. -
Page 117: Restart Device
Edit Advanced Settings 1. Tap Edit Advanced Settings. 2. Tap Employee Enroll Count. 3. To view the names of the employees in each group, tap the appropriate row. Restart Device Note: You can also restart a device using the host application. Access the Device Details page, open the Troubleshooting menu, and select Reboot Device. -
Page 118: Change Database Password
Chapter 4 Maintenance Mode Functions – Strong – Weak 7. To require users to enter this password when they swipe a Maintenance badge, enable Require Password with Badge. 8. Tap Save Settings. Change Database Password Use the Change Database Password function to change the password for a database. -
Page 119: Delete All Punches
2. Tap Delete All Offline Data. 3. To confirm your selection, tap Delete. Biometric Verification Note: This test applies only to devices that include the Kronos Touch ID Plus authentication device. The InTouch DX confirms that an employee’s finger scan image matches the corresponding template in the biometric device. -
Page 120: Configure Smartcard Reader
If the verification fails, an error message appears. Tap Retry and instruct the employee to repeat the verification process. If the verification repeatedly fails, re-enroll the employee’s finger. See “Biometric transactions: Kronos Touch ID Plus” on page 61. Configure Smartcard Reader 1. -
Page 121: View Reports
View Reports View Reports Software This report displays various file components and their version numbers. The report can reveal whether certain components are up-to-date, which can help you perform diagnostics. 1. Tap View Reports. 2. Tap Software. File System This report displays the following information (all sizes in megabytes): •... -
Page 122: Database
Chapter 4 Maintenance Mode Functions Database This report displays information about the tables in the database. It includes information about punches, employees, and the biometrics function. To run the report: 1. Tap View Reports. 2. Tap Database. Hardware This report displays information about the hardware inside or attached to the timeclock, including: •... -
Page 123: Network
View Reports To run the report: 1. Tap View Reports. 2. Tap Communication Settings. Network This report displays the network configuration for the device. It indicates whether the remote access feature is enabled, provides the status and configuration of the proxy client (if any), and includes the IP addresses for the primary and secondary domain name servers (DNS). -
Page 124: Memory
Chapter 4 Maintenance Mode Functions Memory This report displays the amount of memory on the device. It includes the amount of total memory, free memory, and swap memory. To run the report: 1. Tap View Reports. 2. Tap Memory. Ethernet This report displays information about the Ethernet connection to the device. -
Page 125: Biometric
To run the report: 1. Tap View Reports. 2. Tap Readers. Biometric This report is available only for InTouch DX devices that include a biometric validation device. The report displays statistics about the biometric activity at the device, including: •... -
Page 126: Biometric Templates
Chapter 4 Maintenance Mode Functions Biometric Templates This report displays a list of some or all of the biometric templates that are stored in the biometric device. 1. Tap View Reports. 2. Tap Biometric Templates. 3. Do one of the following: –... -
Page 127: Run Tests
Run Tests Run Tests Sequential Use this test to execute the Display, LED, and Tone tests, in succession. When the beeper emits two tones, the test is complete. Note: You can run each test included in the Sequential Tests function individually, using each test’s maintenance function. -
Page 128: Integrated Badge
Chapter 4 Maintenance Mode Functions Use the Communications test to determine whether the data collection device is communicating properly with the application server. The application server is also known as the primary server. The information on the report includes: • The outcome of the test (Success or Failure). -
Page 129: Display
Run Tests Display Note: You can execute the Display test, Tone test, and LED test as a group by running the Sequential test. See “Sequential” on page 127. This test ensures that the timeclock’s screen is operating properly. 1. Tap Run Tests. 2. -
Page 130: Gpio Output Bits
GPIO Output Bits Output bits are electronics that control external devices such as bells or door strikes, which can be attached to the InTouch DX. If you have installed such external devices, use this test to ensure that they are operating. -
Page 131: Network Connectivity
Run Tests 3. Swipe the badge that you are testing, and tap the play button. The information that appears depends on the type of badge you are testing. It can include the following: – Badge data – Badge type – Barcode length –... - Page 132 Chapter 4 Maintenance Mode Functions...
Need help?
Do you have a question about the InTouch DX and is the answer not in the manual?
Questions and answers
only thing on screen is maintenance and clean screen, it says password incorrect, is there a way to restart the setup
To restart the setup on a Kronos InTouch DX when the screen shows "maintenance" and "clean screen" with a password incorrect message, follow these steps:
1. If the device is unresponsive or stuck, reboot it using the restart button on the main board.
2. Open the device’s cover using the security wrench that came with the device.
3. Locate the restart button on the main board (inside the cover).
4. Press and hold the restart button for four seconds.
This will reboot the device and allow you to start the setup again.
This answer is automatically generated
Reset the maintenance password